Fixing the Underlying Problem
Once you have the system operating again, you may need to perform some further troubleshooting in order to fix the underlying problem. Booting the computer successfully in safe mode is a relief, but it is of little consolation if you still can't boot normally. Unfortunately, solving the underlying problem can be very complex and, as a result, the recommendations here are only a starting point. If these recommendations don't help you fix the problem, consult the Microsoft Windows 2000 Knowledge Base for further information. The advice dispensed in the next several sections can help you fix the majority of the problems you are likely to experience.

TIP
When troubleshooting, act like a scientist running an experiment. Change only one thing at a time to minimize the likelihood of confounding variables. Also, do some deep thinking about the results you get. If you see that the system is hanging on a certain service that is failing, check to make sure that the failing service isn't dependent on some other services that aren't starting. And for your own sanity, start with the least painful steps first. Save reinstalling Windows for last.
Undo Anything You've Changed
It is very unusual for a system to start having trouble by itself. Usually problems are a result of some action that we perform on the system—installing a new driver or program, changing a registry setting, and so on. Therefore, the first thing to do once you get the system booting again is to undo anything that you've done recently. Start by undoing registry changes, and then uninstall recently added drivers, and finally uninstall any suspect programs.
Check Event Viewer
Your first move when trying to track down the source of system problems should be to check Event Viewer, located in the Administrative Tools folder of the Programs menu. Event Viewer (Figure 37-1) will often give you a string of clues as to the cause of the problem and sometimes will even tell you what to do to fix it. For more information on using Event Viewer, see Chapter 10. Carefully scrutinize any errors or warnings you see in the system log and any other logs that are relevant to the problem; also glance at the Information events—they sometimes give clues.
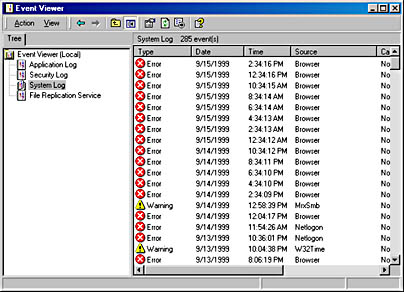
Figure 37-1. The Event Viewer window.
Check Device Manager
If a device in the system is causing a resource conflict or some other problem, you should check the Device Manager snap-in, located in the Computer Management snap-in. Examine the system for devices with conflicts or errors, and consider disabling these devices or removing them from the system. (Note that removing them from Device Manager will usually just cause the devices to be redetected the next time the system boots, potentially causing the same problem.) It is standard practice when troubleshooting resource conflicts to disable or remove every device in the system that you can boot without (such as sound cards, network cards, and modems) until the system works normally, and then add the devices back one by one until the problem reappears. Then you can troubleshoot the device in question.
![]()
REAL WORLD Setting Resources Manually
Advanced Configuration Power Interface (ACPI) systems automatically configure all PCI devices, preventing you from changing a device's resource settings to resolve a conflict. The only way to deal with resource conflicts in this situation is to remove devices from Device Manager and allow it to rescan them. You can also set the BIOS to reset Extended System Configuration Data (ESCD) settings, reconfiguring the PCI devices, or you can try manually specifying resources in the BIOS for each PCI slot or reinstalling Windows 2000 and disabling ACPI. (Follow the instructions in the "ACPI BIOS Compatibility Problems" sidebar in Chapter 5 to disable ACPI support during installation.) If you have a standard PC (no ACPI), you can expand the Computer category in Device Manager, select Standard PC, click Properties, click the IRQ Steering tab, and clear the Use IRQ Steering check box. This procedure will allow you to manually set resources for the PCI devices. Keep in mind that while the Standard PC hardware abstraction layer, or HAL (ACPI, standard PCs, and multiprocessor PCs all use different HALs) may allow for more manual control, ACPI in almost all cases does a better job of managing resources and should be used whenever the system supports it.
Use System Information to Check the Configuration
The System Information tool by itself does nothing to help you get the system working properly again. However, it can give you some important information about the system configuration that you can then use to resolve the conflicts or errors. To open the System Information snap-in, launch the Computer Management snap-in from the Administrative Tools folder on the Programs menu, and then double-click the System Information icon in the console tree and select the subfolder of interest to you, as shown in Figure 37-2.

Figure 37-2. The System Information console in the Computer Management window.
Check the Services
As with Microsoft Windows NT, checking the services in Windows 2000 can be invaluable in solving a problem. If a key service isn't starting, you're going to have problems. Make sure that the key services are set to start automatically, and consider disabling services that could potentially cause trouble, or at least set them to start manually (although an automatically starting service will start any services it needs—even services set to start manually—unless the services are disabled).
Also, you may want to specify what actions to take if the service fails. To perform some of these actions with the Services snap-in, follow these steps:
- Launch the Services snap-in from the Administrative Tools folder on the Programs menu.
- Use the window shown in Figure 37-3 to view the status of the services.
- Use the Start Service, Stop Service, Pause Service, and the especially useful Restart Service toolbar buttons to make changes to the state of the services.
- To change advanced settings for a service, double-click the service to open its Properties window, as shown in Figure 37-4.
- Use the Startup Type list box on the General tab to change how you want the service started.
- Use the Log On tab to control what account you want the service to log on with. The default is the Local System account, but you can change this to a user account as needed.
- Click the Recovery tab, and then choose what actions you want to take on the first, second, and subsequent failures of the service, as shown in Figure 37-5.
- In the Reset Fail Count After box, enter the number of days after which you want to start over counting service failures.
- Click the Dependencies tab to view the services that the specified service is dependent upon.
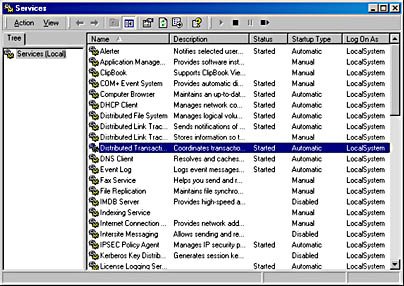
Figure 37-3. The Services window.
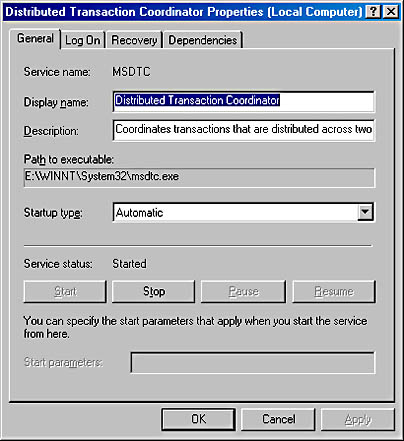
Figure 37-4. A service's Properties window.
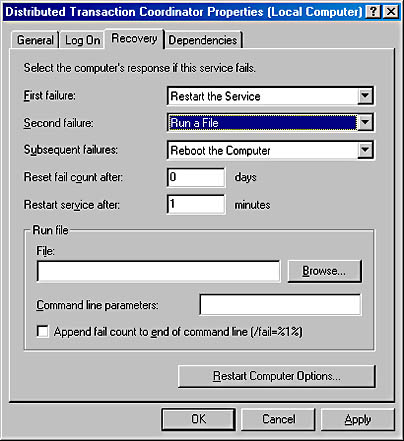
Figure 37-5. The Recovery tab of a service's Properties dialog box.
Use the System File Checker
The System File Checker is a command-line tool that allows you to verify that all of the protected system files are intact. This tool can be handy if you suspect that the system files may be corrupt. If the System File Checker finds that a protected system file has been overwritten, it will retrieve the correct version from the %SystemRoot%\system32\dllcache folder and use it to replace the incorrect version.
To use the System File Checker, log on as an administrator, go to a command prompt, and enter sfc followed by the appropriate parameter. See Table 37-4 for a list of parameters and what they do.
TIP
If the %SystemRoot%\system32\dllcache folder becomes corrupted or is deleted, use one of the following commands to repair the folder: sfc /scannow, sfc /scanonce, or sfc /scanboot.
Table 37-4. System File Checker options
| Parameter | Action |
|---|---|
| /scannow | Immediately scans all protected system files. |
| /scanonce | Scans all protected files only a single time. |
| /scanboot | Scans all protected files every time the computer is booted. |
| /cancel | Cancels all scheduled scans. |
| /quiet | Scans and replaces incorrect files without prompting the user for action. |
| /enable | Resets Windows File Protection to its default status. Users will be prompted to restore any files that are overwritten. |
| /purgecache | Deletes all files in the %SystemRoot%\system32\dllcache folder (the Windows File Protection cache) and immediately scans the protected system files. |
| /cachesize=x | Specifies how large (in megabytes) the %SystemRoot%\system32\dllcache folder (the Windows File Protection file cache) should be. |
Restore from a Backup
Once again, you probably don't need us to tell you how to restore from a backup, but if you can get into Windows 2000 and you feel confident that the system was in a good state at the last backup, you might consider restoring from the backup rather than wasting time trying to track down a corrupt file. Remember, however, that any changes you've made since the last backup will most likely be lost, so use this option as one of your last choices.
Reinstall Windows 2000
Reinstalling Windows 2000 is your last resort. It provides a way to thoroughly clean the system, possibly without reinstalling programs. (If you run Setup from within Windows 2000, you can install right over the old installation and preserve the settings.)
If you can get into Windows 2000 to run the 32-bit Winnt32.exe setup program, by all means do so. You can then choose to install over the old version, thus simply fixing any corrupted files. This method is by far the easiest, safest, and least painful way to go—if it fixes the problem. (See Chapter 7 for more information on performing this type of setup.)
Your problems, however, may be so deeply rooted that even this type of reinstall can't fix them. In such cases, the problem usually lies in the settings, which are largely preserved during a reinstall. It then becomes necessary to perform a clean install, either by uninstalling Windows 2000 via the method described in the section "Uninstalling Windows 2000" (or by just formatting the disk) or by performing a parallel installation (after which you probably will want to delete the damaged installation). See Chapter 5 for information on performing a clean installation of Windows 2000.
EAN: 2147483647
Pages: 366