Customizing Outlook
Now that you've handled the basic setup, you might want to change a number of Outlook settings for particular users. The following sections explain how to customize some key Outlook features such as the toolbars and personalized menus, and even how to eliminate the overly perky Office Assistant.
Eliminating Clippit
Just in case you have a pathological employee who hates that cute, animated paperclip (Clippit) that all of us Outlook users have come to know and love, here's how to make Office Assistants go away—for good. (You can turn it back on if you want, but it won't appear unless you choose the Show Office Assistant command from the Help menu to specifically request it.)
- Go to the Help menu and choose Show Office Assistant if the Office Assistant isn't visible.
- Right-click the Office Assistant and then choose Options from the shortcut menu.
- Clear the Use The Office Assistant check box and click OK.

TIP
The Office Assistant settings are shared among all Office 2000 applications, so if you turn off the Office Assistant in one program, you turn it off in all programs.
Customizing Toolbars and Toggling Personalized Menus
Outlook 2000 lets you customize your toolbars and also turn off the Personalized Menus and Toolbars feature if a user doesn't like it. (The Personalized Menus and Toolbars feature of Office 2000, like the Personalized Menus feature of Windows 2000, hides menu commands and toolbar buttons that are infrequently used.) To do so, right-click the toolbar you want to customize and choose Customize from the shortcut menu. Then do any of the following and click Close when you're finished.
- To turn off the Personalized Menus and Toolbars feature, clear the Menus Show Recently Used Commands First check box.
- To create a new toolbar, click the Toolbars tab, click New, enter a name for the toolbar, and then click OK. A small, floating toolbar appears onscreen.
- To add commands to a toolbar, click the Commands tab, select a menu category, and then drag a command to the toolbar of your choice.
- To modify the appearance of a toolbar button, right-click the button and use the shortcut menu to modify its appearance.
- To remove a toolbar button, drag it off the toolbar.
TIP
You can change any toolbar button to point to a Web page by right-clicking it while in the Customize mode, choosing Assign Hyperlink from the shortcut menu, choosing Open from the submenu, and then using the Assign Hyperlink dialog box to locate the Web page to link to.
Changing the Default Mail Program
When you install Outlook, the program automatically becomes your default e-mail and newsreader program. To change the default e-mail program you use on your system to another program, follow these steps:
- Open the Internet Options Control Panel tool.
- Click the Programs tab, shown in Figure 23-10.
- Select the program you want to use to edit and create Web pages (HTML documents) from the HTML Editor drop-down list box.
- Select the program you want to use by default to send and receive email from the E-Mail drop-down list box.
- Choose the default newsreader you want to use for reading Internet newsgroups by selecting a program from the Newsgroups drop-down list box. This newsreader will automatically be launched when you choose the View menu in Outlook's Go To command and then click News.
- Choose the program you want to use to handle Internet voice calls from the Internet Call drop-down list box.
- Choose the program you want to use to manage your calendar from the Calendar drop-down list box.
- Choose the program you want to use to manage your address book from the Contact List drop-down list box.
- Click OK when you're finished.
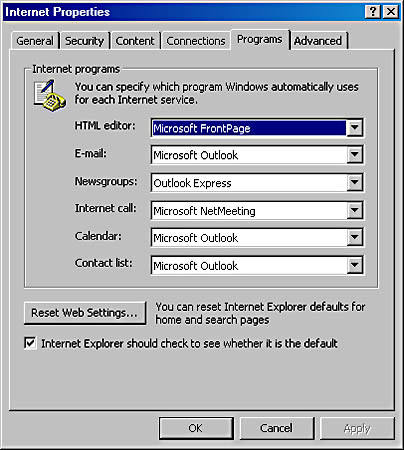
Figure 23-10. The Programs tab of the Properties window.
![]()
NOTE
If you change the default e-mail program from Outlook to another program, the next time you launch Outlook, you'll be asked whether you want to use Outlook as your default e-mail program. Click No.
Creating Custom Forms
Outlook uses forms for just about every bit of information you enter into the program. E-mail messages, calendar items, contacts, and notes are all forms—whenever you enter information in Outlook (other than in a settings dialog box), you're entering it into a form. In most cases, Outlook's default forms work the best, but you might want to customize these forms for your company's own uses.
Customizing Outlook forms is fairly easy, but you can get caught up in a lot of complexity if you feel like it. This section doesn't teach you all the details of Outlook 2000 form design, but it's enough to get you started.
![]()
MORE INFO
For more information on designing your own Outlook forms, we suggest you pick up a good Outlook book such as Building Applications with Microsoft Outlook 2000 Technical Reference (Microsoft Press, 1999).
To create a basic custom form, follow these steps:
- Choose Forms from the Tools menu and then choose Design Form from the submenu.
- Choose the form on which you want to base your custom form and then click Open. Outlook displays the selected form in Design mode, shown in Figure 23-11.
- To add a field to your form, drag the field from the Field Chooser onto your form.
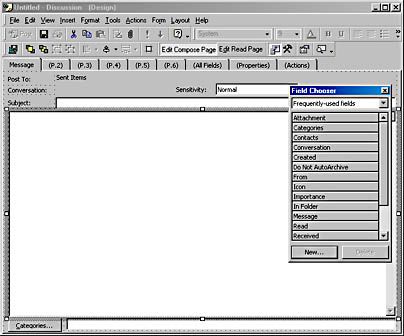
Figure 23-11. The Design mode view.
TIP
Tabs with parentheses around their names are hidden to users. The tabs become visible to users when you add fields to them.
- To reposition a field, click it and then drag it to a new location.
- To delete a field, select it and then press Delete.
- If you are customizing a post-based form or a message-based form, click the Edit Read Page toolbar button to display the Read page, which is used to display information once it has been entered (for example, a posted post or sent e-mail).
- To add a display for a field you added to the Compose page, create a new field by clicking the New button in the Field Chooser, and then use the New Field dialog box to name the field and choose the field type and format.
- Drag the new field onto the Read page.
- Right-click your field and then choose Properties from the shortcut menu.
- Use the Display tab to change how the field appears on your form.
- Click the Value tab (Figure 23-12). Then click the Choose Field button, choose the appropriate field to display from the All Mail Fields submenu, and click OK.
- When you're finished designing your custom form, click the Publish Form toolbar button.
- Choose the location in which to store the form. (See the "Storing and Publishing Forms" Real World sidebar for more information on storing forms.)
- Enter a name for the form and click Publish.
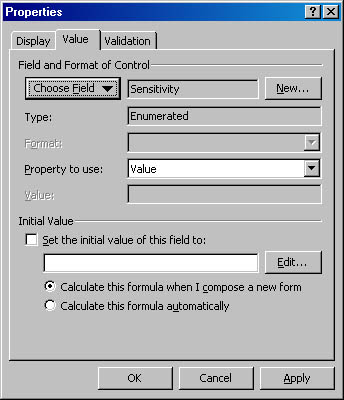
Figure 23-12. The Value tab of the Properties window.
![]()
REAL WORLD Storing and Publishing Forms
You can save a custom form in Outlook 2000 in a variety of ways. For instance, you can save the form as a template by using the Save As command. This creates a file that you can use in another program or attach to an e-mail message to send to someone else. Or you can save the form in a folder in your message store, which is good if you plan to simply attach the form to an e-mail or you don't plan to share the form with others.You can also publish a form to a public folder (or private folder), making it available to all users only while they're in the folder to which you saved the form. This is perfect for forms that you've customized for use with a particular public folder and really aren't applicable elsewhere, such as a form customized for bug reports. Finally, you can publish the form in one of the two Outlook forms libraries. The forms libraries are as follows:
- Personal forms library This library is stored in the mailbox in which you receive mail, and forms published to this library are available only to you. It's handy for storing forms intended only for personal use.
- Organizational forms library This library is stored on your Exchange server, and forms stored in it are available to all users with access to your Exchange server. This is the best place to store a form that you want all users in your organization to have access to.
EAN: 2147483647
Pages: 366