Installing and Configuring AppleTalk
The first step in making your Windows 2000 Server available to your Macintosh users is to install the AppleTalk network stack. Installing FSM or PSM before AppleTalk will cause AppleTalk to be installed, but it's easier to troubleshoot Macintosh-related problems if you're sure that the underlying protocol stack works before you install the service components.
Installing AppleTalk
Since AppleTalk is a network protocol, you install it from the Network and Dial-Up Connections dialog box. Before attempting to install AppleTalk, make sure you have access to a Windows 2000 CD-ROM or network install point. To install AppleTalk, follow these steps:
- From the Start menu, point to Settings and choose Network And Dial-Up Connections.
- Right-click Local Area Connection. The Local Area Connection Properties window appears, shown in Figure 22-1.
- Click the Install button. When the Select Network Component Type dialog box appears, select the Protocol icon and click Add.
- In the Select Network Protocol dialog box, select AppleTalk Protocol from the list and click OK. If prompted, provide the location of your Windows 2000 distribution.
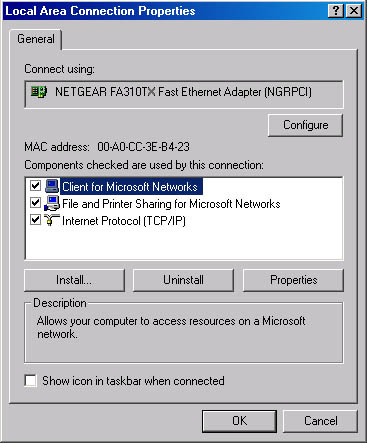
Figure 22-1. The Local Area Connection Properties window.

TIP
These steps will install and bind AppleTalk to all network interface cards (NICs) on your computer. If you want to remove AppleTalk from specific NICs, open each NIC's Properties window and clear the AppleTalk check box.
Configuring AppleTalk Routing
Before you configure the AppleTalk protocol itself, you need to configure AppleTalk routing if you plan to use it. This ensures that your Windows 2000 machine has a current zone list and network information before the AppleTalk configuration process requires it. AppleTalk routing is handled from the Routing and Remote Access console. To turn on and configure routing, follow these steps:
- From the Start menu, point to Programs and then to Administrative Tools and choose Routing And Remote Access.
- Double-click the server you want to configure. The icon expands to list the routing protocols installed on that server. At a minimum, you'll see AppleTalk; depending on how Routing and Remote Access is configured, you may also see other items.
- Right-click AppleTalk Routing and choose Enable AppleTalk Routing (Figure 22-2).
- In the right pane of the console, the adapters to which AppleTalk is bound will change to show a status of Routing (Default), indicating that the router has started and is available for traffic routing on those interfaces, but that it's not seeding the network. If you want your Windows 2000 Server to act as an ordinary router, that's all you have to do.
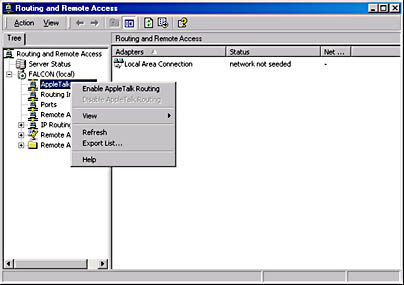
Figure 22-2. Enabling AppleTalk routing.
Establishing a Seed Router
Microsoft notes that it's much more efficient to use a hardware AppleTalk seed router than it is to use a Windows 2000 computer. If you don't have any hardware routers, though, you can use Windows 2000 as a seed router for your AppleTalk network. Once you've installed the AppleTalk stack as described earlier, follow these few additional steps:
- In the Routing And Remote Access console, expand the server you're configuring and select AppleTalk Routing.
- Right-click Local Area Connection in the console window and choose Properties. The Local Area Connection Properties window shown in Figure 22-3 appears.
- Select the Enable Seed Routing On This Network check box. This activates the controls in the Network Range and Zones areas.
- Choose the range of network numbers that you want this router to seed by filling in the From and To boxes in the Network Range area. You can choose arbitrary network numbers, but they cannot overlap and they must be unique. Each network can support 253 nodes, so assign a range that's big enough for the number of nodes on that network. AppleTalk networks usually group more than one network into a zone, which is why you can specify a range of networks to seed instead of just one.
- Build the list of zones you want seeded to the network by doing the following:
- Start by clicking the Get Zones button; this causes Windows 2000 to query the network for available zones just as a client would. The results appear in the zone list.
- Use the New Zone button to add any new zones you want to make available. Zone names can contain any printable ASCII character except * : = @, and they must have fewer than 32 characters. (Note that there's no way to rename a zone after it's created; you have to delete and re-create it.) Remove unwanted zones with the Delete button.
- Specify a default zone for network nodes in the Default Zone box. The default zone contains any node whose owner hasn't assigned it to another zone; the router automatically assigns unzoned devices to the default zone, so that's where Macintosh users will see them.
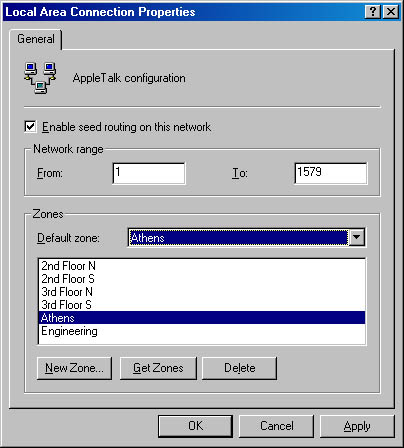
Figure 22-3. The Local Area Connection Properties window for AppleTalk.
Be sure to configure your seed routers before setting up (or starting) other routers on your network.
Configuring the AppleTalk Protocol
AppleTalk was designed to be a low-overhead, low-maintenance protocol, so configuring it is pretty easy. In fact, there's virtually no configuration to it—you simply indicate whether your adapter will accept inbound AppleTalk connections and what AppleTalk zone your server will appear in. Here's how to configure these parameters:
- From the Start menu, point to Settings and choose Network And Dial-Up Connections. Right-click on the adapter you want to configure. (Use the Local Area Connection item if you have only one NIC.) The corresponding Properties window appears.
- Select the AppleTalk Protocol item and then click Properties.
- The AppleTalk Protocol Properties window appears (Figure 22-4). If you're configuring the only network adapter on your system, the Accept Inbound Connections On This Adapter check box will be selected and dimmed, since you must accept inbound connections on at least one adapter.
- Click OK, and then click OK again in the adapter's Properties window.
The This System Will Appear In Zone box lets you control which zone the server appears in; you can use the default zone or explicitly assign it to a particular zone.
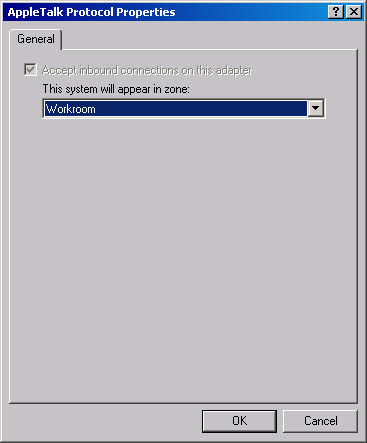
Figure 22-4. The AppleTalk Protocol Properties window.
![]()
NOTE
The AppleTalk performance object encapsulates about two dozen protocol-specific parameters (including counters that record the total amount of inbound and outbound AppleTalk traffic and the number of routed packets).
EAN: 2147483647
Pages: 366