NTFS Version 5
The NTFS file system format has been around, essentially unchanged, since the original version of Windows NT. With Windows 2000, Microsoft has made substantial changes to NTFS to support the new features that administrators and users have been asking for. These new features include disk quotas—finally—and the ability to encrypt files and whole file systems at the physical disk level.
![]()
NOTE
The new version of NTFS, known as NTFS version 5, is a logical extension of the original NTFS but is not completely compatible with it. If you're going to use NTFS in a dual-boot configuration with Windows NT 4 on the same machine as Windows 2000, you must install Windows NT 4 Service Pack 4 or later to permit your Windows 2000 NTFS partitions to be seen when booted into Windows NT 4. Also keep in mind that the quotas and encryption available in NTFS version 5 are not supported under Windows NT 4 and will not be enforced or available in it.
Disk Quotas
Probably the most annoying missing piece of the disk management equation for most Windows NT administrators has been the inability to manage and limit the disk resources of their users without buying an add-on product. Windows 2000 finally addresses this rather glaring omission and provides for either advisory or absolute quotas on disk usage by user or group. However, each volume or partition is treated as a separate entity—there's no way to limit a user or group of users to a total amount of disk usage across the entire server or enterprise. (Sounds like an opportunity for a third-party solution, doesn't it?)
Enabling Disk Quotas
By default, disk quotas are turned off for all partitions and volumes. You must enable them for each volume on which you want a quota. Quotas are available only for volumes that are assigned a drive letter. You can set different quotas for individual users or for groups of users, or you can set them the same for all users. Follow these steps to enable quotas on each volume where you want them:
- Right-click the drive letter in Windows Explorer, and choose Properties.
- Click the Quota tab to display the dialog box shown in Figure 14-32.
- Select the Enable Quota Management option.
- Define the limits on disk usage for this drive letter. The available choices are:
- Deny Disk Space To Users Exceeding Quota Limit When this option is selected, the quotas are enforced on all disk usage. When it is cleared, the limits are advisory only.
- Limit Disk Space To Here you can specify the limits of disk space usage for new users on the volume.
- Set Warning Level To This option indicates the limit at which users will receive a warning message.
- Logging options You can choose to log when users exceed their warning limit or their usage limit, or you can leave these options blank if you don't want logging.
- You'll see a confirmation message. If everything is correct, click OK to scan the drive and enable quotas.
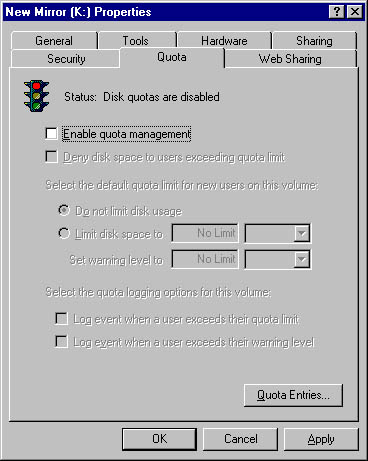
Figure 14-32. The Quota tab of the Properties window for a logical drive.
Setting Quota Entries for Users
There's one catch with quotas enabled as described in the previous procedure: They apply only to users. Administrators slip by without having quotas enforced unless you explicitly set them in a separate quota entry. To set quotas on administrators, or to tweak the quotas for individual users, you need to perform these additional steps:
- In Windows Explorer, right-click the drive you want to set quota entries for, and choose Properties. Click the Quota tab to display the dialog box shown previously in Figure 14-32.
- Click the Quota Entries button to display the quota entries for the volume. You'll see the window shown in Figure 14-33. This window contains entries for everyone who has ever stored files on the volume, unless you have explicitly removed the entries for users who no longer store files there.
- You can change the properties for any entry by double-clicking the entry, which displays the dialog box shown in Figure 14-34. The figure shows a user whose quota has been lowered so that he is now exceeding his disk space limit. He will be unable to store any additional data on the volume until he is below the limit.
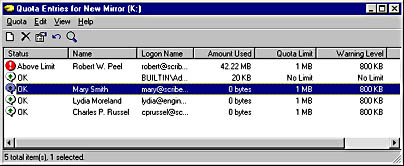
Figure 14-33. The Quota Entries window.
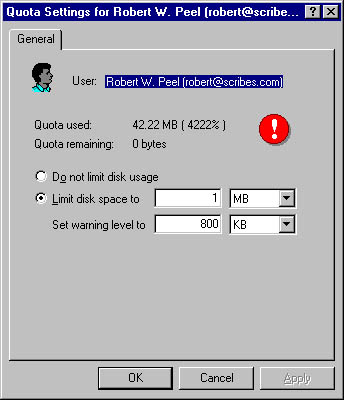
Figure 14-34. Quota settings and status for a user.
The Quota Entries window lets you sort by any of the columns to make it easy to quickly identify problem areas or to locate an individual entry. You can also use the Find function to locate a specific entry.
![]()
REAL WORLD Avoid Individual Quotas
Resist the temptation to fine-tune a disk's quotas for each individual. Giving in will lead to an administrative nightmare, especially since you then cannot manage quotas for the all-users audience, only for individual users. Make changes to the quotas for an individual only when there is a compelling reason to do so, and then keep careful records so that all administrators have ready access to the information.
Exporting and Importing Quotas
If you have a complicated quota system set up so that some users get more space than others do, implementing that system on a new volume can be a pain. But Windows 2000 lets you export the quotas from one volume to another. If there isn't an entry for a user on the new volume yet, one will be created. If a user already has a quota entry, you'll be asked if you want to overwrite it with the imported quota entry for that user, as shown in Figure 14-35. Avoid importing quota settings onto an existing drive unless you're changing your overall quotas across the entire server. Any customizations you've made on the current drive could be lost, and having to acknowledge each change that affects an existing user lends itself to mistakes. In addition, any special limits set for specific users on the source volume will be applied to the target volume.
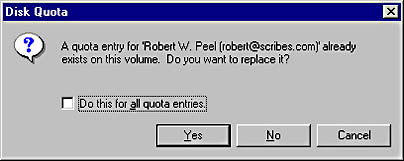
Figure 14-35. Confirmation message for overwriting a quota entry with an imported entry.
There are two ways to import quotas from one volume to another. You can open the Quota Entries window for the source volume, click Quota and choose Export to save the entry to a file, and then open the Quota Entries window for the target volume and choose Import from the Quota menu. Or you can simply open both Quota Entries windows and drag the entries you want to import from the source window to the target one.
Creating Quota Reports
You can use the Quota Entries window to create reports on disk usage. Select the accounts you want to include in the report, and then drag them into the reporting tool you'll be using. The supported formats include Rich Text Format, Comma Separated Value, CF_UNICODETEXT, and CF_TEXT. If you drag the entries into Microsoft Excel, for example, you'll get not only the entries but the column headings as well. This makes whipping out a disk usage report pretty trivial.
Encrypting on the File System Level
Version 5 of NTFS adds the ability to encrypt individual files or entire subdirectories in a totally transparent way. To their creator, encrypted files look exactly like regular files—no changes to applications are required to use them. However, to anyone except the creator/encryptor, the files are unavailable, and even if someone did manage to gain access to them, they would be gibberish, since they're stored in encrypted form.
Encryption is simply an advanced attribute of the file, as compression is. However, a file cannot be both compressed and encrypted at the same time—the attributes are mutually exclusive. Encrypted files are available only to the encryptor, but they can be recovered by the domain or machine recovery agent if necessary. Encrypted files can be backed up by normal backup procedures if the backup program is Windows 2000-aware. Files remain encrypted when backed up, and restored files retain their encryption.
Under normal circumstances, no user except the actual creator of an encrypted file has access to the file. Even a change of ownership will not remove the encryption. This prevents sensitive data, such as payroll, annual reviews, and so on, from being accessed by the wrong users, even ones with administrative rights.

CAUTION
Encryption is available only on the NTFS version 5 file system. If you copy the file to a floppy disk or to any file system other than NTFS version 5, the file will no longer be encrypted. This is true even of NTFS file systems on earlier versions of Windows NT.
When you encrypt a folder, all new files created in that folder are encrypted from that point forward. You can also elect to encrypt the current contents when you perform the encryption. Be warned, however: If you choose to encrypt the contents of a folder when it already contains files or subfolders, those files and subfolders will be encrypted for the user performing the encryption only. This means that even files that are owned by another user will be encrypted, and available for your use only.
When new files are created in an encrypted folder, the files are encrypted for use by the creator of the file, not the user who first enabled encryption on the folder. Unencrypted files in an encrypted folder can be used by all users who have security rights to use files in that folder, and the encryption status of the file will not change unless the filename itself is changed. Users can read, modify, and save the file without converting it to an encrypted file, but any change in the name of the file will trigger an encryption, and the encryption will make the file available only to the person that triggers the encryption. To encrypt a file or folder, follow these steps:
- In Windows Explorer, right-click the folder or files you want to encrypt, and choose Properties from the pop-up menu.
- Click the Advanced button of the General tab to open the Advanced Attributes dialog box shown in Figure 14-36.
- Select the Encrypt Contents To Secure Data option, and click OK to return to the main Properties window for the folder or file. Click OK or Apply to enable the encryption. If any files or subfolders are already in the folder, you're presented with the dialog box shown in Figure 14-37.
- If you choose Apply Changes To This Folder Only, all of the current files and subfolders in the folder will remain unencrypted, but any new files and folders will be encrypted by the creator as they are created. If you choose Apply Changes To This Folder, Subfolders And Files, all of the files and folders below this folder will be encrypted so that only you can use them, regardless of the original creator or owner of the file.
- Click OK and the encryption occurs.
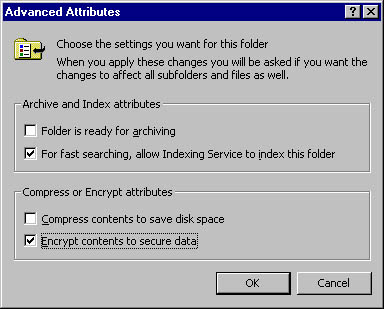
Figure 14-36. The Advanced Attributes dialog box.
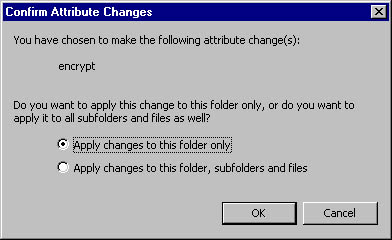
Figure 14-37. Choosing whether to encrypt the files already in a folder or just new files.
EAN: 2147483647
Pages: 366