Disk Management Tasks
Like all MMC snap-ins, the Disk Management snap-in can be opened in a number of ways. One of the most direct ways is to right-click the My Computer icon in the upper left corner of your desktop and choose Manage from the menu. This opens a local version of the Computer Management snap-in, containing the System Tools, Storage, and Services and Applications snap-ins. Click Storage to access the Removable Storage (if you have removable storage drives installed), Disk Defragmenter, Logical Drives, and Disk Management snap-ins, and then click Disk Management to open the Disk Management window. To open the Disk Management snap-in only, double-click the file Diskmgmt.msc in the %WinDir%\System32 directory. Note that the .MSC extension will likely be hidden unless you've changed the default options in Windows Explorer.
When you open the Computer Management snap-in, you have the ability to manage not only the resources of the local computer but also those of remote computers. This makes it easy to manage the disks on a remote computer. If you run the Disk Management snap-in only, you'll be limited to managing disks on your local computer, unless you create a custom MMC. See Chapter 10 for information on creating and customizing MMCs.
Adding a Partition or Volume
Adding a new drive or partition to a Windows 2000 Server is straightforward. First, obviously, you need to physically install and connect the drive. If you have a hot-swappable backplane and array, you don't even have to shut the system down to accomplish this task. If you're using conventional drives, however, you'll need to shut down and power off the system.
Once the drive is installed and the system is powered up again, Windows 2000 will automatically recognize the new hardware and make it available. If the disk is already partitioned and formatted, you'll be able to use it immediately. If it's a brand new disk, you'll need to prepare it first. Even if it is a disk that has been used and formatted but doesn't contain any critical data, we strongly recommend that you upgrade it to a dynamic disk.
Adding a New Disk Using the Write Signature And Upgrade Disk Wizard
To use the Write Signature And Upgrade Disk Wizard to add a new disk once the logon is complete, follow these steps:
- Open the Computer Management console by right-clicking the My Computer icon on your desktop and choosing Manage from the shortcut menu.
- On the Storage menu, choose Disk Management. If the disk is new, you'll see the first screen of the Write Signature And Upgrade Disk Wizard, shown in Figure 14-3. This wizard allows you to upgrade the new disk to a dynamic disk. Click Next.
- You'll see a confirmation of the disk (or disks, if you've added more than one) that can be selected for upgrading, as shown in Figure 14-4.
- Make sure that there is a check mark to the left of the disk or disks to be upgraded, and then click Next again. You'll get a confirmation message. If all the options are correct, click Finish and the disk will be upgraded to a dynamic disk.
- Once the wizard finishes, you'll be at the main Disk Management console, as shown in Figure 14-5. Notice that the disk is still not formatted or allocated and is highlighted in black (if you haven't changed the default color settings for the Disk Management console).
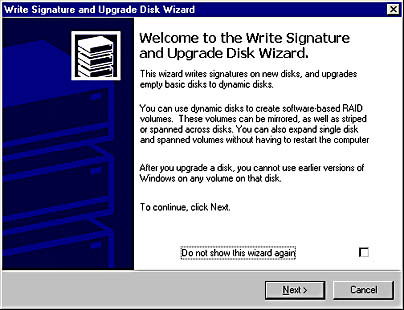
Figure 14-3. The first screen of the Write Signature And Upgrade Disk Wizard.
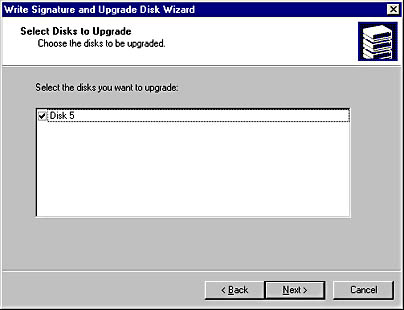
Figure 14-4. The Select Disks To Upgrade screen of the Write Signature And Upgrade Disk Wizard.
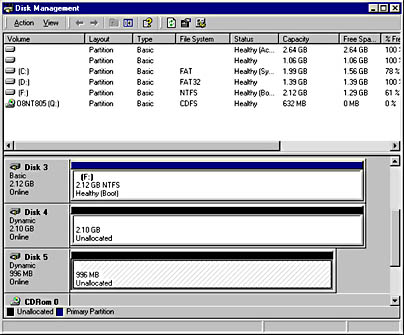
Figure 14-5. The main Disk Management console, showing the new disk (Disk 5).
Creating a Volume
To create a new volume (the dynamic disk equivalent of a partition), complete these steps:
- In the Disk Management console, right-click the unallocated disk and choose Create Volume from the shortcut menu. The Create Volume Wizard opens to guide you through the process of creating the new volume on the dynamic disk, as shown in Figure 14-6. Click Next.
- Select the type of volume you'll be creating, as shown in Figure 14-7. Depending on the number of available unallocated volumes, you'll see one or more options for the type of volume. These options include Simple, Spanned (the Windows NT 4 Volume Set), Striped (RAID-0), Mirrored (RAID-1), and RAID-5. Click Next.
- Select the dynamic disks to use for the new volume, as shown in Figure 14-8. The choices available and the selections you'll need to make will depend on the type of volume you're creating and the number of available unallocated disks. Figure 14-8 shows a RAID-5 volume being created.
- On the same screen, adjust the size of the new volume. By default, the new volume will use the maximum available space from each of the selected disks. For spanned volumes, this will be the sum of the free space on the selected disks; for other types of volumes, it will be the number of disks times the available space on the smallest of the selected disks. Click Next.
- Select either a drive letter or a mount point for the new volume (as shown in Figure 14-9), or opt not to assign a drive letter or path at this time. With Windows 2000, you can "mount" a volume on an empty subdirectory, minimizing the number of drive letters and reducing the complexity of the storage that is displayed to the user. If you want to take advantage of this feature, use the Browse button to locate the directory where you will mount the new volume. See the Real World "Mounting a Partition or Volume" for more on this subject. Click Next.
- Select the formatting options you want, as shown in Figure 14-10. Even when mounting the volume rather than creating a new drive, you can choose your format type without regard to the underlying format of the mount point. Click Next.
- You'll see a confirmation screen. If all of the options are correct, click Finish to create and format the volume. You return to the Disk Management console, where you'll see the new volume, as shown in Figure 14-11.
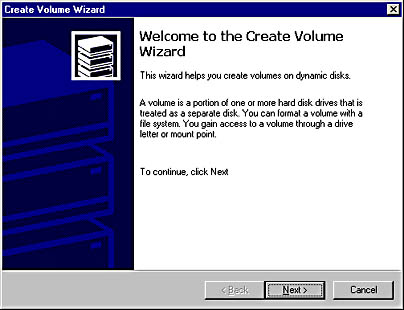
Figure 14-6. The first screen of the Create Volume Wizard.
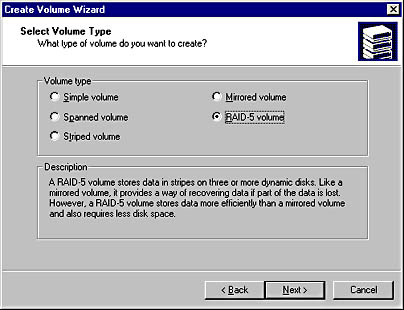
Figure 14-7. Select the type of dynamic volume you want to create.
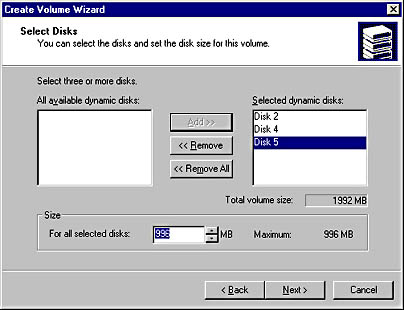
Figure 14-8. Select the dynamic disks that will be part of this volume.
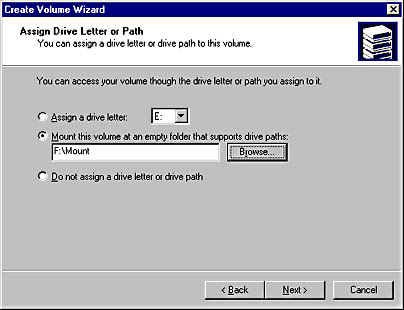
Figure 14-9. Select a drive letter or mount point for the new volume.
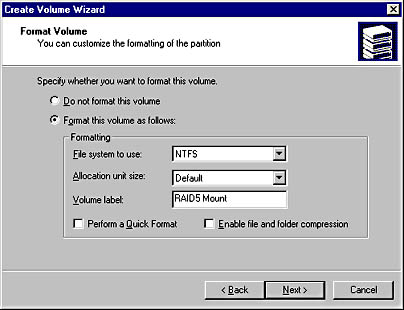
Figure 14-10. Set the formatting options for the new volume.
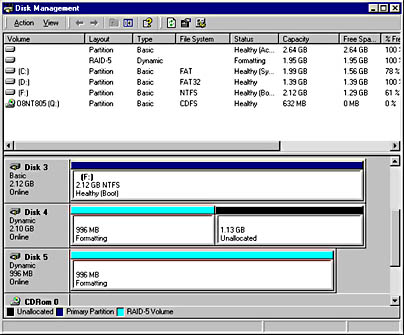
Figure 14-11. The new RAID volume being generated and formatted.
![]()
REAL WORLD Mounted Volumes
Windows 2000 borrows a concept from the UNIX world by adding the ability to mount a volume or partition on a subdirectory of an existing drive letter. A mounted volume may also have a drive letter associated with it, although it does not need to, and it can be mounted at more than one point, giving multiple entry points into the same storage.A volume must be mounted on an empty subdirectory of an existing NTFS volume or drive. FAT and FAT32 drives do not support mounted volumes. You can, however, mount a FAT or FAT32 volume at any mount point. You can mount only a single volume at a given mount point, but you can then mount further volumes on top of an existing mounted volume, with the same rules and restrictions as any other mount. The properties of a drive will not show all of the available disk space for that drive, since they will not reflect any volumes mounted on the drive.
Mounted volumes can be used to provide a mix of redundant and nonredundant storage in a logical structure that meets the business needs of the enterprise while hiding the complexities of the physical structure from the users.
Creating a Partition
You can create partitions only on basic disks, not on dynamic disks. To create a new partition, follow these steps:
- In the Disk Management console, right-click the unallocated basic disk and select Create Partition. The Create Partition Wizard opens to guide you through the process of creating the new partition on the basic disk, as shown in Figure 14-12. Click Next.
- Select the type of partition you'll be creating, as shown in Figure 14-13. If this is a removable drive, you'll see only an option for a primary partition, but with a nonremovable disk you'll be able to choose either a primary or an extended partition. A basic disk can hold up to four primary partitions or three primary partitions and one extended partition. Click Next.
- Specify how much of the available space on the disk you want to use for this partition, as shown in Figure 14-14. Click Next.
- If you're creating an extended partition, continue with step 6. If you're creating a primary partition, select either a drive letter, as shown in Figure 14-15, or a mount point for the new partition. You can also choose to defer giving the new partition a mount point or drive letter. However, it will be unavailable to your users until you do. Click Next.
- Select the formatting options you want, or opt to defer formatting until later. Click Next.
- You'll see a confirmation screen. If all the options are correct, click Finish to create the partition. If it is a primary partition, it will be formatted and the drive letter or mount point assigned. If it is an extended partition, you'll need to format it and choose the drive letters and mount points for it, as discussed in the next section, "Creating Logical Drives in an Extended Partition."
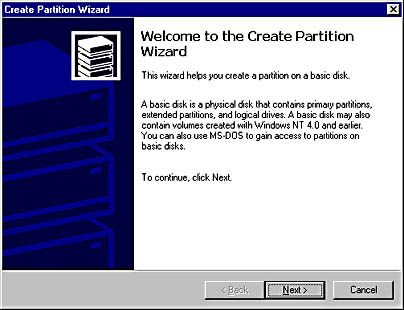
Figure 14-12. The first screen of the Create Partition Wizard.
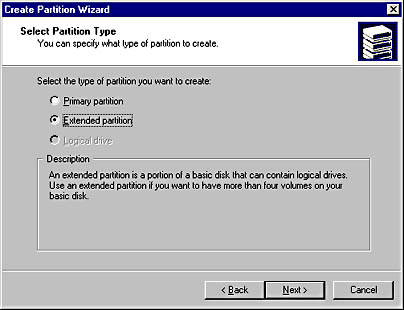
Figure 14-13. Select the type of partition you want to create.
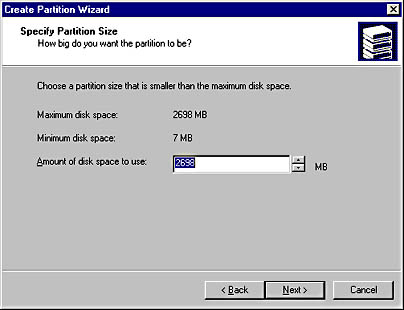
Figure 14-14. Specify how much of the disk will be used by this partition.
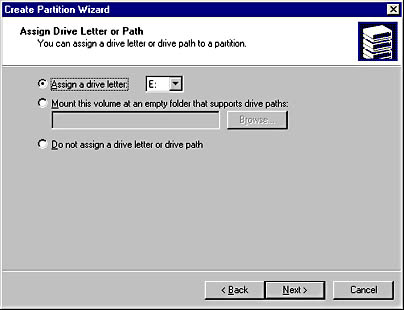
Figure 14-15. Select a drive letter or a mount point for the new partition.
![]()
REAL WORLD Formatting Options
Windows 2000 supports three different file system formats: FAT, FAT32, and NTFS. Before any disk or volume can be used, it must be formatted. For disks larger than 510 MB, you will probably find that FAT32 or NTFS use space most efficiently. However, only NTFS supports the more advanced features of Windows 2000.You can choose to quick-format a drive to make it available more quickly, but this option simply removes the file entries from the disk and does no checking for bad sectors. You should select this choice only when recycling a disk that has already been formatted and you are confident that it hasn't been damaged.
On an NTFS volume or partition, you can specify the allocation unit size. This option lets you tune the disk for a particular purpose, depending on the disk's size and intended function. A database storage volume that will contain large database files that are managed by the database program may lend itself to large allocation units (also called clusters), while a disk that must hold many small files is a candidate for smaller clusters. However, the default sizes are an excellent compromise for most situations and should be modified only with caution and with a clear understanding of the consequences for your environment.
You can also choose to enable disk and folder compression on NTFS volumes and partitions. This causes all files and folders on the volume to be compressed, as opposed to individual files or folders that you select. Compression can minimize the amount of hard disk space used by files but can have a negative impact on performance.
Creating Logical Drives in an Extended Partition
If you've created a new extended partition, the next step is to create logical drives in the partition. You can assign one or more logical drives in an extended partition, and each of those logical drives can be assigned a drive letter and/or one or more mount points. Each of the logical drives can be formatted with any of the supported file systems, regardless of the format of other logical drives. To create a logical drive, follow these steps:
- In the Disk Management console, right-click on the Free Space portion of the extended partition, and select Create Logical Drive from the menu to open the Create Partition Wizard (shown earlier in Figure 14-12). Click Next.
- You'll see the Select Partition Type screen, shown in Figure 14-16, with the Logical Drive option selected and the only choice active. Click Next and specify the size of the logical drive you'll be creating, as shown in Figure 14-17. You can specify the entire partition for a single drive, or you can divide the partition into multiple logical drives. Click Next.
- Select the drive letter or mount point for the new logical drive, as shown in Figure 14-18. You can also choose not to assign a letter or mount point at this time. Click Next.
- Select the formatting options you want. Click Next again, and you'll see the final confirmation screen. If all of the options are correct, click Finish to create and format the new logical drive. If you need to create additional logical drives on the partition, you can repeat these steps as many times as required to create the number of logical drives desired.
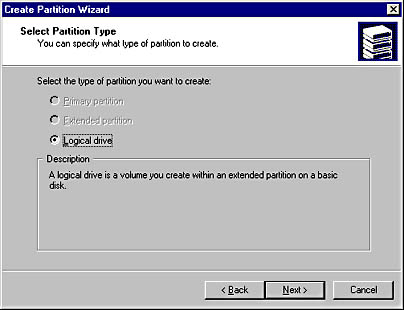
Figure 14-16. The Select Partition Type screen of the Create Partition Wizard.

Figure 14-17. Adjusting the size of the logical drive.

Figure 14-18. Assigning a drive letter or mount point for the logical drive.
Deleting a Partition, Volume, or Logical Drive
Deleting a partition, deleting a logical drive, and deleting a volume are essentially the same task, with one important exception. When you delete a logical drive, you end up with free space on the partition, but other logical drives on the partition are untouched. When you delete a partition or volume, the entire volume or partition is deleted. You cannot, however, delete an extended partition until all of the logical drives in the partition have first been deleted. You can directly delete a primary partition or a volume.
In all cases, when you delete a volume, logical drive, or partition, you'll end up with free or unallocated space and no data on the volume, drive, or partition when you're done, so make sure you've got a good backup if there's a chance you might later need any of the data. To delete a partition, logical drive, or volume, follow these steps:
- Right-click the partition, logical drive, or volume and choose Delete Partition, Delete Logical Drive, or Delete Volume.
- If you're deleting a volume or partition, you'll see a warning message similar to the one shown in Figure 14-19. Deleting an extended partition involves extra steps, since you must first delete the logical drives in the partition before you can delete the partition itself.
Once the volume or partition has been completely deleted, the space it occupied will be unallocated. Space that is unallocated on dynamic disks can be used to create mirrors, extend an existing volume, create a RAID array, or otherwise manage the storage on your server. Space that is unallocated on basic disks can be partitioned.
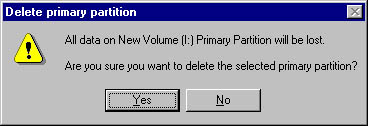
Figure 14-19. Confirmation message for deleting a volume.
Converting a Disk to a Dynamic Disk
The advantages of dynamic disks are substantial. Even if you use hardware RAID controllers and hot-swappable disks to manage your hard disks, you'll probably find it a good idea to use dynamic disks. There is a caveat, however. Since you can't boot from or even see a dynamic disk from another operating system, you may want to consider leaving at least your boot drive as a basic drive, since doing so will make working with it somewhat easier. If you need to provide for redundancy on that drive, and if hardware RAID is an option, use RAID level 1 to make recovery from a failed hard disk or other disaster as painless as possible. To convert a basic disk to a dynamic disk, follow these steps.
- Right-click the disk's icon on the left side of the Disk Management console, and choose Upgrade To Dynamic Disk from the shortcut menu.
- You'll see a dialog box like the one shown in Figure 14-20, listing the available basic disks on your machine. The disk you clicked will be checked, and you can select other disks to upgrade at the same time. Click OK to continue with the upgrade.
- You'll get a warning message stating that no other version of Windows can use these disks. Click Next.
- If there are no file systems on the disks you've chosen to upgrade, that's all there is to it. However, if there are file systems on any of the disks, you'll get a warning message stating that the file systems will be force dismounted. Click Yes and the upgrade will proceed. You can now manage the disks dynamically and they can be part of mirrors, RAID-5 arrays, or other enhanced disk configurations that aren't supported by basic disks.
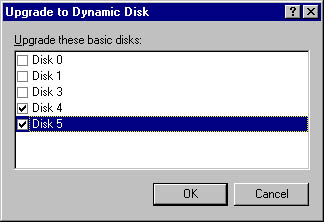
Figure 14-20. You can select more than one disk to upgrade.

CAUTION
If there are any open files on the disk to be upgraded, you may experience data loss. You should only perform disk upgrades during quiet times when no users are logged onto or using the server.
Extending a Volume
You can add space to a volume without having to back up, reboot, and restore your files if the volume is on a dynamic disk and if it is a simple volume or a spanned volume. You do this by converting the volume to a spanned or extended volume that incorporates unallocated space on any dynamic disk. Unfortunately, you can't increase the size of a RAID-5 or RAID-0 (striped) volume simply by adding disks to the array, unless you're using a version of hardware RAID that supports this functionality. To extend a volume, follow these steps:
- In the Disk Management console, right-click on the volume you want to extend. Choose Extend Volume from the menu to open the Extend Volume Wizard. Click Next.
- Highlight one or more disks from the list of dynamic disks that are available and have unallocated space. Click Add to add the selected disk or disks, and indicate the amount of space you want to add, as shown in Figure 14-21. Click Next.
- The Extend Volume Wizard displays a final confirmation screen before extending the volume. Click Finish to extend the volume, or click Cancel if you change your mind.
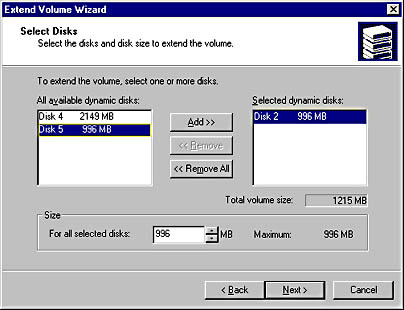
Figure 14-21. Selecting the disks to use to extend the volume.
CAUTION
It's important to remember that a spanned (extended) volume is actually less reliable than a simple disk. Unlike a mirror or RAID-5 volume, in which there is built-in redundancy, a spanned or striped volume will be lost if any disk in the volume fails.
![]()
REAL WORLD Extending—Administrator's Friend or Foe?
Most administrators have wished at some point that they could simply increase the users' home directory space on the fly without having to bring the system offline for several hours while the entire volume is backed up and reformatted to add the additional hard disks, the backup is restored, and the share points are re-created. Fun? Hardly. Risky? Certainly. And definitely a job that means coming in on the weekend or staying late at night—in other words, something to be avoided if at all possible.All this makes Windows 2000's ability to create additional space on a volume without the need to back up the volume, reformat the disks, and re-create the volume a seductive feature. However, if you're using conventional hard disks without hardware RAID, you may want to think twice before you decide to take advantage of this capability. To be able to extend a volume on the fly, you need to use only simple or spanned volumes. Neither is redundant, exposing your users to the risks of a failed drive. Yes, you have a backup, but even under the best of circumstances, you'll lose some data if you need to restore a backup. Further, using spanned volumes actually increases your risk of a hard disk failure. If any disk used as part of the spanned volume fails, the entire volume is toast and will need to be restored from backup.
Why, then, would anyone use spanning? Because they have hardware RAID to provide the redundancy. This combination offers the best of both worlds—redundancy provided by the hardware RAID controller and flexibility to expand volumes as needed, using Windows 2000's disk management.
![]()
NOTE
Windows 2000 uses the terms "extended" and "spanned" nearly interchangeably when describing volumes. Technically, however, a spanned volume must include more than one physical disk, while an extended volume may also refer to a volume that has had additional space added to the original simple volume on the same disk.
Adding a Mirror
When your data is mission-critical and you want to make sure that no matter what happens to one of your hard disks the data is protected and always available, you should consider mirroring the data onto a second drive. Windows 2000 can mirror a dynamic disk onto a second dynamic disk so that the failure of either disk will not result in loss of data. To mirror a volume, you can either select a mirrored volume when you create the volume (see "Creating a Volume," earlier in this chapter) or you can add a mirror to an existing volume. To add a mirror to an existing volume, follow these steps:
- In the Disk Management console, right-click the volume you want to mirror. If a potential mirror is available, the shortcut menu will list the Add Mirror command.
- Choose Add Mirror to display the Add Mirror dialog box, shown in Figure 14-22, where you can select the disk that will be used for the mirror.
- Highlight the disk that will be the mirror, and click Add Mirror. The mirror will be created immediately and will start duplicating the data from the original disk to the second half of the mirror, as shown in Figure 14-23. This process is called regeneration. (The process of regeneration is also used to distribute data across the disks when a RAID-5 volume is created.)
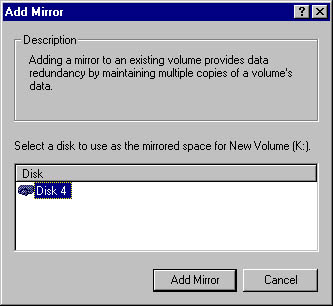
Figure 14-22. The Add Mirror dialog box.
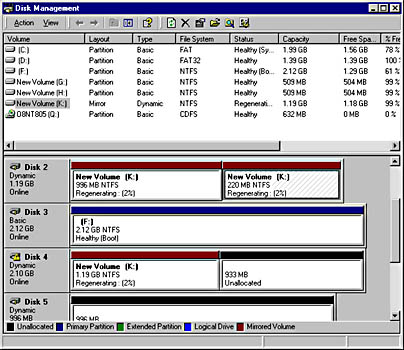
Figure 14-23. A newly created mirrored disk, in the process of regeneration.
![]()
NOTE
Regeneration is both CPU- and disk-intensive. When possible, you will want to create mirrors during slack times or during normally scheduled downtime. This goal should be balanced, however, by the equally important goal of providing redundancy and failure protection as expeditiously as possible.

TIP
To improve your overall data security and reliability, you should mirror your volumes onto disks that use separate controllers whenever possible. This process is known as duplexing, and it eliminates the disk controller as a single point of failure for the mirror while actually speeding up both reading and writing to the mirror, since the controller and bus are no longer potential bottlenecks.
Drive Failure in a Mirrored Volume
If one of the disks in a mirrored volume fails, you'll continue to have full access to all of your data without loss. Windows 2000 will send an alert to the console, as shown in Figure 14-24, mark the failed disk as missing, and take it offline, but it will continue to read and write from the other half of the mirrored volume as though nothing had happened. Be warned, however. You no longer have any fault tolerance on that volume, and any additional failure will result in catastrophic data loss.
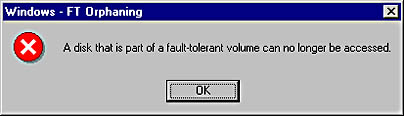
Figure 14-24. The warning message that displays when a disk that's part of a mirrored volume fails.
Once you've replaced the failed disk or corrected the problem and reactivated it, the mirror will automatically start regenerating. If the problem can be solved without powering down the system, you can regenerate the mirror on the fly. To reactivate the failed disk, follow these steps:
- Right-click the icon for the failed disk on the left of the Disk Management console, as shown in Figure 14-25.
- Choose Reactivate Disk, and Windows 2000 brings the disk back online and starts regenerating the failed mirror, as shown in Figure 14-26. Once the mirror has been regenerated, the disk status changes from Regenerating to Healthy.
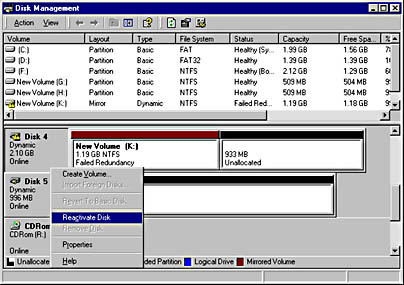
Figure 14-25. Reactivating a failed disk that's part of a mirrored volume.
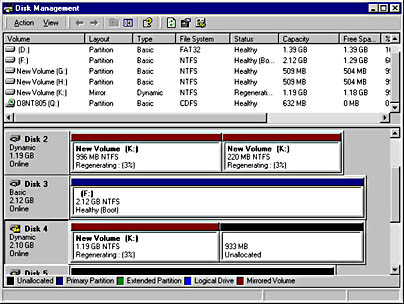
Figure 14-26. Data being regenerated on a reactivated mirrored disk.
Removing a Mirror
If you need to make additional disk space available on your system and you have no additional disks available, you can remove the mirror from a mirrored volume. When you remove a mirror, the data on one of the disks is untouched, but the other disk becomes unallocated space. Of course, you will have lost all redundancy and protection for the data, so you'll need to take steps to restore the mirror as soon as possible, and until then you may want to modify your backup schedule for the remaining disk. To remove a mirror, follow these steps:
- In the Disk Management console, right-click either half of the mirror. Choose Remove Mirror from the menu, and the Remove Mirror dialog box opens, shown in Figure 14-27.
- Highlight the disk that you want to remove from the mirror. Click Remove Mirror. You'll get one last chance to change your mind. Click OK and the disk you highlighted becomes unallocated space.
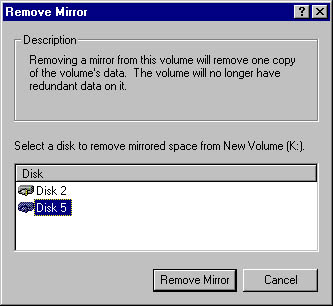
Figure 14-27. The Remove Mirror dialog box.
Breaking a Mirror
If a disk fails and you can't replace it with an identical one, you should break the mirror until a replacement becomes available. Breaking a mirror severs the connection between the two disks, allowing the remaining disk to continue to function normally until a replacement disk becomes available. You may also find it useful to break a mirror even when both disks are still functioning, since you then end up with two identical copies of the same data. One of the halves of the broken mirror continues to have the same drive letter and/or mount point, while the second half of the broken mirror is assigned the next available drive letter. To break a mirror, follow these steps:
- In the Disk Management console, right-click either disk of the mirrored volume.
- Choose Break Mirror from the shortcut menu. You'll be asked to confirm that you really want to break it.
- Click Yes, and the mirror is broken. You'll have two disks. One will retain the drive letter or mount point of the original mirror, and the other will be assigned the next available drive letter. They will both contain exact duplicates of the data at the instant of the break but will immediately start to diverge as they are modified.
![]()
REAL WORLD Backing Up Active Files
One of the most difficult tasks faced by the system administrator is to get a reliable, sure backup of a file that is in constant active use, such as a data file for a database such as SQL Server or Oracle. The Break Mirror command can be used to get around this problem. You can momentarily stop the database, break the mirror, and restart the database. Now you have a copy of the data file that is no longer in active use and can be safely and effectively backed up. Once the backup has completed, you can delete the broken volume and re-create the mirror.
Converting a Volume or Partition from FAT to NTFS
You can convert a volume or partition from the FAT or FAT32 file system to the NTFS file system without losing data or interrupting the availability of the rest of the server. However, Windows 2000 offers no graphical way to do this—you'll have to run a command-line utility. To convert a volume or partition, open a command window and type
convert <volumename | mountpoint | driveletter:> /fs:ntfs [/v]. |
This command converts the volume or drive from either FAT or FAT32 to NTFS. If you use the /v command-line switch, the conversion will be fairly noisy, listing the name of each file and directory that's converted. If someone has a file open on the volume and the program cannot gain exclusive access to it, you will be offered the opportunity to schedule the conversion for the next time you reboot. This option is alright if you have a planned maintenance reboot coming anyway, but otherwise you probably shouldn't schedule the conversion, since it may end up taking a fairly long time if the drive is large and contains a lot of files.
![]()
REAL WORLD NTFS Conversion Planning
If you schedule a conversion to NTFS for the next reboot before you're actually ready to reboot the server and your server needs to be rebooted unexpectedly, you will simply have to wait while the conversion happens. There is no way to bypass the conversion once you've committed to it. This can turn a minor downtime into a major headache if it happens in the middle of the production day. Don't commit to a conversion unless you are sure you can afford the downtime if Windows 2000 decides it needs to reboot.
Formatting a Partition or Volume
Before a partition, logical drive, or volume can be used, it must be formatted. Formatting lays down the necessary structure to support the file system you choose for the volume. You must format a volume or drive when it is first created, and at any later point if you want to clear it off. You can also use Format to change the type of file system on a drive, partition, or volume, but all data on the target will be deleted during the formatting. (The command-line convert command—which allows conversion of FAT and FAT32 targets to the NTFS format only—preserves any data on the target.) The file systems that are supported by Windows 2000 are FAT, FAT32, and NTFS.
In general, we recommend that you use NTFS unless you have a compelling reason not to. One case in which you would not use NTFS is when log files will reside on the volume or partition. A FAT or FAT32 volume tends to be faster and more appropriate for large files that grow constantly in small increments, as log files do. However, even with log files, you should use the FAT or FAT32 file system only when security or quotas are not an issue, since these file systems do not support quotas or the security features of NTFS.
Another reason to use FAT or FAT32 is to allow the computer to support dual booting into other operating systems. NTFS is not visible or accessible from other operating systems, while FAT can be used by a variety of operating systems and FAT32 can be used by Microsoft Windows 95 and by Microsoft Windows 98. To format a logical drive, partition, or volume, follow these steps:
- In the Disk Management console, right-click the logical drive, partition, or volume you want to format, and choose Format from the menu. You'll see the dialog box shown in Figure 14-28. Select the file system you want to use: FAT, FAT32, or NTFS.
- Select the allocation unit size (also called the cluster size). Normally, you'll simply accept the default here. See "Optimum Cluster Size" for a discussion of this issue.
- Type in a name for the volume, logical drive, or partition. The default name is New Volume.
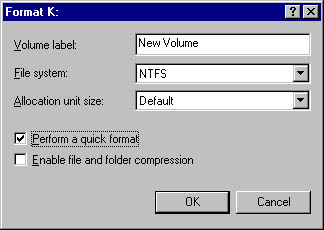
Figure 14-28. The Format dialog box.
![]()
REAL WORLD Assigning Volume Names
The name you assign to a volume, partition, or drive should tell you something about it rather than simply mimicking the drive letter. A volume name like "Big50GBSCSI" tells you pretty conclusively that it's that big new SCSI drive you just bought, unless, of course, you already have half a dozen of them on your server, in which case you're going to need to come up with a more effective name. On the other hand, a volume name of C_DRIVE is just about useless, since the drive letter is available from anywhere that the volume name is.
- Check the Perform A Quick Format box if you want to format the drive quickly. We recommend, however, that you not do this unless you have a strong need to make the volume available immediately. The full, long version of the format checks the entire drive for defects. It can take a while on a large drive, and the overall system performance will tend to suffer while the format is going on, but the greater sense of confidence in the volume should be worth the wait.
- If the entire drive will be compressed, check Enable File And Folder Compression. Note, however, that you can choose to compress individual folders and even individual files regardless of whether you check this option now. And with the size and cost of drives these days, we think this option is much less useful than it once was.
- Click OK and the formatting begins. Windows 2000 can handle only one format at a time, so you'll be unable to format any other partition or volume until this one finishes.
![]()
REAL WORLD Optimum Cluster Size
A discussion of the best cluster size for a particular application or need is beyond the scope of this chapter and can be fairly heated, with an enormous amount of unsubstantiated and generally false statements being bandied about. Suffice it to say that the defaults are good for almost all situations and that decisions to choose something other than the default allocation size should be made only when there is a specific, clearly understood reason and a compelling need to do so. You can choose cluster sizes from 512 bytes up to 256 KB. You will not be able to enable file and folder compression on NTFS if you go beyond 4 KB for your allocation unit size.If you seriously think you need to change the cluster size for a particular volume, we suggest you first make the change in a controlled lab environment and perform confidence and performance tests to ensure that the change meets your needs and doesn't cause unintended side effects.
Changing a Drive Letter
You can change the drive letter of a volume or partition at any time, and you can even have multiple paths to a given drive. In addition, unlike Windows NT, Windows 2000 allows you to change the drive letter of a removable drive, such as a Jaz or Zip drive. To change a drive letter, follow these steps:
- Right-click on the drive in the Disk Management console, and choose Change Drive Letter And Paths.
- A dialog box displaying the current drive letter and any mount-point paths for the disk appears, as shown in Figure 14-29. Highlight the drive letter shown and click Edit. Select the new drive letter from the drop-down list, and click OK.
- You see a confirmation message warning that the change could affect the ability of some programs to run. Click Yes and the drive letter change will take place immediately, unless there are open files on the drive. If there are open files on the drive, the drive will temporarily have two drive letters, the old one and the new one. You'll see the warning shown in Figure 14-30. Click Yes to confirm the change.
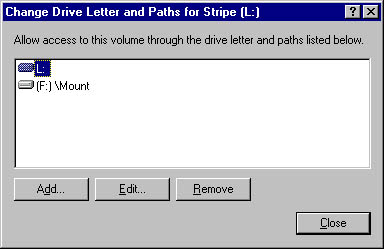
Figure 14-29. Changing the drive letter of a logical drive.
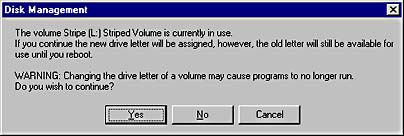
Figure 14-30. Message warning that a drive has a dual identity.
Mounting a Volume
Windows 2000 adds a new feature to the disk and storage management process. You can mount a dynamic volume—or any partition or logical drive in an extended partition—on any empty directory that resides on a drive that is both NTFS formatted and nonremovable. The mounted volume can be formatted as FAT, FAT32, or NTFS and appears to users as a simple directory. This feature makes it possible to create larger file systems that use multiple hard disks without the inherent risks of using spanned volumes, since the failure of any one of the mounted volumes affects only the directories that were part of that volume. You can also easily support multiple formats from a single drive letter. To mount a volume, follow these steps:
- From the Disk Management console, right-click on a volume or partition. Choose Change Drive Letter And Path from the menu. The Drive Letter And Path dialog box, shown previously in Figure 14-29, opens.
- Click the Add button; the Add New Drive Letter Or Path dialog box opens, as shown in Figure 14-31.
- You can type in the mount point or use the Browse button to select or create a mount point. Any empty directory that resides on a nonremovable NTFS volume or drive can be the mount point.
- Once you've selected or typed in the mount point, click OK, and the volume or partition is mounted.
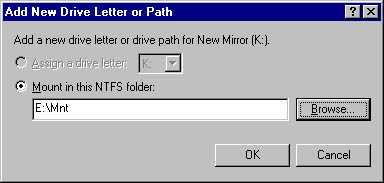
Figure 14-31. The Add New Drive Letter Or Path dialog box, used to mount a volume.
CAUTION
It's actually easy to get yourself into trouble with this new feature. Disk Management will let you make multiple levels of mounted volumes, including ones that are recursive. We think you're well advised to mount volumes only at the root level of a drive. Trying to mount below that point can lead to confusion and make management and documentation difficult.
EAN: 2147483647
Pages: 366