Installing Printers
|
| < Day Day Up > |
|
Before a Windows print server can share a printer on the network, it must first connect to the printer and install the necessary drivers. The following sections walk you through adding printers that are attached directly to the print server via USB or parallel port interface, as well as connecting to printers with built-in network adapters.
Adding Locally Attached Printers
If you’re using a USB or IEEE 1394 (Firewire) connection to the printer, as soon as you plug the printer into the server, Windows automatically detects, installs, and shares the printer on the network, and also publishes it in Active Directory (although you might be prompted for drivers).
To use the Add Printer Wizard to set up a local printer that is physically connected to your system using a legacy parallel port, complete the following steps:
-
Connect the printer to the appropriate port on the server.
-
Click Start, choose Printers And Faxes, and then double-click Add Printer. Alternatively, select Printers from the Standard Management tree in the Server Management console and then click the Add A Printer link.
-
Click Next in the first page to begin using the Add Printer Wizard.
-
On the Local Or Network Printer page, select the Local Printer Attached To This Computer option, select the Automatically Detect And Install My Plug And Play Printer check box (Figure 11-1), and then click Next.
Caution If you’re installing a Plug and Play (PnP) printer, always select the Automatically Detect And Install My Plug And Player Printer check box in the Add Printer Wizard. If you don’t select this option, Windows detects the printer the next time the system is rebooted and attempts to install the printer a second time.
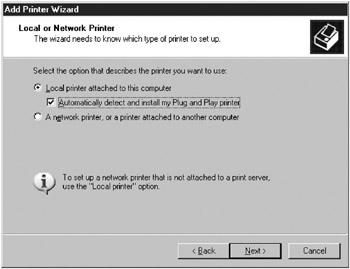
Figure 11-1: The Local Or Network Printer page of the Add Printer Wizard. -
Windows displays the New Hardware Found dialog box when it locates the printer. If Windows has the appropriate drivers for the device, it installs them automatically.
-
If the printer wasn’t detected, click Next to set up the printer manually.
-
On the Select A Printer Port page, shown in Figure 11-2, choose the port the printer is attached to, and then click Next.
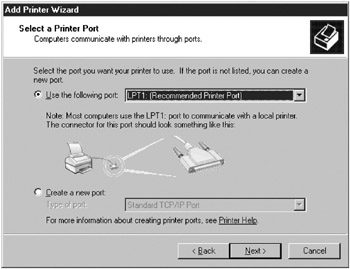
Figure 11-2: The Select A Printer Port page of the Add Printer Wizard. -
On the Install Printer Software page, select the manufacturer and model of the printer from the Install Printer Software page. Click Windows Update to search for drivers online, or click Have Disk to provide the location of updated drivers. When finished, click Next.
Note Microsoft strongly recommends that you use only digitally signed drivers. If the driver isn’t digitally signed, Windows warns you, and you should go find a driver that has been certified by Microsoft for use on Microsoft Windows Server 2003 or Windows 2000.
-
On the Name Your Printer page, type a name for the printer in the Printer Name text box and click Next. Try to keep the total length of the printer name, including the server’s fully qualified domain name (FQDN), to 31 characters or fewer, and don’t use spaces or special characters if you want to support Mac OS clients.
-
On the Printer Sharing page, select Share Name and then type a share name for the printer. Windows automatically creates an 8-letter name for optimal compatibility with MS-DOS and Microsoft Windows 3.x clients; don’t use spaces when you want to maintain compatibility with Macintosh clients and automated Windows installations. Click Next.
Caution Printers with share names longer than 13 characters are invisible to clients running Microsoft Windows Me, Microsoft Windows 98, and earlier versions of Windows.
-
On the Location And Comment page, type the location name for the printer in the Location box, describe the capabilities of the printer in the Comment text box, and then click Next.
Note The Location field was designed for large networks that have the Printer Location Tracking feature enabled; however, on a smaller network, it’s still useful for communicating the location of a printer to users.
-
On the Print Test Page, print a test page by clicking Yes, and then click Next to display a summary of the printer installation. To change the installation choices, click Back; otherwise, click Finish to complete the installation.
Adding Printers with Network Interfaces
If you have a printer with a built-in network connection, you can connect to it in two ways: via a standard TCP/IP printer port, or via the slower LPR service if the printer refuses to work with a Standard TCP/IP printer port.
| Note | You can also connect Windows Small Business Server to printers shared by other Windows servers or clients, and turn around and share these connections using the Add Printer Wizard (choose the Network Printer option). |
Adding Printers on a Standard TCP/IP Printer Port
The best solution for connecting to network printers is to use a standard TCP/IP printer port. The standard TCP/IP printer port in Windows Small Business Server 2003 supports network printers that use TCP/IP (most commonly implemented with LPD), as well as printers connected to network devices such as the Hewlett-Packard JetDirect or the Intel NetPort. The standard TCP/IP printer port is easier to set up, provides more printer status information, and is 50 percent faster than an LPR Port Monitor (which is discussed in the next section).
To set up a network-based printer through a standard TCP/IP printer port— which Windows Small Business Server treats as a local port—complete the following steps:
-
Connect the printer to the network and configure the printer with the proper TCP/IP settings for the network. (You might want to disable DHCP so that the printer’s IP address doesn’t change.)
-
Click Start, choose Printers And Faxes, and then double-click Add Printer. Alternatively, select Printers from the Standard Management tree in the Server Management console, and then click the Add A Printer link.
-
Click Next on the first page to begin using the Add Printer Wizard.
-
On the Local Or Network Printer page, select the Local Printer Attached To This Computer option, clear the Automatically Detect And Install My Plug And Play Printer check box, and then click Next.
-
On the Select A Printer Port page, select Create A New Port, select Standard TCP/IP Port from the drop-down list (Figure 11-3), and then click Next. Windows launches the Add Standard TCP/IP Printer Port Wizard.
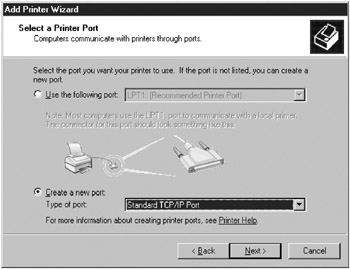
Figure 11-3: The Select A Printer Port page of the Add Printer Wizard. -
Make sure the printer is turned on and connected to the network, and then click Next on the first page of the Add Standard TCP/IP Printer Port Wizard to begin using the wizard.
-
On the Add Port page, type the printer name or IP address in the first text box, as shown in Figure 11-4.
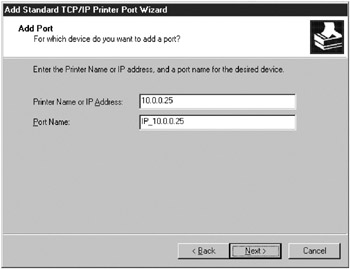
Figure 11-4: The Add Port page of the Add Standard TCP/IP Printer Port Wizard. -
If necessary, modify the TCP/IP port name that Windows automatically fills in and then click Next. Windows attempts to connect to the printer.
-
If Windows can’t detect the printer, the Additional Port Information Required page is displayed. Select the printer type from the Standard list (Figure 11-5), click Next, click Finish, and then skip to Step 15. Or select Custom and click Settings to display the Configure Standard TCP/IP Port Monitor dialog box, shown in Figure 11-6 and discussed in the next steps.

Figure 11-5: The Additional Port Information Required page.
Figure 11-6: The Configure Standard TCP/IP Port Monitor dialog box. -
Choose the protocol the printer uses, either RAW or LPR. Use RAW if possible; it closes the printer port when finished with a print job, reducing the likelihood of hanging the print spooler.
-
Type the port number for the printer if you’re using the raw protocol. Use the default port number (9100) unless the printer documentation specifies that you must use a different port.
-
If using the LPR protocol, type the queue name in the box provided.
-
If the printer supports Simple Network Management Protocol (SNMP), select the SNMP Status Enabled check box, and type the Community Name (usually “public”) and SNMP Device Index. SNMP allows the printer to communicate status information to the server.
Tip Select the LPR Byte Counting Enabled check box if you’re having problems with incomplete or missing documents. However, be aware that selecting this check box tells the server to count the number of bytes in a document before sending it to the printer, requiring the server to spool the job twice (taking extra time).
-
Click OK when you’re finished configuring the TCP/IP port, click Next, and then click Finish.
-
If Windows Small Business Server doesn’t detect the printer, the Install Printer Software page is displayed. Choose the manufacturer and printer model and then click Next.
-
On the Name Your Printer page, type a name for the printer in the Printer Name text box. Try to keep the total length of the printer name, including the server’s fully qualified domain name (FQDN), to 31 characters or fewer, and don’t use spaces or special characters if you want to support Mac OS clients. Specify whether to make the printer the default printer, and then click Next.
-
On the Printer Sharing page, select Share Name and then type a share name for the printer. Windows automatically creates an 8-letter name for optimal compatibility with MS-DOS and Windows 3.x clients; don’t use spaces when you want to maintain compatibility with Macintosh clients and automated Windows installations. Click Next.
Caution Printers with share names longer than 13 characters are invisible to clients running Windows Me, Windows 98, and earlier versions of Windows.
-
On the Location And Comment page, type the location name for the printer in the Location box, describe the capabilities of the printer in the Comment text box, and then click Next.
Note The Location field was designed for large networks that have the Printer Location Tracking feature enabled; however, on a smaller network, it’s still useful for communicating the location of a printer to users.
-
On Print Test Page, print a test page by clicking Yes, and then click Next to display a summary of the printer installation. To change the installation choices, click Back; otherwise, click Finish to complete the installation.
Adding Printers on an LPR Printer Port
If you have an old network printer or print device that won’t work using a Standard TCP/IP printer port, you should use an LPR printer port. You’ll probably also have to use an LPR printer port if the printer is being shared by a Linux system using the LPD service.
To set up a network-based printer through an LPR port, complete the following steps:
-
Connect the printer to the network and configure the printer with the proper TCP/IP and LPD settings.
-
Install Print Services For Unix: In Control Panel, click Add Or Remove Programs, click Add/Remove Windows Components, select Other Network File And Print Services, click Details, select Print Services For Unix, click OK, and then click Next.
-
Click Start, choose Printers And Faxes, and then double-click Add Printer. Alternatively, select Printers from the Standard Management tree in the Server Management console and then click the Add A Printer link.
-
On the Local Or Network Printer page, select the Local Printer Attached To My Computer option, clear the Automatically Detect And Install My Plug And Play Printer check box, and then click Next.
-
On the Select A Printer Port page, choose Create A New Port, select LPR Port from the drop-down list, and click Next.
-
In the Add LPR Compatible Printer dialog box, type the IP address or DNS name of the printer or print server running LPD in the first text box, shown in Figure 11-7.
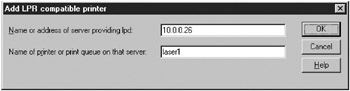
Figure 11-7: The Add LPR Compatible Printer dialog box. -
In the second text box, type the name of the printer or print queue on the LPD server, and then click OK. Windows adds the port to the list of ports.
-
If Windows doesn’t detect the printer, the Install Printer Software page is displayed. Choose the manufacturer and printer model and then click Next.
-
On the Name Your Printer page, type a name for the printer in the Printer Name text box. Try to keep the total length of the printer name, including the server’s fully qualified domain name (FQDN), to 31 characters or fewer, and don’t use spaces or special characters if you want to support Linux or Mac OS clients. Specify whether to make the printer the default printer, and then click Next.
-
On the Printer Sharing page, select Share Name and then type a share name for the printer. Windows automatically creates an 8-letter name for optimal compatibility with MS-DOS and Windows 3.x clients; don’t use spaces when you want to maintain compatibility with Macintosh and Linux clients and automated Windows installations. Click Next.
Caution Printers with share names longer than 13 characters are invisible to clients running Windows Me, Windows 98, and earlier versions of Windows.
-
On the Location And Comment page, type the location name for the printer in the Location box, describe the capabilities of the printer in the Comment text box, and then click Next.
-
On the Print Test Page, print a test page by clicking Yes, and then click Next to display a summary of the printer installation. To change the installation choices, click Back; otherwise, click Finish to complete the installation.
|
| < Day Day Up > |
|
EAN: 2147483647
Pages: 224