Performing the Upgrade
|
| < Day Day Up > |
|
When all preparations are complete, use the following steps outside of normal business hours to upgrade a server running Small Business Server 2000, Windows 2000 Server or Windows Server 2003 to Windows Small Business Server 2003:
-
Disable disk utilities such as backup programs and antivirus programs.
-
Disconnect any uninterruptible power supply (UPS) devices, including USB models.
-
Notify users that the server will be upgraded by typing the following command at a command prompt (change the text as desired):
Net send * The server will be unavailable in five minutes. Please save your work and disconnect from the server.
-
Unless you have a hardware firewall, disconnect the Internet connection device from the Internet.
-
Log on using an Administrator account and insert the Windows Small Business Server 2003 DVD or CD 1. The Microsoft Windows Small Business Server Setup window appears automatically.
-
Click Set Up Windows Small Business Server.
-
On the first page of the Microsoft Windows Small Business Server Setup Wizard, click Next, review the upgrade information, and then click Next again.
-
On the Setup Requirements page, review any warnings, select the I Acknowledge All Warnings check box, and then click Next.
-
On the License Agreement page, review the license agreement, choose I Agree, and then click Next.
-
On the Product Key page, type the product key from the Windows Small Business Server 2003 packaging, and then click Next.
-
On the Required Components page, click Next. Setup installs Windows Small Business Server 2003 and reboots the computer several times.
-
Log on using an Administrator account and then click Next on the first page of the Microsoft Windows Small Business Server Setup Wizard. (Double-click the Continue Setup icon on the desktop if the wizard doesn’t appear automatically.)
-
If the Setup Requirements page appears, address any requirements and then click Next.
-
On the Company Information page, type the phone, fax, and address for your company or organization, and then click Next. This information is used by Setup to configure server tools.
-
If the Internal Domain Information page appears, enter the DNS domain name, NetBIOS domain name, and computer name, and then click Next.
-
On the Local Network Adapter Information page (Figure 5-1), select the network adapter connected to the local network and then click Next.
-
If the Local Network Adapter Configuration page appears, specify the IP address and subnet mask for the network adapter that connects to the local network and then click Next.
-
During the remaining parts of Setup, the computer reboots several times. To save time logging on, provide your password on the Logon Information page and then click Next. (This saves your password only until Setup is complete.) Click Next again to continue Setup.
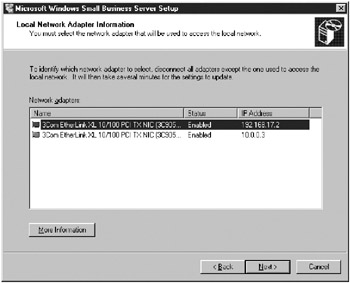
Figure 5-1: The Local Network Adapter Information page of the Microsoft Windows Small Business Server Setup Wizard. -
On the Component Selection page (Figure 5-2), all components are selected by default. Click the arrowheads to select items you do not want to install and then click Next.
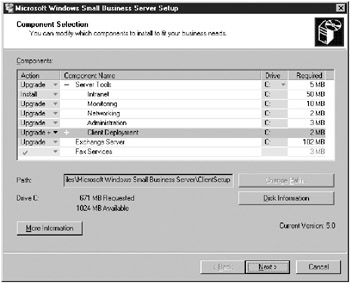
Figure 5-2: The Component Selection page. -
The Data Folders page displays components and the folders in which they’ll be placed. To make changes, select the item and click Change Folder. Click Next to continue.
-
The Component Summary page provides an opportunity to review your choices and modify them. Click Next to continue. Windows installs the specified components and then reboots the computer.
From this point on, the installation requires no further input except the changing of CDs. Errors are reported on a Component Messages page. After the final reboot, you see the To Do List, covered in Chapter 6, “Completing the To Do List and Other Post-Installation Tasks.” However, there’s one more task to complete—migrating user permissions. Users of Windows Small Business Server 2003, Premium Edition, who upgraded from Windows 2000 Server or Windows Server 2003 and aren’t currently running SQL Server 2000 and ISA Server 2000 should also install these applications from the Premium Technologies CD, as discussed in Appendix B.
| Caution | After upgrading from Windows Server 2003, reinstall the service packs and hotfixes that were on the original server. |
|
| < Day Day Up > |
|
EAN: 2147483647
Pages: 224