Installing a New SQL Server 2000 Instance
|
| < Day Day Up > |
|
Use the following steps to install a new instance of SQL Server 2000 and install SQL Server 2000 Service Pack 3a:
| Note | The version of SQL Server 2000 included on the Premium Technologies CD is an updated version that addresses the Slammer worm. To ensure SQL Server is not exposed to other potential vulnerabilities before Service Pack 3a is installed, make sure that the server is disconnected from the Internet or is behind a firewall. |
-
Insert the Windows Small Business Server 2003 Premium Technologies CD. The Microsoft Windows Small Business Server 2003 Premium Technologies Setup window appears.
-
Click Install Microsoft SQL Server 2000. A dialog box appears warning that SQL Server 2000 SP2 and earlier are unsupported. Click Continue and then click Next on the first page of the Microsoft SQL Server Installation Wizard.
-
On the Computer Name page, click Next to install SQL Server on the local computer (the only supported configuration in Windows Small Business Server 2003).
Tip If you have trouble getting past the Computer Name page because Setup insists that a previous installation didn’t complete, reboot the server and log on locally (not using Remote Desktop).
-
On the Installation Selection page (Figure B-4), choose Create A New Instance Of SQL Server, Or Install Client Tools and then click Next.
Note You can install or upgrade only a single instance at a time—to install or upgrade another instance, rerun the Microsoft SQL Server Installation Wizard.

Figure B-4: The Installation Selection page. -
On the User Information page, type your name and company and then click Next.
-
On the Software License Agreement page, read the End-User License Agreement (EULA) and then click Yes.
-
On the Product Key page, type the CD key from the Windows Small Business Server 2003 packaging and then click Next. (This page appears only when installing the first instance.)
-
On the Installation Definition page, choose Server And Client Tools and then click Next.
-
On the Instance Name page, select the Default check box and then click Next.
-
On the Setup Type page (Figure B-5), choose either Typical or Minimum (or Custom if you want to tweak the installation options), specify where to place the SQL Server files, and then click Next.
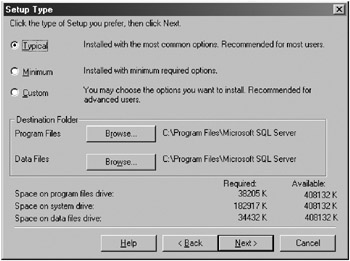
Figure B-5: The Setup Type page. -
On the Services Accounts page (Figure B-6), specify the user account to use for the SQL Server service and then click Next.
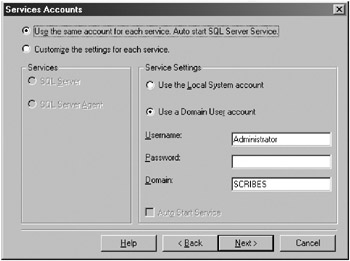
Figure B-6: The Services Accounts page.Security Alert For maximum security, use an administrator account created specifically for use by SQL Server. If password policies are in place on the network, remember to reset the password on this account and change the password in SQL Server when the password expires.
-
On the Authentication Mode page, choose Windows Authentication Mode. The authentication mode can be changed after SQL Server is installed.
-
On the Start Copying Files page, click Next to install SQL Server.
-
After installation completes, click Finish.
-
Double-click Setup.exe on the Windows Small Business Server 2003 Premium Technologies CD. The Microsoft Windows Small Business Server 2003 Premium Technologies Setup window appears again.
-
Click Install SQL Server 2000 Service Pack 3a. When the Welcome page of the Microsoft SQL Server 2000 Service Pack 3a Wizard appears, click Next.
Planning You must install Service Pack 3a (or newer) on every SQL Server instance that you install or upgrade. For example, if you install a default instance of SQL Server to store business data and you upgrade the SharePoint database to SQL Server, install Service Pack 3a twice: once to the default instance and once to the SharePoint instance.
-
Read the standard Microsoft license agreement, and then click Yes to continue.
-
On the Instance Name page, select the Default check box and then click Next.
-
On the Connect To Server page, select The Windows Account Information I Use To Log On To My Computer With (Windows Authentication) option and then click Next.
-
On the SA Password Warning page, type a secure password for the System Administrator (SA) login and then click OK.
Security Alert The System Administrator login is present for backwards compatibility with earlier versions of SQL Server and is disabled while Windows authentication mode is used. However, if an administrator reconfigures SQL Server for mixed mode authentication, SQL Server enables the SA login, which has a blank password by default (essentially rolling out the red carpet for hackers). Because of this potential vulnerability, always set a strong SA password, even if you never plan on switching authentication modes.
-
On the Backward Compatibility Checklist page, make sure the check box is cleared to disable cross-database ownership chaining, thereby improving security. Click Continue.
-
On the Error Reporting page, optionally select the Automatically Send Fatal Error Reports To Microsoft check box to send error information to Microsoft and then click OK.
-
On the Start Copying Files page, click Next to install SQL Server 2000 Service Pack 3a.
-
After installation completes, a dialog box appears telling you to back up the SQL databases. Click OK.
-
On the Setup Complete page, click Finish.
-
Open Services from the Administrative Tools folder on the Start menu and verify that the MSSQLSERVER service is started. If the service isn’t started, select it and click the Start Service toolbar button.
|
| < Day Day Up > |
|
EAN: 2147483647
Pages: 224
- Challenging the Unpredictable: Changeable Order Management Systems
- Enterprise Application Integration: New Solutions for a Solved Problem or a Challenging Research Field?
- Distributed Data Warehouse for Geo-spatial Services
- Healthcare Information: From Administrative to Practice Databases
- Relevance and Micro-Relevance for the Professional as Determinants of IT-Diffusion and IT-Use in Healthcare