Administering ISA Server
|
| < Day Day Up > |
|
The initial configuration of ISA Server is handled automatically as part of the Configure E-Mail and Internet Connection Wizard, which is run as the final step of installing ISA Server. All the necessary protocol and publishing rules are set up, and if your installation never changes, you really don’t need anything else. But inevitably there will be changes—there always are. If the changes are covered by the Configure E-Mail and Internet Connection Wizard, your first step should always be to rerun the wizard. The tasks that you can use the Configure E-Mail and Internet Connection Wizard to perform include:
-
Changing your broadband or dial-up connection
-
Enabling or disabling services through the ISA Server, specifically:
-
E-mail (enabled by default when you are running Microsoft Exchange)
-
Virtual Private Networking
-
Terminal Services
-
File Transfer Protocol (FTP)
-
-
Enabling or disabling Web Publishing of internal Web site services, specifically:
-
Outlook Web Access
-
Remote Web Workplace
-
Server performance and usage reports
-
Outlook Mobile Access
-
Outlook via the Internet
-
Business Web site (your public Web site)
-
-
Changing the Web server certificate
-
Enabling or disabling Internet e-mail
| Caution | If you are using L2TP for your VPN protocol, as described in Chapter 15, “Managing Connectivity,” running the Configure E-Mail and Internet Connection Wizard to modify your Firewall Configuration will disable your VPN configuration. You’ll need to re-enable the packet filters manually, as described in Chapter 15. |
Changing Your Broadband or Dial-Up Connection
You can use the Configure E-Mail and Internet Connection Wizard to change your Internet connection type, or to change the specific parameters of your current connection type. When you run the wizard, the wizard will make the necessary changes to ISA Server as well. See Chapter 6, “Completing the To Do List and Other Post-Installation Tasks,” for details about setting or changing your Internet connection type.
Enabling or Disabling Services Through the ISA Server
You can use the Configure E-Mail and Internet Connection Wizard to control which services running on your Windows Small Business Server network are available directly from the Internet. When you run or rerun the Configure E-Mail and Internet Connection Wizard, the wizard makes the necessary changes to packet filters and publishing rules in ISA Server to support the changes you’re making. The services you can enable for direct Internet access are:
-
E-mail
-
Virtual Private Networking
-
Terminal Services
-
File Transfer Protocol (FTP)
To make changes to these services, complete the following steps:
-
In the Server Management console, click Internet And E-Mail, and then click Connect To The Internet to open the Configure E-Mail and Internet Connection Wizard.
-
Click Next to open the Connection Type page. Select Do Not Change Connection Type and click Next to open the Firewall page.
-
Select Enable Firewall, and click Next. You are warned that any custom packet filters you defined will be disabled, such as L2TP VPN packet filters, as shown in Figure 16-7. See Chapter 15 for more information about L2TP and how to re-enable the filters.

Figure 16-7: The Configure E-Mail and Internet Connection Wizard disables any custom packet filters you defined, including L2TP VPN connections. -
Click OK to bring up the Services Configuration page, shown in Figure 16-8.
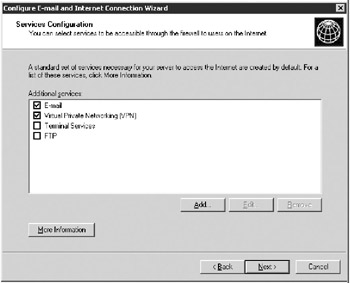
Figure 16-8: The Services Configuration page of the Configure E-Mail and Internet Connection Wizard. -
Select the check boxes of any service you want available directly through the Internet. Clear the others. If you enable Virtual Private Networking (VPN), these other services will be available to client computers once they have established a VPN connection to your network.
-
You can add custom services that are available directly from the Internet, or edit existing ones you created. If you click Add, you see the Add Or Edit A Service dialog box, shown in Figure 16-9. You need to know the port used by the service, the protocol type (TCP or UDP), and whether the service is an inbound or outbound service. Type and select the appropriate information, and then click OK to return to the Services Configuration page.
-
After you make the necessary changes on the Services Configuration page, click Next.
-
Step through the rest of the Configure E-Mail and Internet Connection Wizard. Don’t change any additional settings as you step through it. When you reach the end, click Finish, and the changes are implemented.
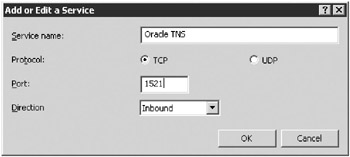
Figure 16-9: Adding or editing a custom service allows it to be used through the ISA Server. -
Once the configuration is implemented, you see a confirmation message, as shown in Figure 16-10. Click Close and you’re finished.
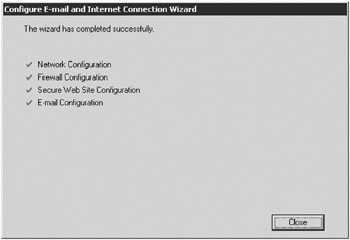
Figure 16-10: Confirmation message showing that the Configure E-Mail and Internet Connection Wizard completed successfully.
Enabling or Disabling Web Services
You can use the Configure E-Mail and Internet Connection Wizard to control which Web services running on your Windows Small Business Server are available directly from the Internet through your firewall. When you run or rerun the Configure E-Mail and Internet Connection Wizard, the wizard makes the necessary changes to packet filters and publishing rules in ISA Server to support the changes you’re making. The Web services you can enable for direct Internet access are:
-
Outlook Web Access
-
Remote Web Workplace
-
Server performance and usage reports
-
Outlook Mobile Access
-
Outlook via the Internet
-
Business Web site (your public Web site)
To make changes to these Web services, complete the following steps:
-
In the Server Management console, click Internet And E-Mail, and then click Connect To The Internet to open the Configure E-Mail and Internet Connection Wizard.
-
Click Next to open the Connection Type page. Select Do Not Change Connection Type, and click Next to open the Firewall page.
-
Select Enable Firewall, and click Next. You are warned that any custom packet filters you defined will be disabled, as shown earlier in Figure 16-7.
-
Click OK to bring up the Services Configuration page. Don’t make any changes here, and click Next to bring up the Web Services Configuration page, shown in Figure 16-11.
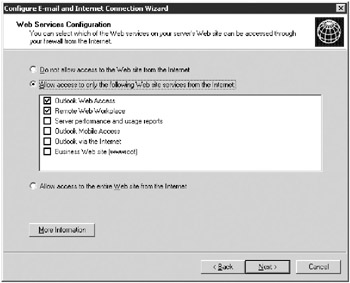
Figure 16-11: The Web Services Configuration page of the Configure E-Mail and Internet Connection Wizard. -
Select the check boxes of those Web services you want available directly from the Internet. If you have Virtual Private Networking enabled, the other services will be available from the Internet by first establishing a VPN connection to your network.
-
After you make your changes, click Next.
-
Step through the rest of the Configure E-Mail and Internet Connection Wizard. Don’t change any additional settings as you step through it. When you reach the end of the wizard, click Finish, and the changes are implemented.
-
After the configuration is implemented, you see a confirmation message (Figure 16-10). Click Close and you’re finished.
Creating Protocol Definitions
ISA Server is automatically configured with definitions for most protocols, and you can create other definitions by using the Configure E-Mail and Internet Connection Wizard and adding a service. However, you might need to use a protocol that ISA Server doesn’t already know about. If so, you need to create a protocol definition first and then a protocol rule enabling the use of the new protocol definition. To create a protocol definition, complete the following steps:
-
Open the ISA Management console by clicking Start, All Programs, Microsoft ISA Server, and then ISA Management.
-
Open Policy Elements and then Protocol Definitions in the console tree, as shown in Figure 16-12.
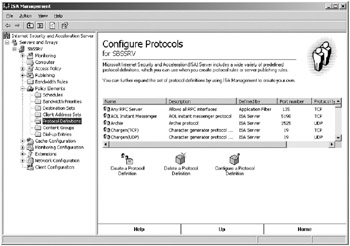
Figure 16-12: Protocol Definitions in the ISA Management console. -
Scan the list of protocol definitions to make sure there isn’t already a suitable definition, and if there isn’t, click Create A Protocol Definition.
-
On the first page of the New Protocol Definition Wizard, type the protocol name and then click Next to open the Protocol Connection Information page, shown in Figure 16-13.
-
Type the port number used by the protocol, the protocol type, and the direction of information transfer, and then click Next.
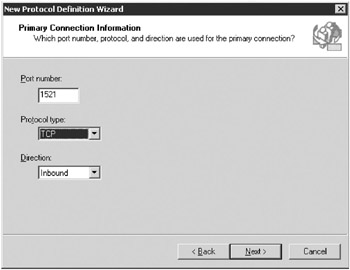
Figure 16-13: The Protocol Connection Information page of the New Protocol Definition Wizard. -
If the protocol uses secondary connections, select the Yes option on the Secondary Connections page, and then click New to specify a port range, type, and direction for secondary connections. Click Next to continue.
-
Review the settings and then click Finish. To use the protocol definition, either add it to an existing protocol rule or create a new Allow protocol rule for it.
Creating a Protocol Rule
ISA Server is automatically configured with protocol rules for the protocol definitions that are configured as part of the Windows Small Business Server Configure E-Mail and Internet Connection Wizard, but if you create new, custom protocol definitions without using the wizard, you’ll also need to create a protocol rule enabling the use of the new protocol definition. To create a protocol rule, complete the following steps:
-
In the ISA Management console tree, open Access Policy and then Protocol Rules, as shown in Figure 16-14.
-
Click Create A Protocol Rule in the details pane to open the New Protocol Rule Wizard.
-
Type a name for the rule. Include Allow or Deny as part of the name to make it easy to identify the rule later. Click Next.
-
On the Rule Action page, select Allow or Deny to specify whether this is a rule to allow or deny the use of the protocol.
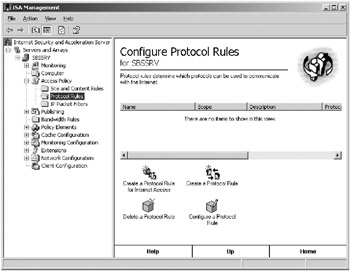
Figure 16-14: Protocol Rules in the ISA Management console. -
On the Protocols page, select Selected Protocols from the Apply This Rule To drop-down list, locate the protocol you want to create a rule for, and then select the check box for it, as shown in Figure 16-15. Click Next.
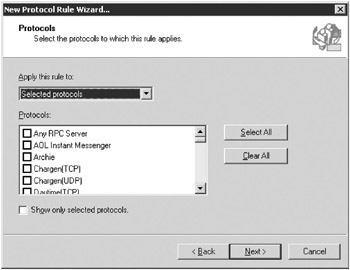
Figure 16-15: The Protocols page of the New Protocol Rule Wizard. -
On the Schedule page, select from the available schedules. Click Next.
-
On the Client Type page, select Specific Users And Groups, as shown in Figure 16-16. This selection will maintain consistent security with existing Windows Small Business Server rules. Click Next.
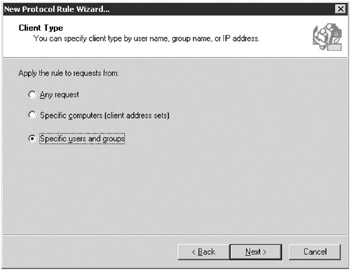
Figure 16-16: For Windows Small Business Server, you should choose Specific Users And Groups. -
On the Users And Groups page, Click Add to bring up the Select Users Or Groups dialog box. To allow all Internet users to use this protocol, click Object Types, select Groups in the Object Types dialog box, and then click OK to return to the Select Users Or Groups dialog box.
-
In the Enter Object Names To Select box, type Internet Users. Click OK to return to the Users And Groups page, as shown in Figure 16-17.
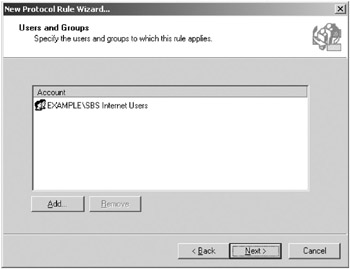
Figure 16-17: The Internet Users group, consisting of all SBS Domain Users permitted to use the Internet. -
Click Next and then click Finish to create the protocol rule.
Configuring Schedules
ISA Server automatically sets up a Work Hours schedule (9–5 Monday through Friday) and a Weekends schedule (all day Saturday and Sunday). You can use these schedules to control when certain protocols or features are enabled by way of protocol rules. If the default schedules don’t really match up with your business, you can modify the existing ones or create new ones. Create new schedules rather than modify the existing ones to make problems easier to troubleshoot later.
Creating a Schedule
To create a new schedule, complete the following steps:
-
In the ISA Management console tree, open Policy Elements and then Schedules, as shown in Figure 16-18.
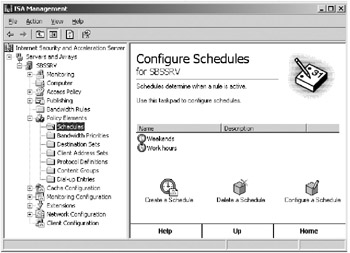
Figure 16-18: Schedules in the ISA Management console. -
Click Create A Schedule in the details pane to open the New Schedule dialog box, shown in Figure 16-19.
-
Type a name for the schedule and a description, and then highlight the hours you want the rule to apply to (shown in blue if you are using the default color scheme). Activate or inactivate times by selecting a region with your mouse and then clicking the Active or Inactive options.
-
Click OK and your new schedule is created.
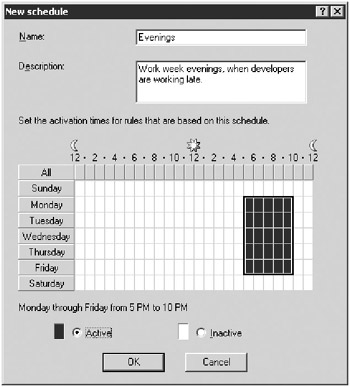
Figure 16-19: Creating a new Evenings schedule to use with protocol rules.
Deleting a Schedule
You can delete a schedule that isn’t being used any longer, but you need to be certain that the schedule isn’t being used by any existing protocol rules. Navigate to the Schedules in ISA Management. Highlight the schedule you want to delete and click Delete A Schedule. You get the Confirm Delete dialog box shown in Figure 16-20. Make sure that the Verify That No Rules Use This Element check box is selected, and then click Yes.
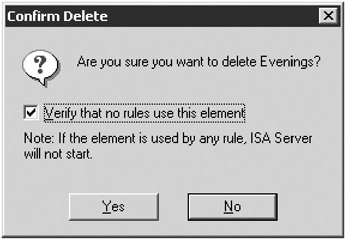
Figure 16-20: Never delete a schedule without checking whether it is being used somewhere.
Changing Cache Properties
Although most cache configuration is performed when you install ISA Server, you can configure additional settings or modify the ones that were created during the initial configuration. Use the following sections to change the size of the cache and which drives are used for caching, and to set up specific Web sites or objects for scheduled downloading into the ISA Server cache.
Changing the Size and Location of the Cache
To change which drives are used to store the ISA Server cache and how much disk space is used on each drive, complete the following steps:
-
In the ISA Management console tree, click Cache Configuration.
-
Select the Windows Small Business Server system in the details pane.
-
Click the Configure Cache Size link to open up the Cache Drives dialog box, which is shown in Figure 16-21.
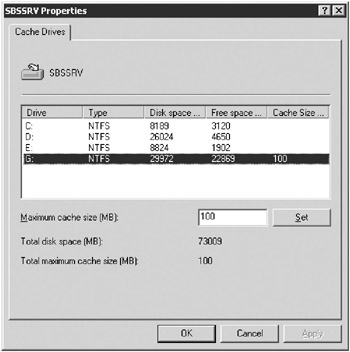
Figure 16-21: Configuring the cache size for SBSSRV server. -
Select a drive from the list, and type the size of cache you want on that drive in the Maximum Cache Size box.
-
Click Set to add the cache. Click OK. You get a warning dialog box, as shown in Figure 16-22.
-
Choose either to save the changes and not restart the service, in which case the settings are not immediately applied; or to restart the Web Proxy service now to immediately enable the new cache settings. Then click OK.
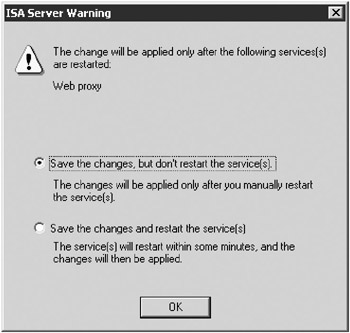
Figure 16-22: Changes in cache size require a restart of the Web Proxy service.
Setting Up Content for Scheduled Downloading
You can set up ISA Server to automatically download individual Web pages or even entire Web sites on a set schedule. This ensures that the desired content is always available and fresh in the ISA Server cache.
Use this feature of ISA Server when you have a particular site or set of sites that many users in the company need access to regularly, such as a reference site or the site of a partner company.
If you have a separate internal Web server, you can also use ISA Server’s scheduled download functionality to accelerate performance of the internal Web server for external (Internet) clients. Set up the ISA server to automatically download the Web site from the internal Web server, and then when Internet clients request pages from the Web site, the clients are served directly from the ISA server.
To schedule ISA Server to download content automatically, complete the following steps:
-
In the ISA Management console tree, open Cache Configuration and then Scheduled Content Download Jobs.
-
On the Action menu, choose New, Job to start the New Scheduled Content Download Job Wizard.
-
Type a descriptive name for the download job and then click Next.
-
On the Start Time page, specify the date and time the download job should begin, and then click Next.
-
On the Frequency page, specify how often ISA Server should download content from the Web site, and then click Next.
-
On the Content page, type the URL of the content to download. Select the Content Only From URL Domain check box if you want to prevent download of material from other sites that this site links to.
-
Select the Cache Dynamic Content check box if you want dynamic content cached. Click Next.
Note If the dynamic content requires user authentication or identification (including the use of cookies), it won’t cache properly.
-
On the Links And Downloaded Objects page, specify how ISA Server should deal with the Time to Live (TTL) of objects it downloads. The choices are:
-
Always Override Object’s TTL Gives all downloaded objects the TTL you specify in the box provided (default is 60 minutes)
-
Override TTL If Not Defined Writes the TTL you specify on downloaded objects only if they don’t have a specified TTL
Note Web page authors can specify a Time to Live (TTL) for Web pages to indicate how long the content is “fresh” (in other words, how long the page should hang around before getting checked for a new copy). When the TTL expires, ISA Server considers the page invalid and automatically checks for an updated copy if active caching is enabled and the page is popular. If active caching isn’t enabled, ISA Server updates the page the next time the page is requested.
-
-
Choose to set a maximum depth to cache or to set no limits on cache depth, which is the default. ISA Server follows all links on the page you specified and continues following all links on each linked page up to the maximum link depth.
-
Optionally change the maximum number of objects ISA Server caches during the scheduled download operation, and then click Next. Click Finish to enable the caching job.
Backing Up the ISA Server Configuration
You should always run a full Windows Small Business Server backup as soon as practical after any major change, such as installing ISA Server. Follow the instructions in Chapter 13, “Backing Up and Restoring Data,” for performing an immediate backup once you have your ISA Server installed and working correctly.
You can also back up just the ISA Server configuration using the ISA Server backup tool. This will store a complete copy of your current configuration on disk to allow for a quick restore in case of problems. To back up the ISA Server configuration, complete the following steps:
-
In the ISA Management console tree, right-click your ISA Server and select Back Up from the shortcut menu to open the Backup Array dialog box, shown in Figure 16-23.
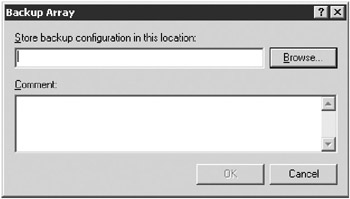
Figure 16-23: Backing up the ISA Server configuration to disk. -
Type a file name and location for the backup, and then type a description. Click OK to begin the backup of the configuration.
-
When the backup completes, you get an informational message that tells you the backup succeeded. Click OK and return to the ISA Management console.
| Tip | Always back up the ISA Server configuration before making any changes. If your configuration changes cause problems, you can quickly return to a known good working configuration by restoring the backup you made before you started. |
|
| < Day Day Up > |
|
EAN: 2147483647
Pages: 224