Using the TreeView Control
Using the TreeView ControlThe TreeView control allows you to present data in a hierarchical view. The TreeView control is similar to the traditional tree data structure in that it is made up of a collection of nested node objects. The TreeView control exposes the Nodes property that is a collection TreeNode objects. These are the root nodes of the tree. Each TreeNode object exposes a Nodes property, as well. As you can see, the TreeView control will be composed of several levels of nested TreeNode objects. Understanding TreeView PropertiesThe TreeView control allows quite a bit of control over how it is rendered. Table 3.8 contains a list of TreeView control properties that determine how the TreeView control will be rendered. A brief description that describes how the property affects the control is also provided. Table 3.8. TreeView Control Properties and Descriptions
TreeNode objects also expose properties that affect how the TreeNode will be rendered in the TreeView . Table 3.9 lists these properties and their descriptions. Table 3.9. TreeNode Properties
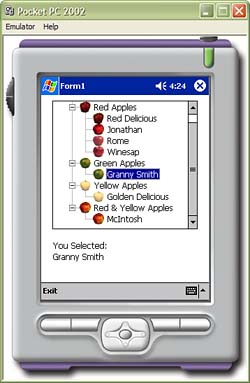
Adding TreeNodes to a TreeView ControlAdding a TreeNode to the TreeView control can be done at both runtime and design time. Adding a TreeNode at runtime is done through the Form Designer. First, drag a TreeView control onto the application form. Next, select the TreeView control. If you have configured an ImageList control, set the ImageList and/or SelectedImageList properties in the Properties window. Now click the ellipsis next to Nodes property name in the Properties window. This displays the TreeNode Editor (see Figure 3.28). Figure 3.28. The TreeNode Editor. The Add Root button in the TreeNode Editor can be used to add a TreeNode to the root of the TreeView control. The Add Child button will add a TreeNode to the currently selected node. The Delete button will remove the currently selected node. Changing the text in the Label textbox sets the TreeNode.Text property. If you have set the ImageList and/or SelectedImageList of the TreeView control and you want to override the default image of the TreeNode object, select the appropriate image in the Image and/or Selected Image drop-down controls. TreeNode objects can also be added at runtime. The following code demonstrates how to add a TreeNode object through code: C# TreeNode treeNode1 = new TreeNode(); TreeNode treeNode2 = new TreeNode(); treeNode1.Text = "Red Apples"; treeNode2.Text = "Red Delicious"; treeNode1.Nodes.Add(treeNode2); treeView1.Nodes.Add(treeNode1); VB Dim treeNode1 = new TreeNode() Dim treeNode2 = new TreeNode() treeNode1.Text = "Red Apples" treeNode2.Text = "Red Delicious" treeNode1.Nodes.Add(treeNode2) treeView1.Nodes.Add(treeNode1) Figure 3.29 shows an application with a TreeView control running on the Pocket PC 2002 emulator. The code for this application can be found in the code listing for this book. Figure 3.29. The TreeView control sample application. Determining the Selected TreeNodeThe TreeView control exposes the SelectedNode property. This property is a reference of the currently selected node in the control. The .NET Compact Framework's TreeView control allows only one control to be selected at once. An AfterSelect event is fired after a TreeNode is selected. The AfterSelect event handler receives a TreeViewEventArgs object, which carries information about the action. The TreeViewEventArgs exposes the Node property. The Node property is a reference to the node that has been checked, expanded, collapsed , or selected. The TreeViewEventArgs also exposes the Action property. This property describes the type of action that raised the event. The Action property is a member of the TreeViewAction enumeration. Table 3.10 describes the members of the TreeViewAction enumeration. Table 3.10. TreeViewAction Enumeration Members
The following code demonstrates how to handle the AfterSelect event: C# private void treeView1_AfterSelect(object sender, System.Windows.Forms.TreeViewEventArgs e) { TreeNode selNode = e.Node; label2.Text = selNode.Text; } VB Private Sub _ treeView1_AfterSelect(sender As object, e As System.Windows.Forms.TreeViewEventArgs) Handles treeView1.AfterSelect Dim selNode As TreeNode selNode = e.Node label2.Text = selNode.Text } |
EAN: 2147483647
Pages: 206