| Now let's build a more complex presentation. We'll start with the basic functionality of the slideshow example and build from there. The first thing we will add is a Back button to match the Next button. We'll also place these buttons only on frames where they apply. So there will be no Next button on the last slide and no Back button on the first slide. The major advancement for this movie will be the addition of a main menu screen. This will be the new first frame of the movie, and it will have buttons that link to every other frame of the movie. This means that the user can start anywhere in the movie that he wants. If he wants to jump right to the third slide, then he can. Figure 5.5 shows the main menu screen. There is a movie title and a screen title. Under that are four simple buttons with the names of the frames that they link to on the right of each button. Figure 5.5. The main menu screen has links to all the slides in the presentation. 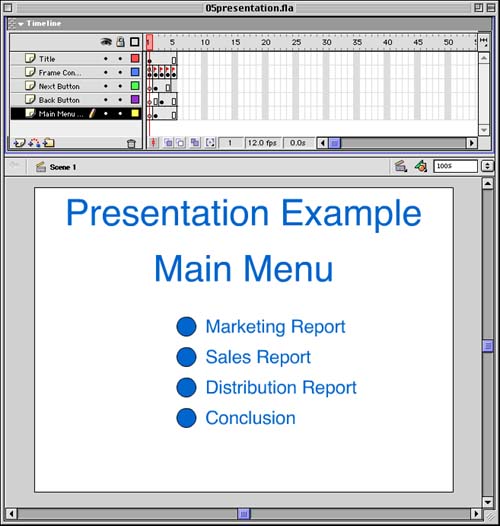 In Figure 5.5, you can also see the main timeline. I have done a lot more to separate out the elements onto layers and to label the layers . You can see that the Next button is present on only the first three out of four slides, and the Back button is present only on the last three out of four slides. You can also see that the main menu screen precedes these slides. The little flags in the Frame Contents layer of the timeline show that I have labeled the four slide frames. This means that we can refer to each slide by a name rather than a frame number. Now, let's build this movie. You can refer to the example movie on the CD-ROM named 05presentation.fla if you want. -
Create a new movie, or start with the movie from the slideshow in the previous task. -
The title of the movie is on a layer by itself. It is just a piece of text at the top, in this case "Presentation Example." -
The elements of the main menu are all in the Frame Contents layer, in a key frame that stretches across only the first frame of the movie. It includes a piece of text reading "Main Menu" and four buttons. The four buttons are actually one button in the library. I just dragged the button onto the work area four times. The buttons are just simple circles. Next to each button is a piece of text with the name of the slide that the button links to. -
The script on each button uses the gotoAndStop command. Here is the script in the first button: on (release) { gotoAndPlay("marketing"); } As you might guess, the first slide, which will be in the second frame of the movie, is labeled Marketing. I could have used gotoAndPlay(2); and avoided using labels at all, but labels make the code much easier to work with. For instance, suppose that we wanted to add more frames at the start of the movie. Then slide 1, the marketing slide, would no longer be located in Frame 2 of the movie. This means that you would have to go back and change this script. However, by using a name rather than a number, you can shift things around in your movie without having to update your scripts. The other three buttons use the same script but with different markers. They are Sales, Distribution, and Conclusion to match the names of the rest of the frames. -
Create the other four key frames in the Frame Contents layer. Instead of using the simple "Frame X" titles as in the slideshow example, I used real-world titles: Marketing, Sales, Distribution, and Conclusion. This makes the example seem a little like a corporate presentation or Web site. Figure 5.6 shows the second slide, which is the Sales slide. You can see the name of the slide, a shape to give the slide some content, and some buttons at the bottom. Pretend that the shape is actually some complex and boring graphic showing the rise in sales of a fantastically successful Internet company. Figure 5.6. The Sales slide includes a title, some content, and a row of buttons at the bottom. 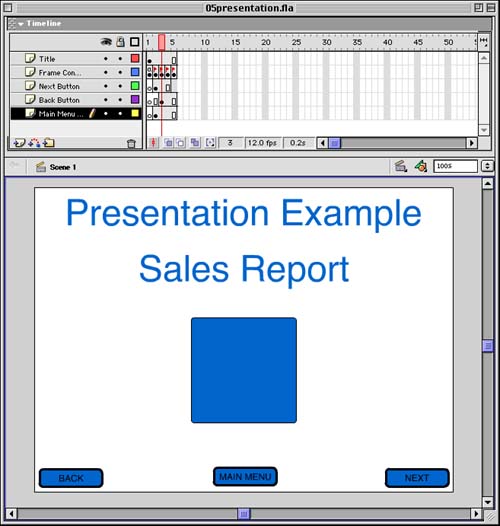 -
The buttons at the bottom of the slide in Figure 5.6 are actually placed on several frames. Each button has its own layer in the timeline. The Next button stretches across all but the last slide. The Back button stretches across all but the first slide. The Main Menu button stretches across all the slides. None of these buttons stretches back to the first frame of the movie, which is the main menu. Create these three buttons and place them in their own layers stretched across the appropriate frames. -
The script for the Next button is identical to the script used in the previous example: on (release) { nextFrame(); } -
The script for the Back button is similar. It just uses the prevFrame command instead: on (release) { prevFrame(); } -
The script for the Main Menu button is a simple one as well. It uses gotoAndStop to take the user back to the first frame: on (release) { gotoAndStop("main menu"); } Make sure that you also label the first frame as "main menu" . -
The only script remaining is the one that needs to be placed on the first frame to prevent the movie from animating through all five frames when it starts: stop(); This completes the presentation movie. Test the movie to make sure that it works. Look over all the scripts again to make sure that you understand what each one is doing. A movie like this can be used for many things. For one, it can be the entire contents of a Web site. The main menu can link to frames that explain a company's mission, services, and contacts. Or, it could be a personal home page with frames about the owner's history, interests, and other bits of information. The important thing to realize is that Flash is no longer just an animation tool to you. You now control the movement of the Flash movie and can make it do other things besides a plain linear animation.  |