Title Properties Panel
| Although you can change an object's style simply by clicking on a different swatch in the Styles panel, the Properties panel provides more details about and adjustments for the chosen style. Five twirl down menus give you access to the necessary parameters: Transform, Properties, Fill, Strokes, and Shadow. Having covered the Transform function in the last section, let's now discuss the remaining parameters. PropertiesSelect your object, then twirl down the Properties panel's Properties menu (Figure 10.13). The resulting Graphic Type drop-down menu lists the current object type and enables you to switch to a new type of object with the same dimensions as the original. Twirl down the Distort menu and adjust the X and Y values to add some x- and y-axis bending or distortion to your object. If you have text selected, an expanded drop-down menu appears revealing additional text-specific adjustment fields. Figure 10.13. The Object Style reveals the style details associated with the selected ellipse. Notice that the X axis distortion has altered the shape of the circle and that the active Fill is using a linear gradient with the color split at a 125-degree angle. The embossed Color Picker for the blue portion of the gradient means that you can adjust and assign that color using the Color Stop Color controls below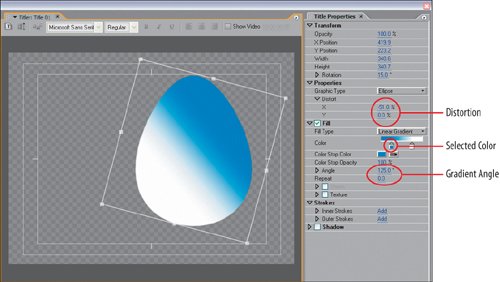 FillThe Fill twirl down houses controls for adjusting the object's fill type, color, and more. For a transparent object, make sure the Fill check box is empty. Click the Fill check box on to access its controls. For example, the Fill Type drop-down menu enables you to specify the kind of fill you want: one solid color, two colors in a linear or radial gradient, four colors in a gradient, a bevel, Eliminate, which makes both an object's fill and shadow transparent, or Ghost, which removes the fill but keeps the shadow. You can specify the fill color in two ways: Click in the color box to access the Color Picker, or click and drag the eye-dropper over any color in your desktop window, then click again to set that color. If you are assigning colors to a gradient, each color in the gradient has a box associated with it and an arrow pointing to where the color exists at its full value. To assign a color, click the box for the color that you want to change. The selected box becomes embossed and any adjustment you make using the eyedropper or Color Picker will update the selected gradient color. Clicking and dragging the boxes, you can increase or decrease the distance and positioning of the two colors. Whether you are assigning one, two, or four fill colors, each fill color has an Opacity parameter that you can adjust. If you want one color of your two-color gradient to be a little bit transparent, select that color (by clicking the box), then adjust its Opacity value. SheenYour fill can also have a sheen, which emulates a highlight on a shiny surface, like a chrome effect. To add a sheen to your object, click the Sheen check box and twirl down its parameters (Figure 10.14). A sheen's Color and Opacity settings work the same as those for a basic fill, and the rest of the sheen parameters are pretty self-explanatory. If you want a thin diagonal white stripe, for example, set Color to white, Size to 10, and Angle to 135. If you do not want the stripe centered, adjust Offset to shift it up or down. Chapter 12, "Advanced Titling: Styles and Templates" uses a sheen to help accentuate the shiny look of a lower third title. Figure 10.14. With the Sheen check box on in the Object Style panel, you can adjust the color, opacity, size, angle, and offset of this dark blue sheen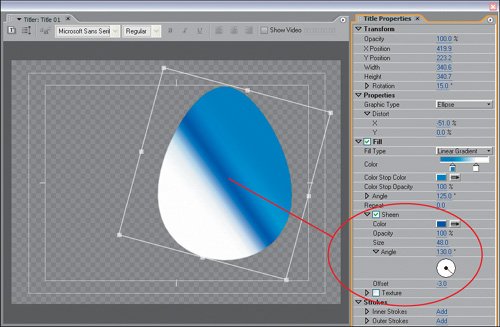 TextureClick the Texture check box on and twirl down its parameters to specify an external graphic to fill your text or object. Click inside the Texture box, and choose an image to load. Premiere automatically inserts it inside your object's fill area. Using the Flip with Object and Rotate with Object check boxes, you can lock the orientation of the fill image (texture) to that of the object, so that if the object is flipped or rotated, then the texture flips or rotates accordingly. The Scaling twirl down menu enables you to scale the size of the texture inside the object, while the Alignment twirl down lets you change the alignment of the texture image, moving it left or right, up or down inside the fill. Twirl down Blending to blend the texture with the fill color and more. StrokesStrokes are basically outlines (see Figure 10.15). They are not called outlines, because there are two types of strokes: inner strokes and outer strokes. An inner stroke is a line inside the defined edge of your object. When you increase the size of an inner stroke, it grows inward, closer to the center of your object. An outer stroke uses the edge of the object as its starting boundary and grows outward when you increase its size. Figure 10.15. This object has both an inner stroke (white) and outer stroke (black). In addition to adjusting the stroke's default values, you can add a sheen or texture to the fill of the stroke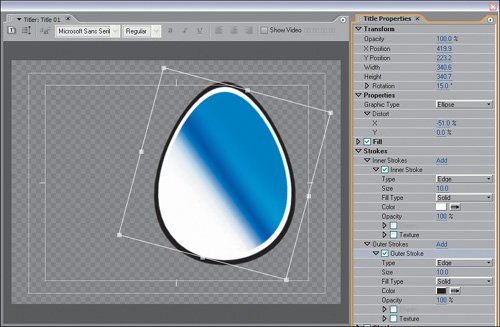 To add and adjust an inner or outer stroke, twirl down the Strokes menu and click Add for the stroke you wish to create. You can create several inner and outer strokes, so get used to twirling down quite a bit to reveal the properties of each stroke. Strokes can be one of three types:
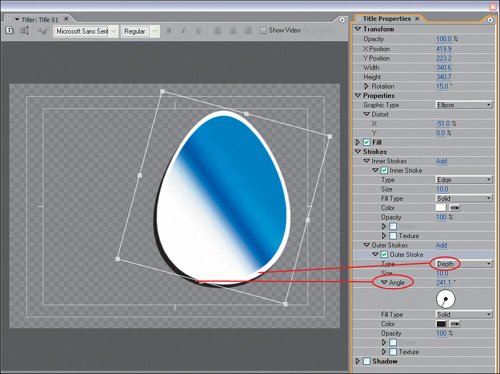
Each stroke type has its own adjustments. For Edge strokes, you can set the line's size. For Depth strokes, you can adjust the angle and size. For Drop Face strokes, you can adjust the angle and magnitude of the stroke. The magnitude is the amount of shifting applied to the drop face of the object. The controls for specifying fill type, choosing a color, setting opacity, and adding a sheen or texture mirror those for the Fill parameters. ShadowThe final property attribute is Shadow (see Figure 10.17). Click the check box and twirl down to access the Shadow parameters: Color, Opacity, Angle, Distance, Size, and Spread. Color and Opacity operate as they do for Fill and Strokes. Angle dictates the angle from which the shadow falls. Distance measures the space between the object and the shadowhow close or how far away the shadow is from the object. Size adjusts the shadow's overall size in accordance with the object: A value of 0.0 creates a shadow of equal size to the object, negative values create smaller shadows, and positive values result in larger shadows. Spread dithers or softens the edge of the shadow's color. Increasing the Spread value softens the shadows edges and gives the illusion of them disappearing into the other color, as opposed to dropping off. Figure 10.17. This shadow is a bit larger than its object (Size set to 10) and has a soft end edge (Spread set to 59). Its opacity is also reduced to make it more transparent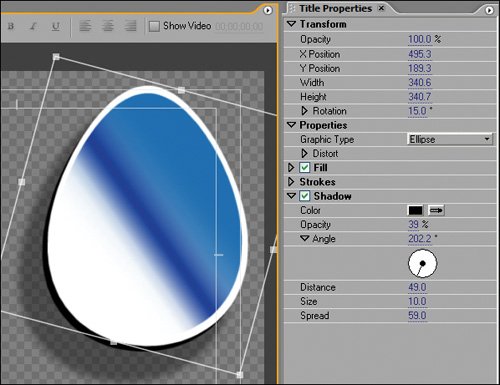 |
EAN: 2147483647
Pages: 200