Effect Controls Panel
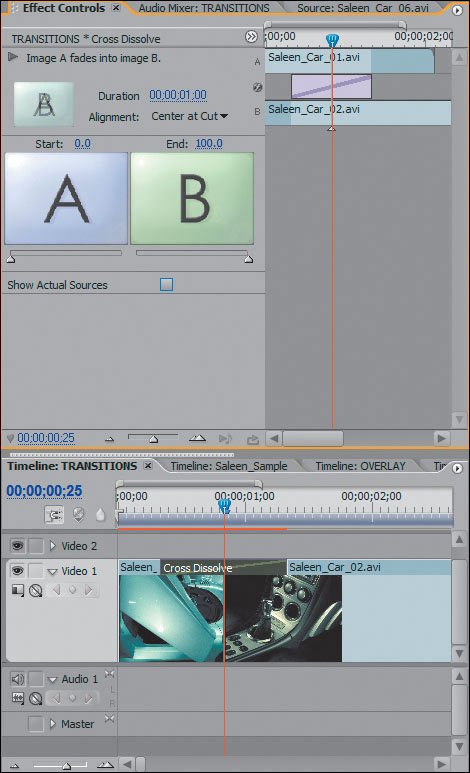
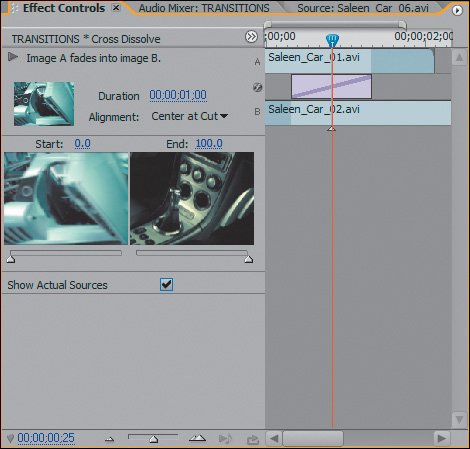
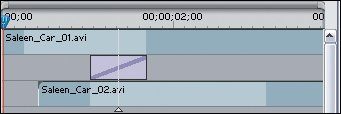
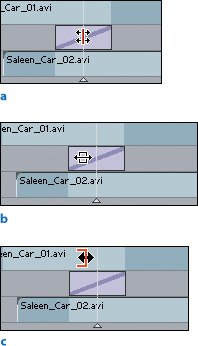
| You can adjust and assign all your effect and transition parameters in the Effect Controls panel (Figure 7.15). Double-click on a transition icon in the Timeline panel, and the selected transition opens in the Effect Controls panel for adjustments. You can also reach the Effect Controls panel by choosing Windows > Effect Controls or by clicking the Effect Controls tab in one of your workspace frames. Figure 7.15. With a transition selected in the timeline, the Effect Controls panel reveals transition settings, parameters, and an AB roll track preview. The outgoing clip in the transition, Saleen_Car_01, appears on track A, and the incoming clip, Saleen_Car_02, appears on track B. The transition is the center track area The Effect Controls panel is defined by two distinct areas: The left area is the Settings area and right area is the Navigation and Keyframe (for effects) area. The Settings area (see Figure 7.16) displays the name of the sequence you are working in and the type of transition that is open. A description of the transition appears below with a Preview Play button. Click it to loop a thumbnail playback of the applied transition. By default, the Thumbnail Preview window shows only icons to preview the transition. To see what the video in the timeline looks like, you must click on the Show Actual Sources check box. The Duration hot text box enables you to dynamically scrub the value to either increase or decrease the duration of the transition. In the Alignment field, you choose a method of alignment from the drop-down list: Start at Cut, End at Cut, or Center at Cut. All three respect the original cut point that was assigned to your clips. The large Start and End preview windows allow you to customize the percentage value for which your transition will start from and end at, as well as reveal the flow of the transition, the A roll (start) to B roll (end) flow. Figure 7.16. When you select a transition, the Settings area of the Effect Controls panel displays the sequence and transition names, a short description of the transition, previews, settings for Duration and Alignment, as well as the option to show the actual source frames In the Navigation area to the right (Figure 7.17), you get to see a display of your transition and the material it covers in an AB editing mode. The clip on the top is A (note the icon), B is the bottom track, and the transition is in the middle. The bright colored portion of the clips signifies parts of the clips that are used and visible when playing back in the Timeline panel. Additional unused material, if any, is displayed as darkened material either after the transition on track A or before the transition on track B. Being able to see if there is additional material gives you the option of knowing which adjustments you can make to the transition. Figure 7.17. The entire Saleen_Car_01 clip is on the A track in the Navigation and Keyframe area of the Effect Controls panel. Only the light blue portion of the clip, however, will be visible in the sequence. The dark blue areas reflect additional clip material that is beyond the timeline frame boundaries of the used instance. With this view you can easily determine whether you have extra material to draw from when extending or contracting your clip material The viewing area bar allows you to zoom in and out and navigate to different sections of your material. You can scrub the CTI from either the timeline or the Navigation area of the Effect Controls panel. To make adjustments to your transition and clip material, click, drag, and move the transition or clip edges using the various editing tools that reveal themselves depending on where you hold your mouse (Figures 7.18a, b, and c). Figures 7.18a, b, and c. Hold your mouse over the exact cut point of the two clips to get the Rolling Edit tool (a), which enables you to roll the edit point between the two clips while also sliding the entire transition. Hold your mouse over the transition to get the Slide tool (b), which allows you to preserve the cut point of the clips, but slide the transition in its exact duration to a different timeline position. Hold over either clip near the cut point to get the Ripple Edit tool (c), with which you can ripple edit the clip material, preserving the transition and the adjacent relationship of the clips Adjusting Your Transitions in the Effect Controls PanelThe white line in the middle of the tracks (Figure 7.19) signifies the original physical cut point between the two clips. If you toggle between Start at Cut, End at Cut, and Center at Cut, notice how the alignment of the transition is displayed in accordance with the cut point. To change your cut point, you can roll the white Edit Line back and forth. To properly change the cut point, hold the mouse over the Edit Line so that the cursor appears as the Rolling Edit tool. The Edit Line will update in the Timeline panel and a two-up display in the Program Monitor will reveal your updating cut point frames. When you roll the Edit Line, it's also nice to see that the duration and alignment of the transition is preserved. While you roll your edit, the two-up display in the Program Monitor reveals the last frame of your A roll on the left and the first frame of your B roll on the right. Figure 7.19. When you roll the edit point in the Transition view mode of the Effect Controls panel, the Program Monitor provides a two-up display of the new cut point, showing the outgoing frame on the left and incoming frame on the right. The frame count number in the bottom left corner of the Program Monitor tells you how many frames you have moved the edit. In the image, the CTI occupies the original position of the edit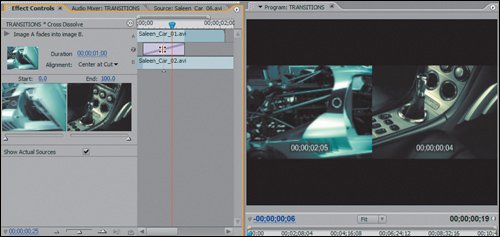 To update the position of the transition but preserve the original cut point, hold the mouse over the boundary of the transition so that the Slide tool icon appears. Now, slide the transition back and forth to move its entire position and preserve its duration. The two-up display shows the same last frame of A and first frame of B (Figure 7.20). Figure 7.20. When you slide the transition itself, you get another two-up display that shows the first frame from the outgoing shot to be included in the transition on the left and the last frame of the incoming shot to be included on the right. The timecode feedback at the bottom of the Program Monitor shows the exact frame position of the sliding transition's In and Out points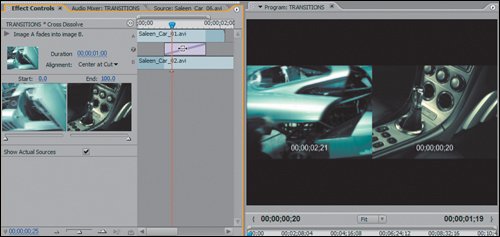 To extend either edge of the transition to make it longer or shorter, you need to hold the mouse over the edge of the transition so that you get the Edge Trim tool. Now, click and drag left or right to increase or reduce the duration of the transition. Dragging the right edge moves the incoming point from the B roll, so the right side of the two-up in the Program Monitor updates as you trim. Dragging the left edge updates the last frame of the A roll, so the left side of the Program Monitor's two-up updates. To make ripple edits to clips under a transition, hold the mouse a tiny bit further inside the edge of the clip on A or B. Once you see the thick Ripple Edit tool (Figures 7.21a and b), any adjustment will ripple that clip's In or Out point, thus shifting all tracks in the timeline left or right appropriately. The two-up display will reveal the edge frame that is being adjusted, A on the left and B on the right. Figures 7.21a and b. By dragging the outgoing shot to the right, I reduced its overall duration by 10 frames (as shown in the feedback of 7.21a's Program Monitor). In 7.21b, I added 11 frames of material by sliding the B clip to the right. Notice how you can snap the head of the source material to the cut point, and Premiere indicates that there is no additional material to the left of the clip's head (see the dog ear)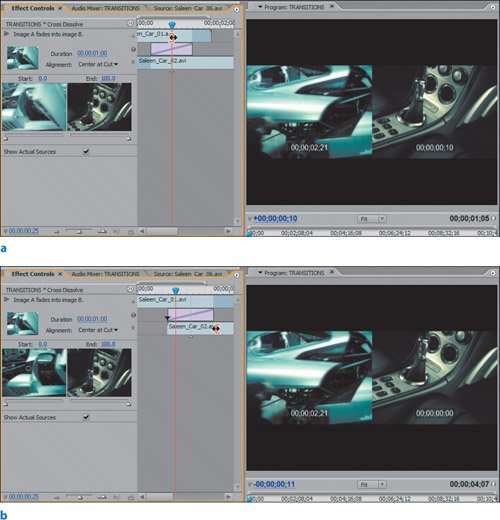 The power of all these tools and the strength of Premiere Pro's new transition architecture is that although a transition may cover an edit point, you can still make editing adjustments to that point. |
EAN: 2147483647
Pages: 200