The Source Monitor
| In older versions of Premiere, the Source Monitor was called the Clip window and it was not attached to the Program Monitor. The windows were recombined in Premiere Pro 1.0, but Premiere Pro 2.0 finally breaks that attachment. You can still think of the Source Monitor as a clip window, because it is the only window where you can open and play individual clips. You use the Source Monitor to open and review media that you wish to edit and incorporate into your sequences (Figures 4.2). Figure 4.2. The Source Monitor features a drop-down menu and wing menu (right corner), as well as timecode fields, a time navigation area, transport controls, and editing group boxes What You Can OpenIn the Source Monitor you will be able to open and view
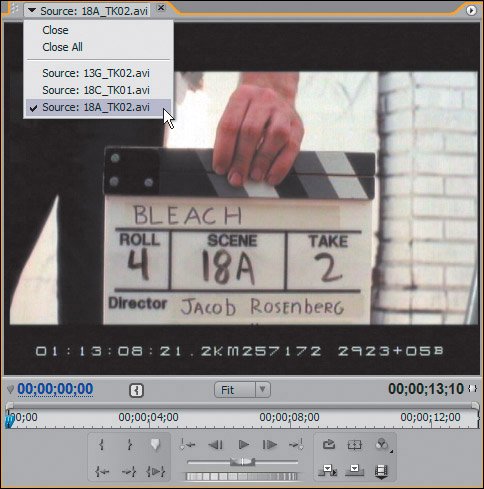
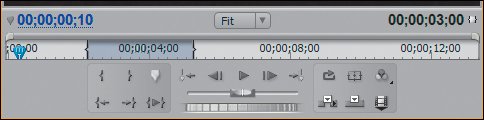
When you drag media from the Project panel into the Source Monitor, you open the media for viewing and playback (even offline files). If you double-click on media in your Project panel, it will load it into the Source Monitor. However, not all media opens for viewing when double-clicked on. With sequences, a standard double-click opens the sequence in the Timeline panel, and a Ctrl+double-click opens the sequence in the Source Monitor. With offline files, a double-click opens an offline file's properties; dragging it into the Source Monitor opens it as a clip to scrub in. Monitor LayoutAs shown in Figure 4.2, the Source Monitor has a few distinct regions that display information and give you access to transport controls and features. Although the Source Monitor has a tab area, media does not open as separate tabs. Media opens and is listed within the Source Monitor tab. To the right of the tab area is the wing menu (Figures 4.3), which has physical links to some of the button options at the bottom of the window. These physical links can be assigned to unique keyboard shortcuts using the Keyboard Customization function. Figure 4.3. Like all panels, the Source Monitor has a wing menu that allows direct access to features that can be routed to customized keyboard shortcuts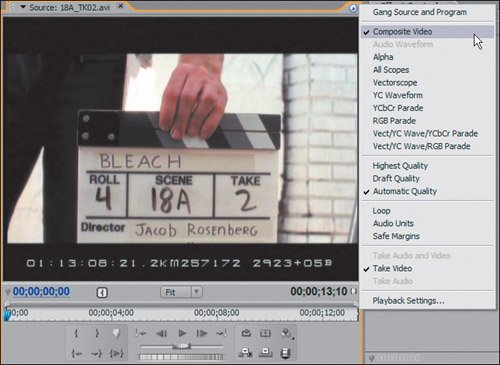 The center of the Source Monitor is the viewing area, where media plays back. You can load multiple items into the Source Monitor by dragging multiple selections or folders into its viewing area. Dragging a folder full of items loads all of the items into the Source Monitor. To open an individual item once it is loaded, select it from the drop-drown menu. You can close the open media from the window by selecting Close from the drop-down menu. You can also close all the listed items by selecting Close All. Below the viewing area, you have the timecode display, time ruler, viewing area bar, and the transport controls arranged in three separate groups, similar to the Capture window. Timecode and the Time Navigation ControlsWhen you open media in the Source Monitor, the lower left text area reveals the timecode value of the current frame that is being played or scrubbed on in the monitor. The timecode value to the right is the total duration of the media in the window. Once you start modifying the In and Out points, the duration updates dynamically. Notes To watch a tutorial that discusses how Premiere Pro 2.0 handles clip timecodes, open the Timecode_Review.wmv file, located in the Video Tutorials folder on the book's DVD. When the file loads in Windows Media Player, press Alt+Enter to play it back at full-screen size. If you find that the correct timecode does not display when you open a clip, there are two new preferences that you should check (Figures 4.4). To ensure you are viewing your source clip's captured timecode, confirm that both the Edit > Preferences > Media > Display Media Timecode in Source Frame Rate and In/Out Points Show Media Offset check boxes are selected. Figure 4.4. Using 2.0's new preferences, you can specify what timecode displays when a clip opens. If you turn on the first check box, when you add a non-drop frame clip to a drop frame project, the clip's timecode displays as non-drop frame instead of the project's drop frame. Checking the second box means that when you open a clip it does not show its In/Out counter value from 00;00;00;00 to the end of the clip; instead it displays the physical timecode that was captured with the clip, such as 01:01:00:00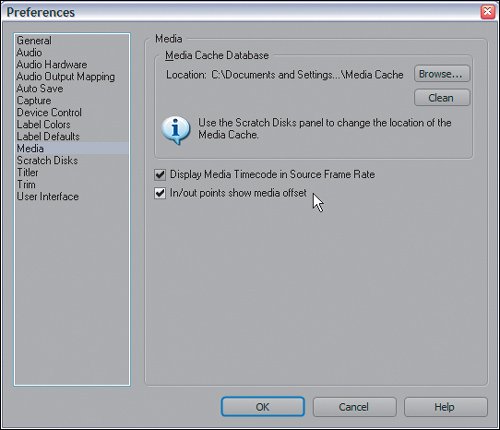 The time ruler is basically a visual counter for your open media that can be scrubbed in and zoomed into and out from (Figures 4.5). Time is delineated by tick marks that represent the Timebase specified in your Project Settings. Any markers, In points, and Out points assigned in your clip also are visually represented in the time ruler. Above the time ruler is the viewing area bar, which you stretch and drag to zoom into and navigate through portions of your open media. In the time ruler, the blue playback head that you click and drag around to scrub through your media is called the Current Time Indicator (CTI). The CTI also exists in the timeline where it is referred to as the CTI or Edit Line. Figure 4.5. The blue timecode value reflects the current position of the CTI. The black timecode value reflects the duration of the In/Out instance visible in the time ruler. You can resize the gray viewing area bar to zoom in and out of the time ruler Scrubbing through a one-hour clip frame by frame would be difficult, for example, if you did not have the capability to zoom into a specific area of the time ruler. By being able to zoom in (dragging inward from the edges of bar), you can get down to whatever magnification you want. Once you are zoomed in, you can click and drag from the center of the bar to reveal different areas of the open clip. The viewing area bar does have an intelligent zoom: If the CTI is within view, the viewing area bar will zoom in and out around the CTI position. Buttons and Transport ControlsBelow the time ruler are your transport controls and various buttons associated with marking and navigating to In and Out points in the source media. These buttons and controls are broken up into three separate group boxes (Figures 4.6). The left group assigns and navigates to In and Out points for your open media. The center group holds the transport controls for playing back your media. The right group contains buttons specific to the editing tasks of the Source Monitor window. Figure 4.6. The Transport area of the Source Monitor contains three group boxes of controls. The left group manages In and Out points, the center group handles playing back your media, and the right group houses editing-related buttons Tip If you hold down the Alt key, Play In to Out becomes the Play Edit button. Although some buttons do not have keyboard shortcuts assigned to them, you can search the Edit > Keyboard Customization > Windows > Monitor and Trim Windows to see which keyboard shortcuts are available to be assigned. Holding the Shift key when clicking Step Back steps back five frames at a time. Likewise, holding the Shift key when pressing Step Forward steps forward in five-frame increments. In the left group are six buttons (and one hidden one):
The center group houses your primary transport controls, which are (from the left):
On the right, the third group has specific functions unique to the Source Monitor:
The quality settings are Highest, Draft, and Automatic. Highest displays the media in the Source Monitor at its full resolution. Draft displays media at quarter resolution. Automatic plays your media at full resolution when it does not detect instances with filtering or effects (which require rendering). If Automatic mode detects an instance that needs to be rendered, it switches to quarter resolution for that instance, then back to full resolution when finished with the instance. The changes in sizes will affect playback performance. If you have a sequence with a lot of effects open in your Source Monitor, you may not experience excellent real-time playback if you are set to Highest quality, because it will try to render the sequence in real-time at high quality, which requires a lot processing. Leave your Source Monitor in Automatic mode, instead.
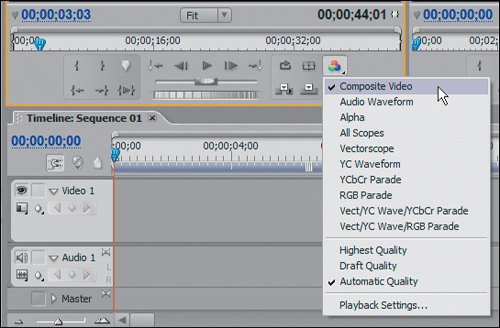
The Source Monitor group boxes contain all the tools necessary for navigating and defining which portions and attributes of the open media will be added to your sequence. Once media is added to your sequence, you can continue to use the Source Monitor to edit material from the active sequence. Editing FunctionsIn the Source Monitor, you can perform edits using the Insert and Overlay buttons, or you can drag and drop from the Source Monitor into the Timeline window. The usual workflow is to open the media in the Source Monitor, to determine the In/Out instance of the media, then to add it into the Timeline window (Figures 4.10). Figure 4.10. You can designate a subclip instance within the source material by assigning In and Out points (notice the dark gray region in the time ruler). You then can drag that subclip from the Source Monitor and drop it in the timeline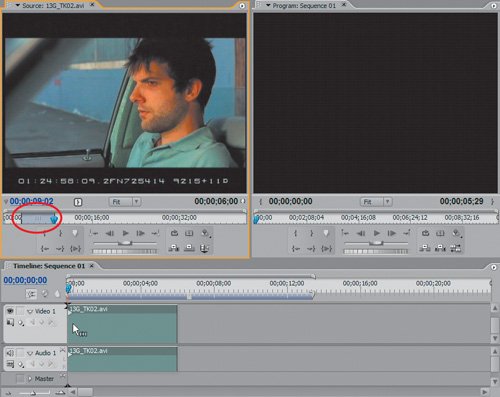 Additionally, a clip instance edited into the Timeline window can be opened in the Source Monitor by double-clicking on the clip in the timeline (Figures 4.11). The clip opens as a subclip in the Source Monitor window, and any adjustments to its In point or Out point automatically update the clip instance in the timeline. Figure 4.11. Double-clicking on the subclip instance from the timeline does not open the master clip from which the In/Out was assigned. Instead, it opens the subclip as its own clip instance in the Source Monitor. Any modifications made to this subclip's In or Out points in the Source Monitor immediately affects the clip instance in the timeline. Notice that the clip name in the top of the Source Monitor reflects that of the timeline instance (Sequence Name: Clip Name and timecode) that was opened as opposed to the master clip from which it originated (Clip Name only as seen in Figure 4.10)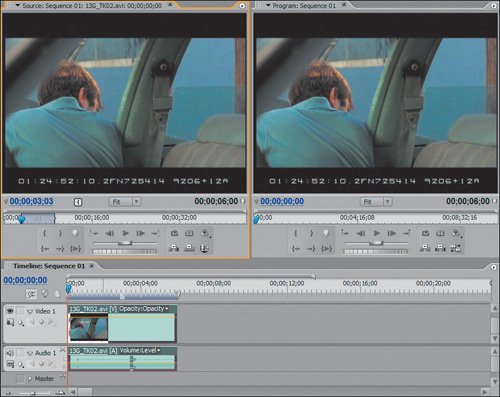 Although the technical name for a clip instance dropped down into the timeline is a subclip, there is also a powerful Subclip feature that is new for 2.0. Creating a SubclipNew to Premiere Pro 2.0 is the ability to create individual subclips for your Project panel. Dragging and dropping clips into your sequences might be fine for most work, but if you work with long or diverse content-oriented clips then you might want to break the master clips up into smaller more defined subclips with individual names. If you want to create a unique subclip instance that references only a small portion of a master clip, you first open the master clip from the Project panel in the Source Monitor and define an In/Out instance. Now, instead of dragging the clip into the timeline, drag the clip directly into the Project panel (Figures 4.12). After you drop the clip into the Project panel, Premiere prompts you to rename it. Do so, and a new subclip instance appears (specific icon and all) in the Project panel, ready for use in any of your sequences. Figure 4.12. With the same In/Out instance from the master clip in Figure 4.10, notice how the cursor updates when you drag the source clip into the Project panel. Once the subclip is named, when it is opened in the Source Monitor notice that the entire range of the clip is defined by the In and Out points previously assigned when creating the subclip. Note that the duration of the clip in both the Project panel and Source Monitor is 6;00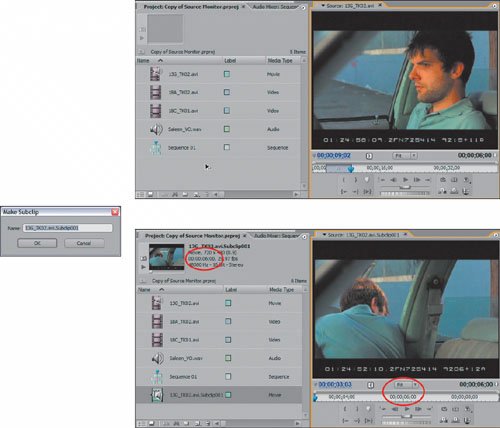 Notes For a quick review of creating and working with subclips in Premiere Pro 2.0, open the Subclip_Review.wmv tutorial, located in the Video Tutorials folder on the book's DVD. When the file loads in Windows Media Player, press Alt+Enter to play it back at full-screen size. With Project panel subclips, as long as the source media for the master clip is not deleted from your disk, you can view the media for subclip. This means you can remove the master clips from your project, to reduce clutter, and continue editing only with the custom-created subclips. Wing Menu OptionsThe Source Monitor's wing menu is where you can choose features or viewing modes specific to the window. Most of the choices are self-explanatory, but two important functions aren't that obvious:
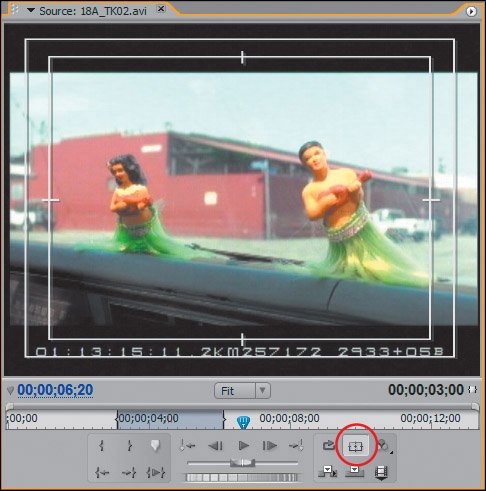
MagnificationFinally, you can magnify the viewable area of your open media, by choosing the Source Monitor's drop-down Magnification menu, between the timecode displays. Clicking it reveals a list of zoom states. The default choice, Fit, considers the current size of the window and then resizes the media so that the entire frame fits inside the window. You will notice that if you set your magnification to Fit, any resizing of the window results in dynamic automatic resizing of the media. If you choose 25% from the Magnification menu, the media takes up a quarter of its normal full-sized space. If your Source Monitor window is larger than the 25% size, there will be gray space surrounding the edge of the media. If you select a size that is greater than the size of the Source Monitor window, the edges of the clip exceed the edges of the Source Monitor window (Figures 4.14a and b). Figures 4.14a and b. Two zoom states for the Source Monitor: Fit (a) always fits the image as large as possible into the current window size. If you are zoomed in close (b), you can use the Hand tool to drag the frame inside the view area to look at a different region of the image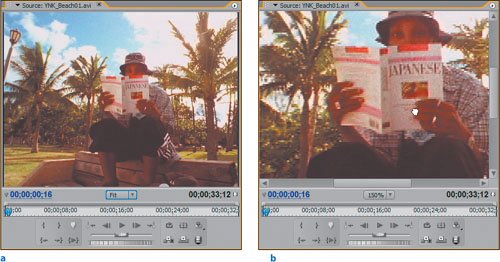 |

EAN: 2147483647
Pages: 200
- Security Architecture and Design
- Legal, Regulations, Compliance, and Investigations
- Appendix A Answers to Assessment Questions
- Appendix C The Information System Security Architecture Professional (ISSAP) Certification
- Appendix D The Information System Security Engineering Professional (ISSEP) Certification