| Say you shot some outdoor video on location or around town. When you filmed, the sky was nice and blue, no clouds, just perfect. But, wait. When you got back to the editing room and watched the video, the sky wasn't the blue you thought it was! In fact, it was light blue and washed out. This scenario is a perfect example of how secondary color correction can be valuable to almost any editor. To increase the saturation of blue in the sky, you need to go into your image and adjust only in the color that makes up the sky: blue. Using the Secondary Color Correction tool in the Three-Way Color Corrector, you can do just that. Create a Secondary Correction Using the Three-Way Color Corrector for tonal range and color cast adjustments is just fine; however, if you twirl down the very last effect parameter in the Three-Way Color Corrector effect, you switch the effect into a whole different mode: Secondary Color Correction. For this lesson, open the 3way_Color2.prproj project file in the APPST2 Lesson Files/Chapter 23 folder. Continue using either the Color Correction workspace or your own custom workspace that has a large Program Monitor and Effect Controls panel. For this secondary correction you are going to target the dark red shirt that the actress is wearing and make it much more rich and vibrant. With the Three-Way Color Corrector, after you target a secondary color, all the controls of the effect are devoted to only adjusting the targeted color. Let's begin. | | 1. | With the 3way_Color2.prproj project open, make sure the Secondary sequence is active in the Timeline panel. Apply the Three-Way Color Corrector effect to the Bleach04.avi file in the timeline. Advance the Edit Line to 00;25 in the timeline, then adjust the Program Monitor zoom to 150% and reposition the viewing area so that you can clearly see the girl in the red shirt (Figure 23.9). Open the Effect Controls panel, expand the Three-Way Color Corrector effect, and then twirl down the Secondary Color Correction effect parameters.
Figure 23.9. The Program Monitor is zoomed in to view at 150% with the viewing area repositioned to view the actress in the right corner of the frame. With the Three-Way Color Corrector and Secondary Color Correction listings expanded, you can easily target and define your secondary color 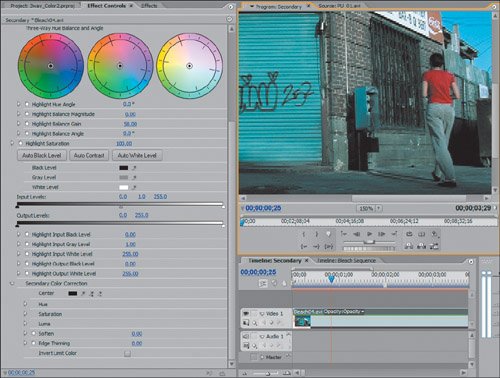
You will be using the eyedroppers at the top of the Secondary Color Correction settings to define the secondary color for selection. Having the image enlarged in the Program Monitor gives you more area to target your color.
| | | 2. | Click on the leftmost Secondary Color Correction eyedropper next to the color picker. Holding down the Ctrl key, click on the red color of the actress's shirt to make a selection (see Figure 23.10).
Figure 23.10. Clicking with the first eyedropper on the T-shirt's red selects that tone of red to be your secondary color selection. After you target your color center, you can then add colors to the selection and tweak the settings beneath the eyedroppers to further refine the secondary. With the secondary defined, use the color wheels and Three-Way controls to adjust it 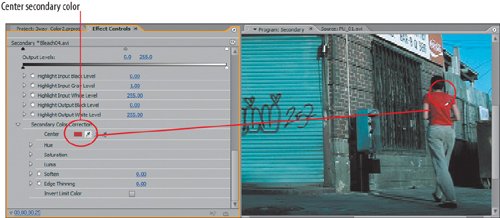
Clicking the first eyedropper defines the center color point of your Secondary Color Correction. As you remember, holding down the Ctrl key gives you a broader color sample in order to make a more accurate color selection. You have targeted the T-shirt's red as your secondary. Because that red has different shades, you need to refine your secondary, add more shades of red to it, and make sure you are selecting the entire T-shirt.
| | | 3. | Scroll up to the top of the Three-Way Color Corrector and change the output mode to Mask. Scroll back down to the Secondary section and click the eyedropper with the plus sign beneath it. Hold down the Ctrl key and click on a darker red region of the T-shirt (Figures 23.11a through f). Click on the plus sign eyedropper again and click on another region of the T-shirt that is not covered in white when the Mask output mode reappears.
Figures 23.11a through f. When you apply secondary color corrections, the Mask Output mode lets you see which portion of your image is defined as the secondary selection (a). Any white or gray colors in the Mask view is considered your secondary selection. The first image shows the initial selection of the red shirt in Mask view. To increase the range of red color being selected, you must add to the secondary color using the Add eyedropper (b). Once you click the Add eyedropper, the Mask output toggles off in order for you to click on and select the color you wish to add (c). Once you click, the mask view updates (d), and in this case more of the shirt is selected. Clicking the eyedropper and selecting a different region of the red T-shirt (e), yields a secondary selection that covers most if not all of the T-shirt (f) 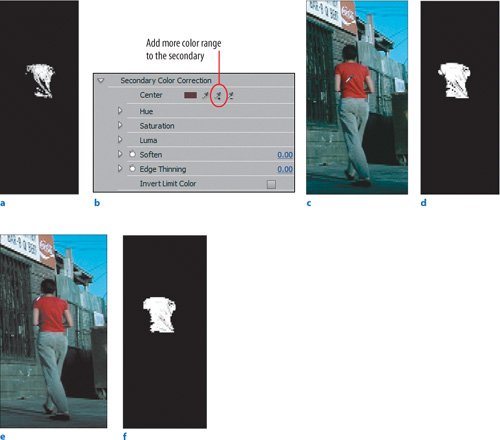
Toggling the Output to Mask allows you to see your secondary selection. When performing secondary color corrections you are targeting a color range and applying a color adjustment to that range. The effect creates a mask through which it applies the color adjustments. When you look at the Mask Output mode, anything that is black is completely transparent, which in the case of the secondary means that it is not selected as the secondary color. The portions of the mask that are pure white are the portions that will have the color adjustments applied to it. Gray areas of the mask are portions that will partially adjust. The goal of using the Mask Output mode is to be able to construct a pure white selection of the color range that you want to be your entire secondary. By clicking the Add Color (plus sign) eyedropper on the darker shades of red in the T-shirt, you are adding to the secondary color range.
| | | 4. | With the Three-Way Color Corrector effect still outputting in Mask mode, twirl down the Secondary Color Correction effect listings for Hue, Saturation, and Luma (Figures 23.12a and b). For Soften enter 1.5, then enter the values in Table 23.1
Figures 23.12a and b. Based on the adjustments made to the Hue, Saturation, and Luma settings (a), you perfectly defined your secondary selection of the red shirt (the mask is all white). Slightly adjusting the Soften value allowed the edges of the mask to smoothen. Here, the entire shirt is selected, it is pure white and it has a soft edge (b). Hue defines the actual range of the secondary selection. Saturation complements this by determining the actual saturation values the secondary selects. Luma then defines the brightness levels of the color that is targeted. To see the effectiveness of your Hue, Saturation, and Luma adjustments, compare Figure 23.11f to Figure 23.12b 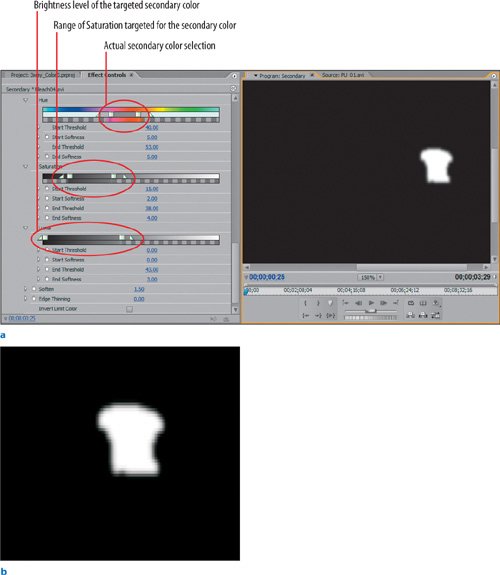
Table 23.1. Secondary Color Correction Settings| | Hue | Saturation | Luma |
|---|
Start Threshold | 40 | 15 | 0 | Start Softness | 5 | 2 | 0 | End Threshold | 53 | 38 | 43 | End Softness | 5 | 4 | 3 |
When selecting and defining your secondary color, each of the settings will vary; your goal, however, should be the same. You want to adjust each of the above effect values so that you create a pure white selection of only the intended secondary selectionin this case, the shirt's dark red color.
Hue allows you to broaden or narrow the actual color of your selection; Saturation allows you to pick the width of the color's strength. Notice that for the selected red, the defined area of Saturation (designated by the gradient scale below the parameter's name) is within the darker region of the scale; this means that a less saturated range of red is being defined as the secondary. The Luma range then targets the brightness of the selected color range that should be attributed to the secondary. Increase the Luma's End Threshold to say 60 or 70, and the secondary will select the brighter red values in the image.
With the Hue, Saturation, and Luma defined, the final step to making the secondary apply smoothly onto your image is to increase its Soften value. So far, I have never used a Soften value higher than 5.
| | | 5. | Switch the Three-Way Color Corrector's Output mode to Composite. Toggle the Tonal Range drop-down to Master, and enter:
Master Hue Angle: 0.0
Master Balance Magnitude: 78
Master Balance Gain: 70
Master Balance Angle: -115
To see your results versus the original clip state, toggle on and off the Three-Way Color Corrector effect listing in the Effect Controls panel (Figures 23.13a and b).
Figures 23.13a and b. Although the red in this secondary is a bit exaggerated, the effect is quite obvious when you compare the original (a) and the secondary result (b) 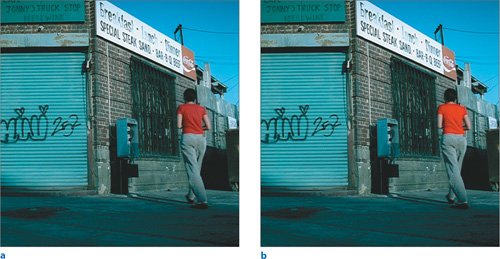
With your secondary defined and softened, you finally applied a color cast to the selection. Because your mask covered the red of the T-shirt only, this red was magnified when you added a Master color cast (a brighter red color) to the secondary selection. If you were to analyze the tonal range of the image you would find that the T-shirt has both midtones and shadows within its boundaries. Selecting the Master tonal range you were able to apply the color cast evenly between the tonal ranges defined in the T-shirt. Congratulations! You achieved a fairly complex effect process in a few steps.
|
Although the technical settings, sliders, and values may seem daunting, the basics of Secondary Color Correction should not. Let's review: First you target the primary color you want to correct; this color is your center. Switching to the Mask Output mode you can see your selection in a simple black-and-white view; your goal now is to get the exact color you want to select to become pure white and the rest of the image pure black. Using the Add Color eyedropper, you click on closely associated colors to expand the range of the secondary color selection. After defining the color, you refine the Hue, Saturation, and Luma settings while the Mask Output mode is still active. Once you have your secondary color all white with the mask you soften its edge and switch back to the Composite Output mode. From here, you use the Three-Way Color Corrector to add a color cast, brighten, darken, or tweak any way you like; just keep in mind that your effect tweaks will apply to only the area defined by your secondary selection. Practice will help your technique. Let's now finish this chapter by adding a slight twist to the usage of the Mask Output mode and Secondary Color Correction. Using Your Secondary as a Track Matte Track mattes are the subject of the next chapter; however, I can't pass up the opportunity to show you a very neat trick with Secondary Color Correction and the Track Matte Key effect. For this lesson, I have organized a timeline that is already set up for you to quickly adjust. You will convert the secondary image to black and white and add your secondary red selection as the only color. This final lesson is results-oriented, meaning that I am not going to explain too much about exactly what the tools are doing; I am just going to walk you through the steps so that you arrive at a very cool final destination. Chapter 24, "Track Mattes and PiPs," explains the Track Matte Key effect in its entirety. Read it, then return to this chapter and review this lesson to understand exactly what the Track Matte Key effect is doing. | | 1. | Open the project 3way_Color3.prproj from the APPST2 Lesson Files/Chapter 23 folder. Open the Secondary Track Matte sequence and note the three video layers all holding the same clips placed one on top of the other. Position the Edit Line at 01;00 in the timeline. Apply the Black and White effect (Video Effects panel: Video Effects/Image Control/Black and White) to the clip on Video 1. Apply the Fast Color Corrector effect to the clip on Video 2, then apply the Track Matte Key effect (Video Effects panel: Video Effects/Keying/Track Matte Key) to the same clip. Notice that the Three-Way Color Corrector is already applied to the clip on Video 3 and it is using the same Secondary correction you applied in the last lesson. Open the Effect Controls panel.
The Black and White video effect on Video 1 will serve as your primary image, which is now black-and-white. Because you are using the Track Matte Key effect to key your secondary color, you applied the Track Matte Key effect to the clip on Video 2 beneath Video 3. To adjust the color of the T-shirt, which will be the only color in the image, you applied the Fast Color Corrector to the clip on Video 2.
| | | 2. | Select the clip on Video 3. In the Effect Controls panel expand the Three-Way Color Corrector effect and toggle the Output mode to Mask. Turn off the Track Output of Video 3 by clicking off the eyeball in its track header. Select the clip in Video 2 and expand the Track Matte Key Effect listing. Set Matte to Video 3 and Composite Using to Matte Luma. Expand the Fast Color Corrector for the same clip and pick any color on the color wheel to change the T-shirt color and have it reveal through the track matte (23.14).
Figure 23.14. With the Fast Color Corrector picking a bright red color, the T-shirt takes on that color as it is processed with the Track Matte Key 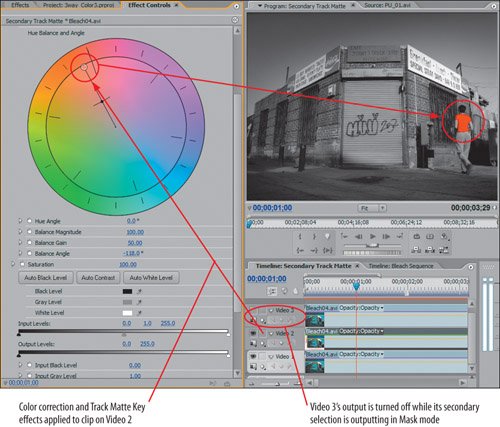
|
Although the steps are very straightforward, the results you achieve with this exact layout and workflow are consistent whenever you want to achieve this type effect. Before you move on to investigate the Track Matte Key effect in the next chapter, you should understand one critical detail: When you apply the Track Matte Key to a video clip it allows the video of that clip to appear inside of a mask or alpha channel from any track above it. By toggling the Three-Way Color Corrector to Mask you created a black-and-white mask image for the video to punch through. Choosing Composite, using Matte Luma with the Track Matte Key, allowed the video from Video 2 to key through the white (luminance) displayed from the Corrector on Video 3. Turning off the Video 3 track is just part of the workflow. Because the clip on Video 3 is exactly the same, when the color of Video 2 punches through the luma matte it is exactly on top of itself, achieving the colorized effect. I think this trick is quite cool. Although it doesn't apply to a ton of situations, if you use it frugally, it could provide a great effect here and there. The main thing that this lesson aimed to provide was a different way of looking at some of the tools used in the application. Here the Three-Way Color Corrector is left in an Output mode that is supposed to provide the user with feedback as opposed to being a literal effect. By looking at the Output mode as a way of creating defined luma mattes, you can use the data quite efficiently with the Track Matte Key effect to create something not normally possible with Premiere Pro. |