| Because the Fast Color Corrector adjusts only the master tonal range (all three ranges combined) of your image, it is useful when you want to white balance your shots or make one quick overall adjustment. The first of this chapter's two lessons will cover how to use the Fast Color Corrector to white balance your shots. The second lesson explains how to use the Fast Color Corrector effect to adjust the levels of your shot to make it brighter or darker. White Balancing When filming someone on location, on a set, or even outdoors, the color temperature of the light that fills the location can often add a color cast to your recorded image. Although the human eye does not detect these color casts as easily, video cameras and film cameras always record them. When filmed, fluorescent lights have a tendency to add light green or light blue color casts to your image. If you were to hold a pure white piece of paper up to the camera under fluorescent lights, the paper would not appear as pure white on video; instead it would be bright blue/white or bright green/white. The term "white balancing" refers to a color adjustment of the image's white value so that the color-tinged paper on tape returns to the pure white that your eye saw on the location. White balancing removes the color cast by allowing you to target a portion of the image that should be pure white and making a color correction adjustment back to pure white. By sampling information from the white area, this color correction removes the identified color cast from the entire image. Most cameras offer an Auto White Balance control that allows you to point at a white object and click a button to apply an automatic white balance, but I find this setting to do more harm than good. Cameras also frequently have additional white balance settings for either outdoor or indoor lighting. I recommend choosing one of these settings depending on whether you're indoors or outdoors, instead of using your camera's Auto White Balance control. In either setting, I record a few seconds of a white card that I will reference back in the editing room. After capturing the footage, I then properly white balance my shots using either the Fast Color Corrector or Three-Way Color Corrector effects. In general when recording you want to stay away from a fluctuation in color. Setting the camera's balance to Sunlight/Outdoor or Electric Light/Indoor at least puts your camera into a consistent mode when shooting outside or in a studio, meaning any effect your camera imparts to footage will be consistent across the board rather than fluctuating each time you auto-balance a new shot. After you set your camera to the proper mode, I also recommend filming a white card in every location to have that pure white reference. Simply hold up a pure white card (or piece of paper) in front of the camera in the direct path of the light at your location. (You can refer to my white card technique in the clips in Chapter 27, "Advanced Editing: The New Multi-Cam Workflow.") If you didn't have a white card to balance with at your shoot, there are other techniques for white balancing using the Fast Color Corrector. Give it a try by using the Fast_Color01_Start.prproj project in the APPST2 Lesson Files/Chapter 22 folder. Make sure that your workspace allows for a large frame with your Program Monitor and another large frame for your Effects Controls panel. You can customize the one my project already uses if you like. | | 1. | With the Fast_Color01_Start project open, open the White Balance sequence in the Timeline panel. Open your Effect panel and twirl down Video Effects/Color Correction. From the Color Correction folder, drag and drop the Fast Color Correction effect onto the first Bleach01.avi (Figure 22.5) in the timeline. Click on this instance of Bleach01.avi, open your Effect Controls panel, and expand the Fast Color Corrector effect listing. At the top of the Effect Controls panel, click the Show/Hide Timeline button to expand the Effects area and hide the timeline.
Figure 22.5. The layout includes the Effect Controls panel, Timeline panel, and Program Monitor. With the first Bleach01.avi file selected in the Timeline panel, its Effect properties are revealed in the Effect Controls panel. To expand the horizontal size of the Effect listings, click the Show/Hide Timeline button 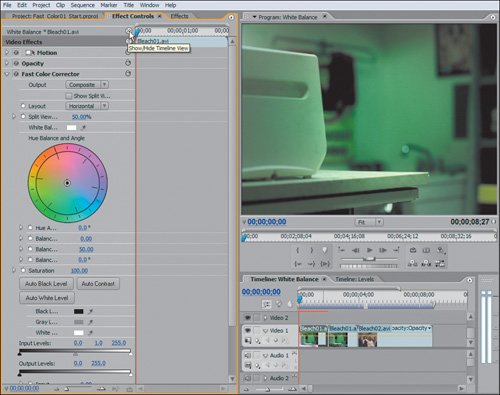
Tip When you hold down the Ctrl key and click on a color with an eyedropper, you sample a five-pixel radius to determine the color you are picking, as opposed to the one pixel that the eyedropper targets without the modifier key. Very often, the color difference between single pixels can be drastic and although you might think you are targeting a specific color, you are not. Holding down Ctrl ensures a more accurate color selection. This first step is very direct; you navigate to the color correction effect folder, then drag and drop the desired effect onto the first clip in the white balance sequence. To adjust the Fast Color Corrector effect, you selected the clip and then opened the Effects Controls panel to see the effect properties. Because you aren't going to keyframe any effect adjustments in the timeline area of the Effect Controls panel, you click the Show/Hide Timeline button to give the Color Corrector effect more screen real estate to display in.
| | | 2. | In the Effect Controls panel for the Fast Color Corrector effect, click on the White Balance eyedropper. Drag the eyedropper over to the counter top in the lower center of the video frame in the Program Monitor (Figures 22.6 a and b). Hold down the Ctrl key and click once on the counter.
Figures 22.6a and b. The White Balance eyedropper samples color from the counter top (a). Meanwhile, the color wheel updates to define the color selected as does the color picker next to the White Balance eyedropper. The results of this selection (b) reveal a frame with the green color cast removed 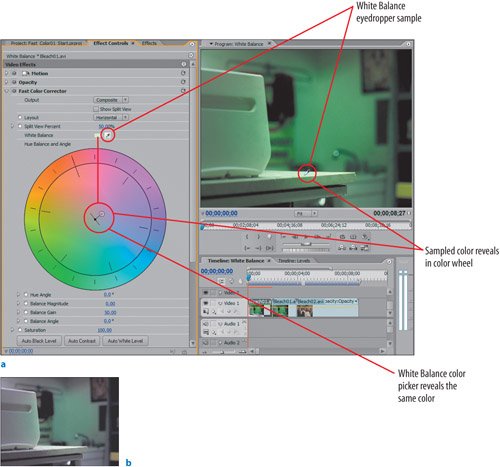
To white balance a clip you need to find a frame in which the unwanted color cast is clearly visible. In the first frame of the Bleach01.avi you can clearly see that the entire image has a greenish tint. You can identify the green tint in the countertop in the center of the frame. Knowing that the countertop should be white, you clicked on the White Balance eyedropper and dragged it over to click on the countertop area of the image. Holding down the Ctrl key toggled the eyedropper from a one-pixel selection radius to a five-pixel selection radius. Because the White Balance feature is an automatic adjustment, the Fast Color Corrector adjusted the clip to remove the green color cast. In essence the White Balance feature is taking the light green color and shifting it so that it is pure white instead of light green. White balancing is exactly that simple.
| | | 3. | Now try another white balance technique on the same clip that assumes you don't have a white card reference from which to sample. Drag and drop the Fast Color Corrector effect onto the second Bleach01.avi file in the White Balance sequence. Select the clip and press the Page Down key to advance the playback head to the beginning of this clip, then expand the Fast Color Corrector effect in the Effect Controls panel. Click on the White Balance eyedropper and instead of sampling from the counter, hold down the Ctrl key, sample from the side of the toaster oven (Figure 22.7), and click on the sampled region.
Figure 22.7. If you do not have a bright colored or pure white area to sample, you can still sample from a region that has the tint you want removed. The Fast Color Corrector will adjust the brightest color from the selected color to pure white. In this case, sampling the side of the toaster (although even a darker green), yielded the same results 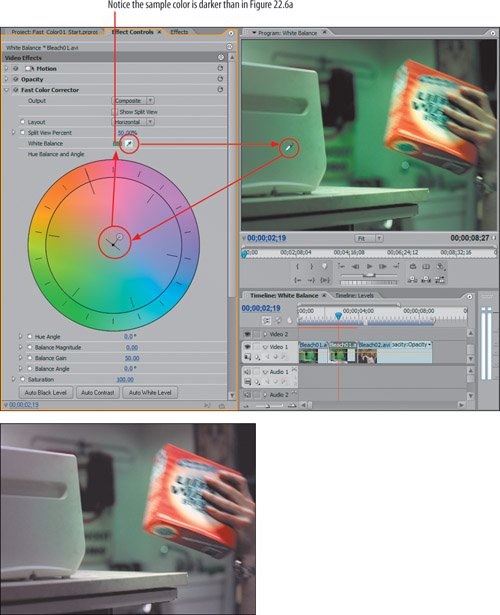
Although you did not have a pure white reference point, you found a region of the image that wasn't brightly colored and should be considered white. You sampled from the side of the white toaster (which had a green tint after being filmed), and the Fast Color Corrector yielded the same results by analyzing the sampled color (in this case a midtone green) and removing the greenish tint until the sample color became a white midtone. Based on the results of this step, all you need to do to white balance a shot is sample the color from a region of the image that should be considered any shade of white. The lighter the color, the more accurate your results will be.
| | | 4. | Drag and drop the Fast Color Corrector to the Bleach02.avi and apply your own white balance adjustment (Figure 22.8) based on one of the shirts from one of the men in the frame.
|
Figure 22.8. This image has a warm tint to it already. If I sample the old man's beige shirt for white balancing, look how cool the image gets. In the case of this shot, the color is already just right and unnecessary to adjust. The white balance adjustment took the warmth right out of the image by shifting the light beige to pure white 
I put this last clip into the sequence because I think it already has a good warm visual tone. The same way the first steps showed the cool green cast shift to white, this last step shows you how you can sample from a warm beige cast and cool off the image. For this clip, the cooling was too much but based on the sample it yielded expected results. Sometimes you need to see an adjustment that goes too far before you can understand how much is enough. This lesson showed you exactly how to white balance your shots so that the color information shifted away from any tinting or color casts added by the camera. To see my results from this lesson, open the White Balance sequence in the Fast_Color02_Start.prproj from the APPST2 Lesson Files/Chapter 22 folder. Level Adjustments White balance adjustments provide a good foundation to build on. The same Fast Color Corrector effect can quickly adjust the black and white levels of a clip to better control its brightness and contrast. Notes If you have a series of clips all shot in the same location with the same camera and same settings, you can white balance one of the shots with the Fast Color Corrector, then copy and paste the effect onto the other clips in the series.
| | 1. | Open the Fast_Color02_Start.prproj project from the APPST2 Lesson Files/Chapter 22 folder. With the project open, open the Levels sequence and apply the Fast Color Corrector to the Bleach03.avi file. Be sure that your layout matches or is similar to that of Figure 22.9. In the Reference Monitor panel set the Output mode to YC Waveform.
Figure 22.9. The Fast Color Corrector effect is applied to the Bleach03.avi file in the timeline. The workspace reveals a Program Monitor on the top right and next to it, the Reference Monitor. Using a Reference Monitor while you color correct is essential for viewing the video's signal data, which updates as you make adjustments. Setting the Reference Monitor to YC Waveform enables you to view the luminance value of the video image while you manipulate it 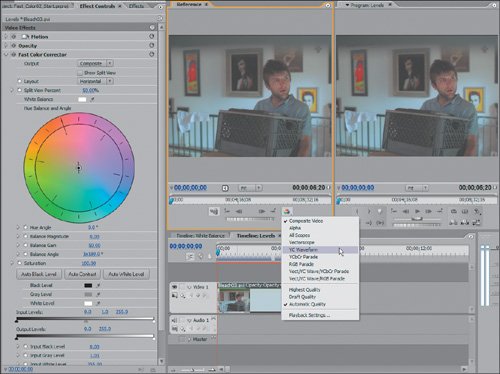
Setting the Reference Monitor's output mode to YC Waveform enables you to view the results of the Fast Color Corrector in the Program Monitor while viewing the luminance value of the results in the Reference Monitor. In YC Waveform mode, the Reference Monitor displays a scale that goes from -20 to 120 with increments of 10 denoted by horizontal lines. Illegal waveform values are above 100 (brightest) and below 7.5 (darkest, which is identified by dotted line). Check that the luminance adjustments result in values within this range (Figure 22.10).
Figure 22.10. A waveform monitor measures the IRE values (luminance) of your video signal. Readouts higher on the scale reflect bright portions of your image, and readouts near the bottom reflect dark portions. The waveform represents the image from left to right as your frame does except it collapses all of the luminance value onto the scale. Here you can see that the darkened top of the frame and darkened crate both reveal low values on the waveform. The brighter white wall that appears behind the actor, however, should show up in somewhat of the same shape as it is in the frame 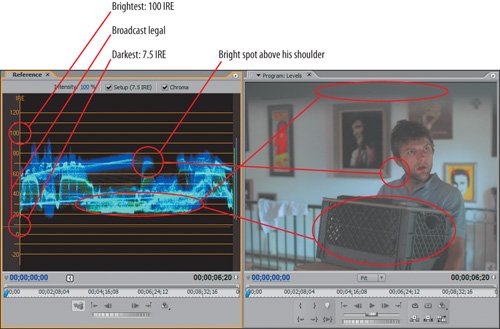
Looking at the waveform values for the Bleach03.avi file you should be able to see that the image could be lighter in some parts and darker in others and still be legal. If you use the Auto Levels buttons, the Fast Color Corrector will achieve these adjustments for you.
| | | 2. | Select the Bleach03.avi file from the sequence so that its effect properties are active in the Effect Controls panel. Twirl down the Fast Color Corrector effect. Click the Auto Black Level button (Figures 22.11 a and b).
Figures 22.11a and b. The darkest portion of the selected clip registers at about 21 IRE in the waveform display (a). Clicking the Auto Black Level button automatically adjusts the darkest information already in file to be true black (b) 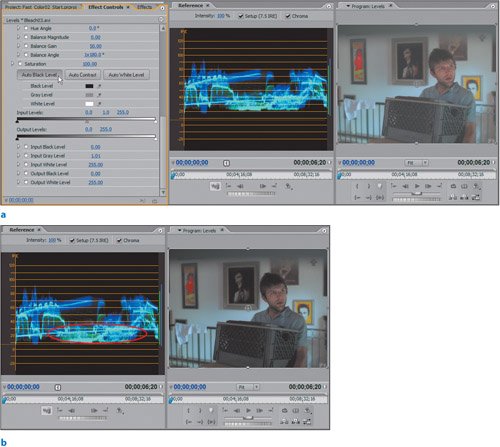
Auto Black Levels shifts the levels of the image so that the darkest portions move to the lowest legal IRE value (7.5), becoming true black for video. The result, as seen in Figure 21.11b, is that black portions of your image are richer.
| | | 3. | Now try the same operation for the clip's whites: Click the Auto White Level button (Figures 22.12 a and b). Click in the farthest right Input Levels hot-text box and change the value from 204 to 212.
Figures 22.12a and b. Compare the starting state of the waveform and image (a) with the result of activating Auto White Level (b). The clip becomes brighter with more defined contrast. Auto White Levels shifts the levels of the clip's brightest point so that the overall scale of the white increases, as evidenced by the feedback and shift in the waveform monitor 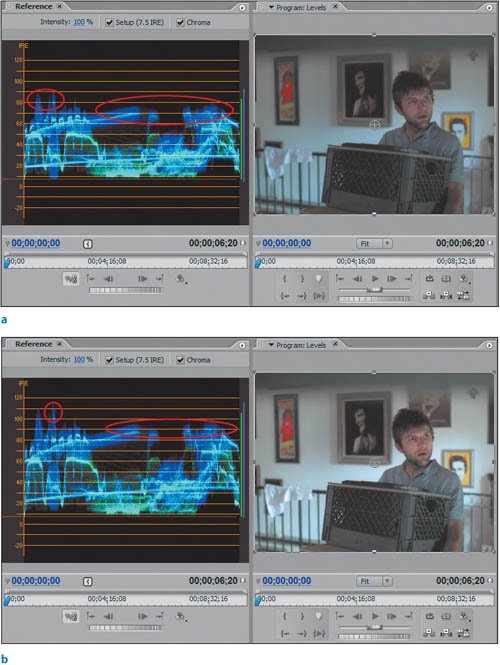
The Auto White Levels effect analyzes an image and adjusts the brightest white it finds to become pure white. Unfortunately Auto White Levels does not constrain its results to only legal values. Because of this, you manually modified the White Input Level so that the brightest value was legal.
| 4. | To put the finishing touches on this clip, adjust the white balance to take some of the coolness out of it. With the Bleach03.avi clip still selected, click the White Balance eyedropper. With the White Balance eyedropper, hold down the Ctrl key and click on the white wall to sample its color information (Figures 22.13a).
|
Figures 22.13a and b. Sample your white balance from this section of the wall (a). Compare the levels-adjusted and white-balanced clip in the Program Monitor with the original clip in the Source Monitor (b). With a basic understanding of the effects and a few clicks you can achieve excellent results with the Fast Color Corrector 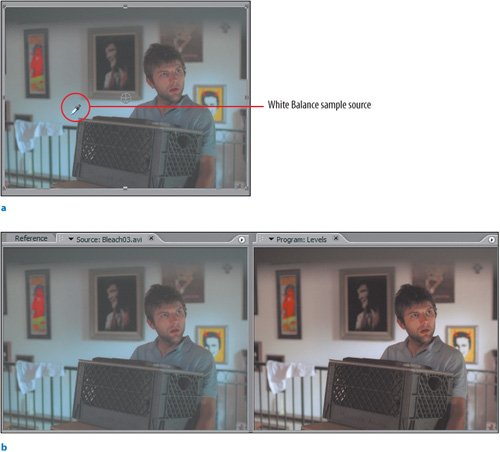
After redefining the black and white levels to strengthen the image, you quickly removed the soft blue color cast using the white balance technique from the previous lesson. The results as seen in Figure 22.13b prove just how crisp you can make an image and how simple using the color correction tools can be. The end result of color correction is not the same for every project but the goal should be: to create through the manipulation of color a better-looking image. Whether performing straightforward color balancing to remove a color cast or using the Auto Levels buttons to give your black-and-white image components more strength and better definition, your eye and your taste dictate how far you take the image in any of these directions. When I am doing any professional job I hire a color correction artist and pay a hefty rate to get results beyond my abilities. Knowing a few things about color, watching over a colorist's shoulder, and doing my own color corrections on side projects, however, increases my ability to create a better image than was originally shot. I've given you the keys; now hop into the Fast Color Corrector and try exploiting these clips further to test the color correction effects. The next chapter will introduce more clips and an even more powerful effect called Secondary Color Correction. |