| Having created the full 5.1 audio mix for your scene, you're ready to get the audio off of your system and out to other people. Consider this scene as a short clip you want to distribute on the Web retaining the full 5.1 surround sound mix. The first lesson in this last section explores the type of audio file formats that support six channels and what you need to remember about encoding into those formats. The final lesson overviews your Audio Hardware preferences so you can ensure that your six-channel audio plays properly on your system. Let's start by exporting the 5.1 audio. Exporting 5.1 Audio With your project converted and remixed in 5.1 surround sound, your next step is to actually export the file into a relevant viewing format. Premiere Pro supports two file formats for six-channel audio export: MPEG2-DVD (using the SurCode for Dolby Digital codec) and Windows Media. Windows Media actually supports up to eight channels of audio using the latest Windows Media Professional audio codec. If you are exporting 5.1 audio for DVD authoring, you can use the SurCode for Dolby Digital codec; three free trial uses come with Premiere Pro, and then you must purchase a full license. Because Windows Media is free and the most accessible format with which to author 5.1 sound, this lesson offers a quick overview of the presets, settings, and check boxes relevant for creating a surround sound Windows Media file. 1. | Open the project file Surround_Export_START.prproj from the APPST2 Lesson Files/Chapter 21 folder. Open the Bleach Edit 5.1 sequence in the Timeline panel. With the sequence active, select File > Export > Adobe Media Encoder.
To access the audio format that encodes six- and eight-channel audio, you need to use the Adobe Media Encoder. The Export > Export Movie or Export Audio commands will not give you access to the Windows Media codec that you need.
| | | 2. | In the Adobe Media Encoder, select Windows Media from the Export Settings > Format drop-down menu (see Figure 21.7). Choose the preset labeled WM9 NTSC 1024K download. Click the Audio tab, click the Audio Codec drop-down menu, and select Windows Media Audio 9.1 Professional. From the Basic Audio Settings > Audio Format drop-down menu select the preset labeled 192 kbps, 48kHz, 5.1 channel, 16 bit (A/V) CBR (see Figure 21.8).
Figure 21.7. The Adobe Media Encoder is set to Windows Media. With the 1024K preset selected, you can see Audio Codec is set to Windows Media Audio 9.1. The Basic Audio Settings reveal Stereo as the Audio Format setting 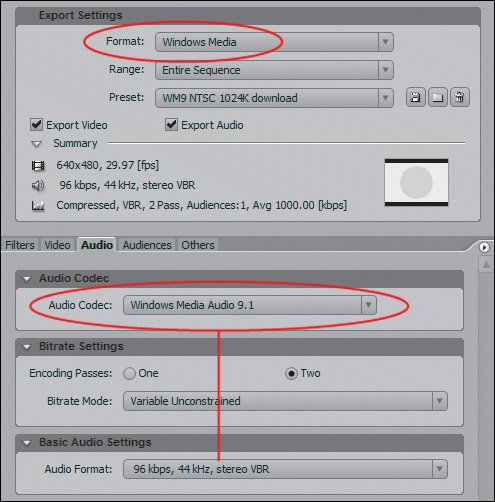
Figure 21.8. With the Windows Media Audio 9.1 Professional codec selected, you can choose presets that support two, six, or eight channels of audio 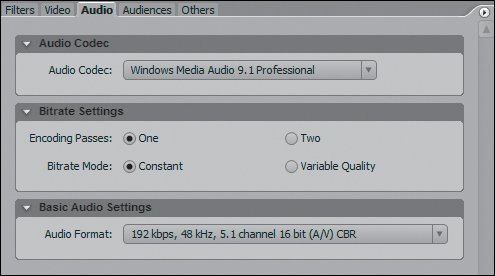
Using Windows Media as your format in the Adobe Media Encoder, the Windows Media Audio 9.1 Professional Audio Codec is my preferred codec when encoding more than two channels of audio. Although the Windows Media Audio 9.1 Lossless codec supports two- and six-channel audio, the Professional audio codec gives you a ton of presets.
For this step, you chose a bitrate (192 kbps) that was not too high, but also not too low. This keeps your quality at a good level but does not make your overall file size too big. The rest of the preset dictated that the audio remained at its original 16 bit, 48 kHz. In general, the NTSC 1024K preset gives you decent quality video without a high data rate at a 640x480 frame size, which will be just fine for full-screen desktop computer playback. The video settings of the preset matched that of the source sequence, but the audio portion was the most important component and the flavor of audio preset should be based on the type of encode you are doing (audio only or audio and video) and the projected size of the file.
| 3. | Go to the Source/Output side of the encoder, and click on Source. Crop the Left and Right values to 7 with Top and Bottom cropped to 68. Click on Output, then click Deinterlace and Scale to Fit. In the Export Settings area of the Encoder, click the Video tab and change Basic Video Settings > Frame Size to 640x346. Click the OK button in the Encoder to name and then render out your file. (If you do not wish to render out the file, you can simply open the Bleach Edit 5.1.wmv file in the APPST2 Lesson Files/Chapter 21 folder.)
Because the content of the scene that you want to encode is smaller than the full frame, you cropped the file to the letterboxed frame size of the video. Because the clip is going to play back on computer monitors and not on televisions, you clicked the Deinterlace button to merge the fields for the encode. Finally you adjusted the frame size so that the cropped video clip was encoded exactly at the dimensions to which the video was cropped.
|
Notes The Audio Format presets are very direct and easy to navigate, but Premiere Pro has a lot of them. If you are exporting audio and video (sequences or clips) with the encoder, use one of the (A/V) presets. This ensures that sync between audio and video does not drift and is frame-accurate during playback. Often when encoding into various codecs, sections of the playback might drift out of sync or audio may not play accurately to the video frame.
If you performed this type of workflow and wanted to encode only 5.1 audio from the timeline, you would uncheck the Video check box in the Export Settings area of the Adobe Media Encoder. The resulting audio-only file would have the extension .wma (Windows Media Audio) as opposed to .wmv (Windows Media Video). This short lesson illustrates just how easy it is to export six-channel audio into a common file format. To watch this file prospective users need only Windows Media 9 or later installed on their system. If they have stereo speakers, the file will play in stereo. If they have 5.1 speakers, they will experience the audio exactly as you mixed it in Premiere Pro. Playing 5.1 Audio Although visually monitoring your 5.1 audio is pretty easy (keep the Audio Mixer panel open to review the panning properties of each track), this last quick lesson guides you through the Audio Output Mapping preference, which enables you to verify that your surround sound audio is playing back as you expect. Notes This lesson applies to anyone who has an attached USB, FireWire, or PCI-based audio interface. My eMagic USB audio interface will serve as the hardware example for this lesson.
1. | With a 5.1 surround sound sequence or stereo sequence open, go to Edit > Preferences > Audio Hardware. In that preference, select the Audio device that you wish to use as your default device from the Default Device drop-down menu.
On my system, for example, I chose the ASIO eMagic A26/A62m device from the drop-down menu. Selecting the device engages Premiere Pro to play back audio using that device. If you do not have a device with up to six output channels you will not be able to listen to 5.1 surround sound audio in its true surround environment.
| | | 2. | Click on the Audio Output Mapping preference and check that the Map Output For drop-down menu matches the selection from the previous preference. In the Audio Output Mapping preference, also make sure that the speaker configuration displayed below the drop-down menu matches the routing of the speakers on your system (Figure 21.9).
Figure 21.9. If you have an audio interface with six channels, you can easily configure it to properly play 5.1 surround sound audio. When connecting your speakers to your audio device, make sure the intended position of each speaker matches the output channel being mapped to in the Audio Output Mappings preference. Here, the Output 6 port on the audio interface should connect to the LFE (the bass unit) of the surround sound speaker system 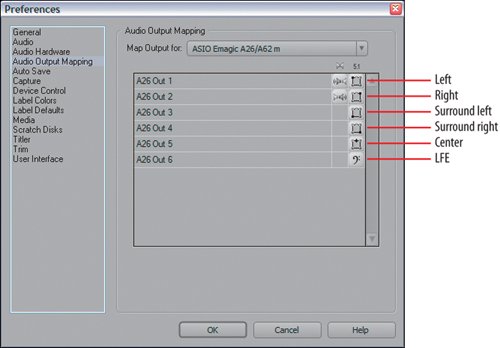
To accurately play back surround sound audio you need to make sure that the channel mappings of your audio interface match that of Premiere Pro. As seen in Figure 21.9 each of the six channels has a surround sound speaker assigned to it. The icon for the speaker in the Audio Output Mapping preference should match the physical position of the speaker connected to the output channel. For example, Output 1 in Figure 21.9 points toward the Left Stereo speaker icon in the dialog. At home or in your office, Output 1 should be connected to the left stereo speaker of your computer. If Output 2 is connected to your physical left stereo speaker, you can drag the icon for Left Stereo in the Audio Output Mapping preference down one track to reside in line with Output 2 instead of Output 1.
If you can't adjust the routing of your physical output ports on your audio interface, you can quickly reroute the mapping of the 5.1 speakers within the Audio Output Mapping preference to match that of your physical speakers.
|
You need just two steps to properly monitor and play back surround sound audio with Premiere Pro 2.0. The first step is having a 5.1 audio interface that supports six channels of playback, and the second is to create a 5.1 surround project. Although the first step in not an absolute requirement, you will, of course, have the best and most accurate results when you have a 5.1 playback setup to monitor your 5.1 mix. |