| Editing the voiceover file is the first step to getting it into shape. Once you normalize the volume level, you will cut the voiceover into smaller pieces and adjust the timing with the flow of the video. By spacing out the words and sentences you will create timing that is different than in the original recording. 1. | Open the VO_Editing_Start.prproj file from the APPST2 Lesson Files/Chapter 18 folder. Press Ctrl+I to access the Import File dialog, and import the file Saleen_VO.wav from the same APPST2 Lesson Files/Chapter 18 folder. The imported file will appear selected in the Project window. Choose Clip > Audio Options > Audio Gain (Figure 18.7), and in the resulting Clip Gain dialog, click Normalize.
Figure 18.7. When you normalize the master file selected in the Project panel, all subsequent instances and uses from the master clip will use the adjusted Gain value. The first and most important step before cutting up your file is to Normalize its volume level 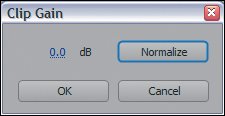
This voiceover file does not require any gain adjustments, and the result from Normalize is 0dB. This is because the pre-amp that I used for recording properly adjusted the incoming signal so that the levels were as strong as possible without exceeding the ceiling. I strongly recommend always starting your workflow with normalization of the audio, because you may often have a less than perfectly recorded file.
| | | 2. | Double-click the Saleen_VO.wav file in the Project panel to open it in the Source Monitor. Adjust the viewing area bar so that you are zoomed into the details of the file (Figures 18.8a and b).
Figures 18.8a and b. The clip as it is first revealed in its entirety (a) and with the viewing area bar reduced to zoom in tighter on the open clip (b). When editing audio, not only can you use the viewing area bar to zoom in, but you can also toggle your display to audio units so that you can zoom to the subframe level 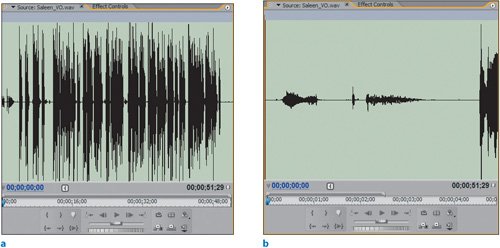
To begin cutting up the voiceover file, you want to be zoomed in tight enough to the source material so that your In and Out points don't include a lot of extraneous material.
The next step is to edit out all the mistakes and empty spaces between the important words and phrases that will make up your final voiceover edit. I'll walk you through cutting up the first element and then identify the rest of the cuts for you to finish later.
| | | 3. | Make sure you are displaying video frames in your Source Monitor and not audio units. Click to select the current frame's timecode value in the lower-left corner of the Source Monitor, type the value 412, and press Enter. Your CTI should snap to the timecode value of 04;12, just before the first phrase, "A Dream." Press I to mark an In point. Select the current frame timecode value again, type 511, and press Enter. Your CTI should snap to 05;11, which is right after the phrase "A Dream." Press O to set an Out point. Click and drag the In/Out instance from the Source Monitor, releasing it onto the VO track at the 0 numbered marker in the timeline (Figure 18.9).
Figure 18.9. By creating a small In/Out instance from the master clip, you have a unique clip that contains only the duration specified from the Source Monitor. Because Snapping is on, if you drag the subclip near any of the numbered markers, you can automatically snap to their position and release the subclip in that place. Notice that because you are dropping the subclip using no modification keys, the Overlay icon displays and no elements of the timeline are shifted when you release the clip. Finally, notice how the Snapping line has an arrow pointing up at the top of the timeline, this indicates that it is snapping to a timeline marker 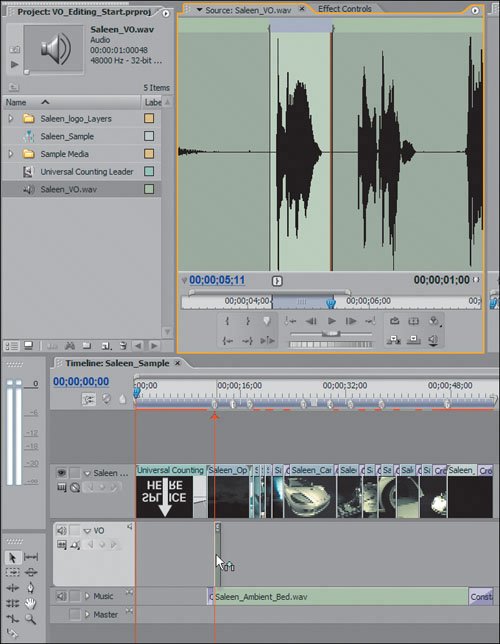
You identified a section of the audio file and determined precise In and Out points so that there was no extra material. Once you made your selection, you added the clip into a predetermined position in the sequence.
| | | 4. | To make the next subclip, simply create a new In/Out instance and drag the subclip to the next marker position in the timeline. Table 18.1 lists the remaining In/Out instances and the phrases that each contains. After you have cut each up, your edit should look something like Figure 18.10.
Figure 18.10. The markers make an easy guide for placing each subclip, but feel free to take some liberties if you want to change their position. Remember that if you do want to move the clips within a small range, you can toggle off Snapping ("S") so that every slight move doesn't snap to the next potential snapping point 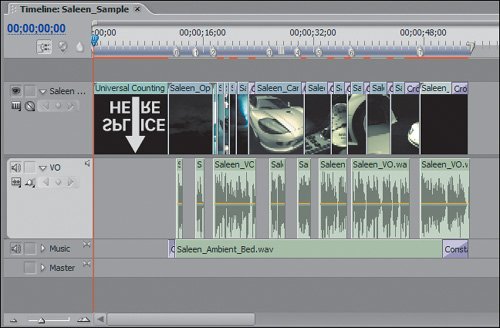
Table 18.1. Voiceover In/Out Instances for CuttingTimecode Range | Phrase | Marker Number |
|---|
05;21-6;29 | "Comes to life." | 1 | 11;26-18;02 | "The Saleen S7…art." | 2 | 18;16-20;27 | "From its sleek aerodynamic shape…" | 3 | 21;01-23;02 | "To its luxurious interior…" | 4 | 28;17-32;21 | "The S7 is…century." | 5 | 33;03-41;18 | "Built…dream come true." | 6 | 42;00-49;09 | "This…Thank you." | 7 |
Once the pieces of the voiceover are separated, you can put certain elements farther apart or closer together. It's up to you to feel the rhythm and flow, deciding where exactly everything should line up. Because there is a music track, don't worry too much about the dead air between clips.
| | | 5. | Open Edit > Preferences > General, and assign a value of 0.15 seconds for your Audio Transition Default Duration. Click in the VO track header to make sure that track is targeted (the track header will become dark gray). With no clips selected, press the Home key to snap the CTI to the beginning of the timeline. Press the Page Down key until your CTI is snapped to the head of your first voiceover subclip. Press Ctrl+Shift+D to add a default transition to the head of the subclip. Press Page Down to snap the CTI to the tail of the first subclip, and press Ctrl+Shift+D to place a default transition at its tail. Your first clip should look like Figure 18.11.
Figure 18.11. A one-sided transition was added to both the head and tail, creating a smooth volume fade from the empty space of the timeline to the audio of the subclip and then back to the empty space of the timeline. If your audio levels pop up in volume while you play the cuts of your inserted subclips, you can add transitions at the head and tail of each subclip to smooth the increase in volume 
It may be necessary to zoom into your timeline to see the placed transitions because their size is 15/100ths of a second. You can vary the size of the transition to create a longer or shorter fade in and out.
|
Once you have placed your transitions, your edit should be in perfect shape to continue with the adjustments. |