| Having prepped your timeline and set it up for recording, it's time to click Record and lay down your voice track. For this series of steps, make sure that your voice registers at a healthy level and does not peak or exceed the 0dB ceiling. Notes Sample Project Voiceover Script "A dream comes to life. The Saleen S7 is a breathtaking sports car that blurs the line between science and art. From its sleek aerodynamic shape to its luxurious interior, the S7 is the premiere sports car for the twenty-first century. Built from the most solid materials and weighing under 2000 pounds, the Saleen S7 is truly a dream come true." Disclaimer: "This voiceover is not intended to endorse or represent Saleen and should only be used for instructional purposes. Thank You."
| | 1. | Practice speaking the voiceover script (see the sidebar "Sample Voiceover Script") into the microphone at a normal room speaking level. Be sure that you see your VU meters responding to your vocal level as you are speaking.
As you speak into the microphone, the volume level coming from the microphone input should never exceed the dark black 0dB line. You will want to be somewhere between -12dB and just above -6dB.
Find the optimum distance and relative position that the microphone should be from your mouth so that your voice is not too loud or too soft. After you are comfortable with your practice, move on to the next step. If you still have low levels, refer to the notes below and/or see the previous chapter "Using Your Audio Hardware" and refer to the "Adjusting Audio Settings" sections.
Notes Troubleshooting Your Input Levels From Windows, open the Sounds and Audio Devices Properties Control Panel. Select the Audio tab, and click the Volume button for Sound Recording. In the Recording Control Panel, be sure that Microphone is the selected Recording Device and that its volume level isn't too low (Figure 18.4a and b). Figures 18.4a and b. In the Recording Control dialog box (a), note that Select is checked under Microphone, indicating that your mic is the incoming device. Clicking the Advanced button then opens an additional dialog (b) where you can add a boost to the incoming levels from your microphone 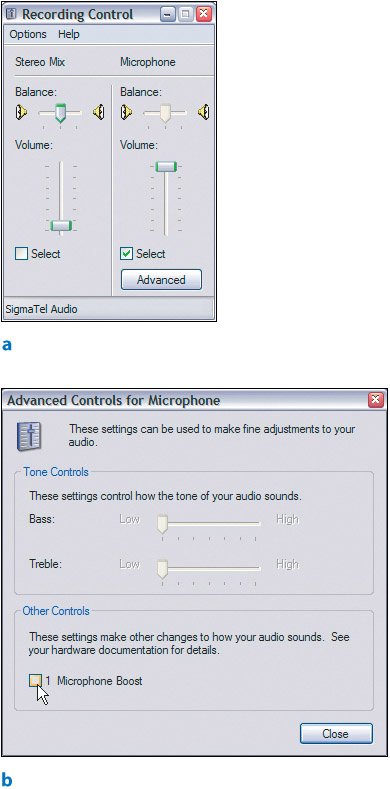
As discussed in the previous chapter, you can set and configure your input and output levels in this Control Panel as well as raise the volume level of your microphone. If you are using a pre-amp with your mic, you can adjust the amp level to make your voice louder or softer. As you speak and adjust your amp, the levels will update live in the Audio Mixer window. | | | 2. | With the volume input level set and your rehearsal complete, click the Solo Track button (the horn button) in the VO track of the Audio Mixer (Figure 18.5).
Figure 18.5. Clicking the Solo Track button automatically mutes the other tracks in the sequence so that the only audio you hear is that of the specified track 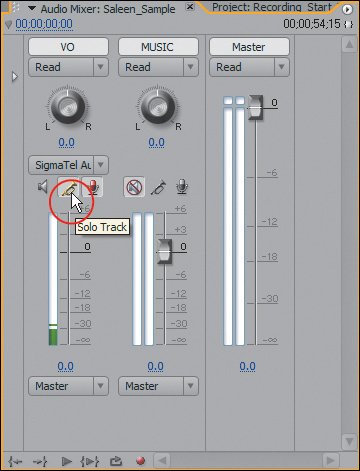
Clicking the Solo Track button mutes the Music track so that the music does not play back as you record. Regardless of whether you turn on Meter Input(s) Only, you will want to solo whichever track you are recording into at the time.
| | | 3. | Select the Timeline panel, and press the Home key to position the CTI at the head of the timeline. In the Audio Mixer, click the red Record button to arm the Audio Mixer for recording. When you are ready to record, click Play.
There is maybe a one-second latency from the moment you click Play until the moment that recording begins. As soon as you see the timecode numbers moving in the Program Monitor, whatever sound that is coming into the microphone will be recording into a file onto the VO track. You can also verify this by watching the VU meters spike up and down when you speak into the microphone. If you do not see the spike while recording is engaged, check your connection and audio device set up.
In terms of timing, once you see the number 3 countdown cut to black in the UCL, you have two seconds before your edit begins.
After you are done recording, your timeline should look something like the one in Figure 18.6.
Figure 18.6. Notice how the newly created file is named with the track name, then a number: VO_107. Also notice how the file is added not only to the track in which it was recorded, but also into the Project panel 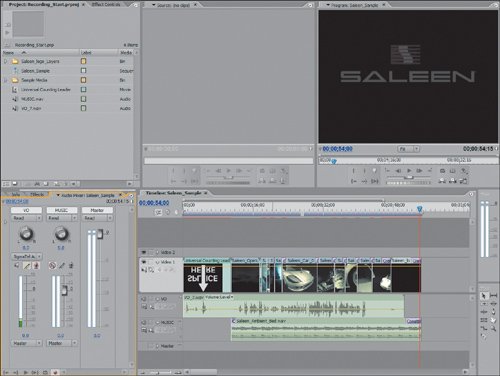
| | | 4. | Once you record a take you are happy with, double-click the audio file from the Timeline panel to open it in the Source Monitor. With the Source Monitor active and the clip selected, choose File > Export > Audio. In the Export Audio dialog, rename the file something specific so that it is easy to identify. I used the name Saleen_VO.wav. If you have multiple takes, then you could name the first file Saleen_VO_01.wav and increment each take. In the Export Audio dialog, click Settings and from the General Settings, make sure that the file type is Windows Waveform and that you are exporting the entire clip. From the Audio Settings, make sure the file is uncompressed with a Sample Rate of 48000Hz, 16 bit, mono. A 1 frame interleave is fine.
Whew! It sounds like a lot, but because the auto-naming format for audio recording isn't specific as to project and other attributes that you might want to add, it's important to save a version of the file to disk with a name you decide. The original file, VO_10.wav, will also be saved to your disk, and it will reside in the scratch disk location that you specified for captured audio (Edit > Preferences > Scratch Disks > Captured Audio). If you recorded a stereo track, then be sure that Stereo instead of Mono is selected when you export. It's always good to double-check your export settings before you save your file.
Tip For monitoring a voiceover while recording, I recommend using headphones or turning the volume of your speakers off. Any additional noise picked up by the microphone can loop back into the recording. This is called feedback. Greater intensities of feedback can occur if the signal you are recording is played out of the speakers and picked up again by the microphone that is recording. Feedback starts low and then quickly crescendos into piercingly loud audio that will make even the toughest punk rockers cry. Because Premiere Pro allows you to play back your timeline as you record your voiceover narration, the first thing to do is render the sequence's preview files so that there are no playback hiccups. Once the files are rendered, any red render bars should now be green. Additionally, if you recorded multiple takes in a single pass, you could mark In and Out points in the Source Monitor for the section of the clip that you want to export and choose the Export Range: IN to OUT from Audio Export General Settings. This exports the In and Out range as an individual file when exporting.
| 5. | The final step for the lesson is necessary only if you feel you need to record your voiceover again. If that's the case, with the Timeline panel active, press the Home key and repeat steps 3 and 4.
Although you will be overwriting the current file in the track with every new recording pass, you will not be deleting the overwritten files from your project.
|
Well, you've done it: You've gotten audio out of your mouth and into your timeline! With the foundation built for recording a voiceover, you should have no problem adding a voiceover track to any sequence. Your only problems to solve will be configuring your volume and finding the right microphone and mic settings. For most of my voiceover workroughing in tracks for later replacementa simple PC microphone is fine. If you are doing voiceovers for DVD movies or for slideshows, however, I recommend putting the extra effort into getting a decent microphone and recording in a quiet environment. Now that you have successfully recorded your voiceover narration, you can do a lot to the file to clean it up and get it flowing and sounding better than the original recording. For the second half of this chapter you will edit the voice-over you recorded to match the flow of the video. You will add transitions to the head and tail of each clip so that there are no abrupt or excess noises. Finally, you will learn a technique for removing unwanted breaths or noises in the spaces between words. |