Using the Layers Palette
Using the Layers Palette
At the heart of all this power is the Layers palette (shown in Figure 7.2). It is the control center from which you perform most layer operations. By default, the Layers palette is clustered with the Channels and the Paths palettes. If the Layers palette is not displayed, you can access it by choosing Window ’ Layers or by pressing F7 on an extended keyboard.
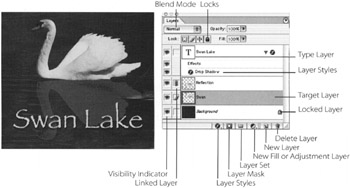
Figure 7.2: The Layers palette
Each layer in the palette is separated from the one directly below it or above it by a thin line. Each layer s row includes a thumbnail of the layer s contents, the layer s name , and any layer styles, masks, or locks applied to that layer. In the far left column is a visibility indicator which, when displayed, indicates that the contents of the layer are visible. Immediately to the right of this visibility indicator is another column that displays a brush icon if the layer is targeted. A small chain icon appears to the right of the visibility indicator if the layer is linked, or a mask icon is visible if the layer is a Fill or Adjustment layer or if a Layer Mask is targeted . (For more about Layer Masks see Chapter 22.)
Above the layer stack are Lock icons, which enable you to lock the transparency, editing, and movement of layer contents. At the upper-left of the Layers palette is a list of blending modes that can alter the color relationships of layers in the stack. And to the right of the blending modes is the Opacity indicator, which controls the level of transparency of a targeted layer s contents. The Fill opacity control is just below the master opacity control.
You can access many layer operations from the Layers Palette menu (shown in Figure 7.3). Clicking the small triangular icon on the upper-right of the palette reveals these options.

Figure 7.3: The Layers Palette menu
Working with the Background
When you scan or import an image from another program and open it in Photoshop, the Layers palette displays one thumbnail, labeled Background . You can think of the Background as an image mounted to a board. If you were to cut away a portion of the image with an X-Acto knife , you would see the board underneath. In Photoshop, when you make a selection on the Background and delete it with the Delete key or erase it with the Eraser tool, the hole fills with the background color specified in the Tool palette.
The contents of all the layers float on top of the Background. Unlike a layer, the Background is opaque and cannot support transparency. If the document contains more than one layer, the Background is always at the bottom of the stack and cannot be moved or placed in a higher position. When new layers are added to the document, their content always appears in front of the Background.
| Note | If your image is composed entirely of layers, you can convert one of your layers into a Background. Target a layer and choose Layer ’ New ’ Background From Layer. The Background will automatically be deposited at the bottom of the stack. Blend Mode Locks |
By default, the Background is locked. If you want to move its contents, adjust its opacity, or reposition it in the Layers stack, you need to convert it to a layer. As with many of Photoshop s operations, there is more than one way to perform this task:
To convert the Background into a layer from the menu , choose Layer ’ New ’ Layer From Background.
To convert the Background from the Layers palette , double-click the Background s name or thumbnail to display the New Layer dialog box. If you click OK, Photoshop names the converted layer Layer 0 by default. You can use the default name, or you can enter a name for the new layer in the Name field and click OK.
Note The New Layer dialog box also lets you color-code a layer, adjust its opacity, and specify a blending mode. You can also group it with other layers if, for example, you re using it to make a clipping group . (Chapter 22, Advanced Layer Techniques, describes clipping masks.)
To convert the Background by using keyboard shortcuts , Option-double-click (Macintosh) or Alt-double-click (Windows) the Background s name or thumbnail to automatically change it into a layer named Layer 0 (see Figure 7.4).
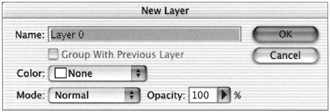
Figure 7.4: The New Layer dialog box showing the layer name Layer 0
Naming Layers
Naming your layers is essential to establishing an efficient work flow. The default numbers that Photoshop assigns to new layers become quite anonymous when their content is too small to be recognized on the thumbnail or when there are 30 or 40 of them in the document. Instead of using the default name Layer 0, I recommend that you give the layer a name that readily identifies it. Naming each layer with a descriptive title is a fast way to organize the components of your image for easy identification.
To name or change the name of a layer, double-click the layer s current name next to the thumbnail in the Layers palette. A box will appear around it. Type in the new name.
Viewing Layers
You can conceal or reveal the content of a layer by clicking the visibility indicator in the first column of the Layers palette (it looks like an eye).
To reveal or conceal the contents of more than one layer at a time, click the eye next to each of the desired layers. To conceal all but one layer, press the Option/Alt key while clicking that layer s visibility icon. With the same key held down, click the icon again to reveal all layers.
Choosing Your Thumbnail Size
The thumbnails that represent each layer display its content in miniature . You can choose from three sizes of thumbnails, or you can choose to display no thumbnail at all. To specify a thumbnail display, click the Layers Palette menu and choose Palette Options. In the dialog box that opens (Figure 7.5), click the radio button next to the desired thumbnail size and then click OK.
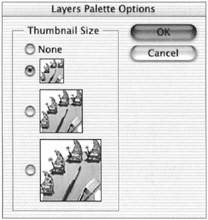
Figure 7.5: The Layers Palette Options dialog box determines the size of the thumbnails that are displayed.
Targeting a Layer
You can apply a Photoshop operation to affect the contents of a layer, but first you must target the layer you want. A targeted layer is active and ready to be edited. To target a layer, click its name, which appears to the right of the thumbnail. You will see a colored highlight in the text field and a brush symbol to the left of the layer s thumbnail, in the second column (as in Figure 7.6). Only one layer can be targeted at a time; a targeted layer must be visible to be affected. Certain effects can be applied to multiple layers simultaneously by linking them (see the upcoming section titled Linking Layers ), placing them in sets, or grouping them (see Chapter 22).
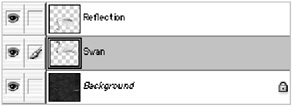
Figure 7.6: The Swan layer is targeted.
Understanding Transparency and Opacity
Because transparency is by nature invisible, it is graphically displayed in Photoshop as a gray and white checkerboard. If you see an area on a layer that is displayed as a checkerboard, then the area is totally transparent. This means that either it is void of pixels or the pixels are completely transparent. If it s displayed as a combination of image and checkerboard, then it is semitransparent; and if it s displayed totally as image, then it s opaque. Figure 7.7 illustrates the difference between opaque and semitransparent images.
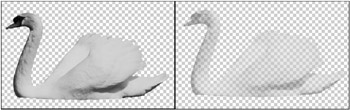
Figure 7.7: The swan at the left is displayed at 100% opacity; the swan at the right is displayed at 50% opacity.
If only one layer is displayed and its contents are surrounded by areas of transparency, the image will appear against a gray and white checkerboard. If the color of the image is predominantly gray and the checkerboard becomes difficult to see, the color and size of the checkerboard can be changed in Transparency & Gamut Preferences to better reveal the image.
Controlling Opacity
The Opacity slider enables you to adjust the level of transparency of all the pixels on a targeted layer, so that you can see through the image to the underlying layers in the stack. Click the arrow next to the Opacity field on the Layers palette; a slider pops up, which you can drag right to increase, or left to decrease, opacity. Or enter a value from 0% to 100% directly in the box.
If any tool other than a painting or an editing tool is active, you can type any number between 01 and 100 to change the Opacity value of the targeted layer.
Setting Fill Opacity
The Fill opacity control enables you to add another opacity setting to a layer. Fill opacity affects a layer s pixels without affecting the opacity of any layer styles that have been applied to the layer. (Layer styles are discussed later in this chapter.)
Changing Layer Order
The stacking order in the Layers palette determines the plane of depth where the visual elements appear. The content of the topmost layer in the Layers palette appears in the front of the image. The further down in the stack a layer is, the farther back its content appears, all the way back to the bottommost layer, or the Background.
You can change a layer s position in the stack and, consequently, its visual plane of depth in the image. In the Layers palette, click and drag the thumbnail or name of the layer that you wish to move. As you drag up or down, you will see the division line between layers become bold (as in Figure 7.8). The bold line indicates the new location where the layer will appear when the mouse is released.
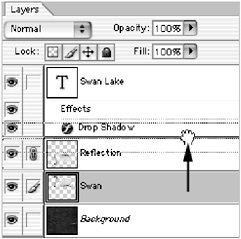
Figure 7.8: You can change a layer s position in the stacking order.
Another method of changing the position of the layer in the stack is to choose an option under Layer ’ Arrange, or use the equivalent key command. The Arrange submenu presents you with four options, as shown in Table 7.1.
| POSITION | MACINTOSH SHORTCUT | WINDOWS SHORTCUT | RESULT IN THE LAYERS PALETTE | RESULT TO THE IMAGE |
|---|---|---|---|---|
| Bring To Front | Shift- | Shift-Ctrl-] | Moves the layer to the top of the stack. | Contents appear at the front of the picture plane. |
| Bring Forward | | Ctrl-] | Moves the layer on top of the layer that was immediately above it. | Contents appear in front of the layer that was immediately above it. |
| Send Backward | | Ctrl-[ | Moves the layer under the layer that was immediately below it. | Contents appear behind of the layer that was immediately below it. |
| Send To Back | Shift- | Shift-Ctrl-[ | Moves the layer to the bottom of the stack one step above of the Background. | Contents appear in front of the Background but behind all of the other layers in the stack. |
Linking Layers
Let s say you ve positioned two elements of a logo on separate layers, and you are satisfied with their visual relationship, except that they are a little too large and they need to be moved a half-inch to the left. You can transform or move two layers simultaneously by linking them.
To link one or more layers, target one of the layers. The target layer will display a brush icon. Click in the column to the immediate left of the thumbnail on the layers that you want link to the target layer. A chain icon appears, like the one next to the Reflection layer in Figure 7.9. You can then choose the Move tool or any transformation function (Edit ’ Transform), and the layers will scale, rotate, distort, and so forth as a group. (See Chapter 13, Sizing and Transforming Images, for more on transformations.)
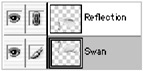
Figure 7.9: Linked layers are indicated by a chain icon.
Linked layers are used primarily for transforming and moving multiple layers simultaneously. You can apply other effects to multiple layers by using specific layer-based operations. (These effects are described in more detail in later sections of this chapter or in later chapters of this book.) These operations include the following:
Adjustment Layers You can control color, brightness, and contrast adjustments and for color mapping functions (see Chapter 16, Adjusting Tonality and Color ).
Layer Masks You have the ability to conceal and reveal areas of layers in the stack (see Chapter 22).
Blending Modes Items for this list apply a preprogrammed color algorithm to affect the relationship between the pixels on a layer and the layer immediately below it in the stack (see companion CD).
Layer Sets You can group, control the opacity and the position of multiple layers in the stack, and transform or move multiple layers simultaneously (see the following section).
| New | Layer Comps You can save different versions of an image to the Layer Comps palette and thereby avoid having to save multiple documents (see Chapter 22). |
Fill Layers These operations apply a solid color, gradient, or pattern to an independent layer. When the opacity is adjusted, the Fill layer affects the underlying layer. A Fill layer also contains a layer mask, so that the color, gradient, or pattern can be superimposed onto a specific area of the image (see Chapter 10, Creating and Applying Color ).
Layer Content You can change the type of Adjustment or Fill layer and how it affects the layers below it in the stack (see Chapter 22).
Clipping Masks You can conform the content of one layer to the shape of the pixel content of the layer immediately below it (see Chapter 22).
Grouping Layers in Layer Sets
Photoshop supports an unlimited number of layers, with the amount of RAM being the only limiting factor. The potential to produce enormous quantities of layers makes a layer-management tool an absolute necessity.
Layer sets let you consolidate contiguous layers into a folder on the Layers palette. By highlighting the folder, you can apply certain operations to the layers as a group. The layers in a layer set, such as Swan and Reflection in Figure 7.10, can be simultaneously revealed or concealed by clicking the visibility indicator for the set in the Layers palette. The whole set can be repositioned in the stack, moved, and ”like linked layers ”transformed by using any of the transformation tools.
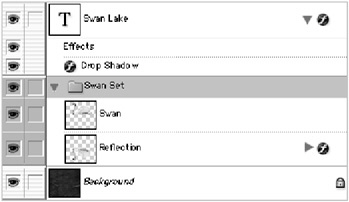
Figure 7.10: The Swan and Reflection layers make up a layer set, which has been color-coded.
Although you can transform and reposition both layer sets and linked layers, layer sets differ from linked layers in that they contain contiguous layers ”that is, layers that are sequenced immediately above or below each other in the stack. Layers that are linked can be anywhere in the stack.
There are a few ways to create a new layer set:
-
From the Layer menu, choose New ’ Layer Set.
-
From the Layers Palette menu, choose New Layer Set.
-
Click the Create a New Set icon
 in the Layers palette. By default, the first layer set will be named Set 1.
When using the first two methods , the New Layer Set dialog box appears (see Figure 7.11). You can name the layer set, color-code it, and specify the blending mode and opacity.
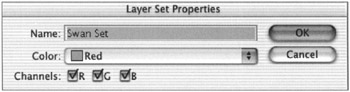
Figure 7.11: Creating a new layer set
Layer Set Properties If you want to change the color properties of a targeted layer set, choose Layer ’ Layer Set Properties, or Layer Set Properties from the Layers palette menu. In the dialog box that appears (see Figure 7.12), select the check boxes to display the individual or combined color information of all the layers in the set. This dialog box also lets you color-code a layer.
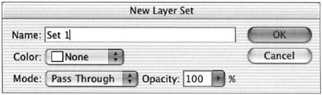
Figure 7.12: Determining layer set properties
Layer Sets from Linked Layers A fast way to create a layer set is to link the layers that you want in the set. Then choose Layer ’ New ’ Layer Set From Linked. All the linked layers will be consolidated into one set. When you convert linked layers into a layer set, however, they become contiguous and their positions in the stack might change.
Adding Layers to a Set To add a layer to a set, click and drag it to the Layer Set folder. Then, release the mouse. To reveal the layers within the set, click the triangle to the left of the folder so that it points down. To conceal the contents of the layer set to eliminate clutter, click the triangle so that it points to the right.
| New | Nesting Layer Sets Photoshop CS enables you subdivide layer sets by nesting them within a layer set. Drag a layer set folder and drop it into another s folder or press |
Locking Layers
Photoshop offers four controls, or locks , in the Layers palette that prevent a layer from being modified (see Figure 7.13). Each lock is represented by an icon at the top of the palette. To lock a layer, target the layer and check the icon for the lock type you want.
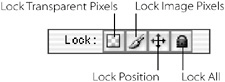
Figure 7.13: Four locking controls
The lock types include the following:
Lock Transparent Pixels This function is comparable to Preserve Transparency in earlier versions of the software. It protects the areas of the targeted layer that don t contain pixels from being edited. If you attempt to paint on a transparent area, for example, the tool will not respond, so in a sense, locking transparency works like a mask. The areas that do contain pixels will still respond to any Photoshop operation. Locking transparency does not protect transparent areas from the effects of transformations such as scaling, rotating, or moving.
Lock Image Pixels The entire targeted layer is protected from editing functions such as painting, color adjustments, or filters. You can, however, transform or move the content of a layer. Menu operations that you can t perform are grayed out. If you attempt to apply a tool function, you will be greeted by a circle with a line through it.
Lock Position Selecting this option prevents you from moving a targeted layer or applying Edit ’ Free Transform or any of the Edit ’ Transform operations such as Scale and Distort. When the Lock Position icon is locked, these menu items are grayed out.
Lock All You can protect a targeted layer from all editing functions by clicking the Lock All box.
EAN: 2147483647
Pages: 355