Creating New Layers
Creating New Layers
It is often necessary to create a new layer, either to add new content to the image or to isolate an existing element. When a new layer is added, the file size of the document increases proportionately to the quantity of information on the new layer. Adding several new layers can significantly increase the amount of space the image consumes on your disk. This, however, is a small inconvenience for the power that layers deliver. As part of your work flow, though, you ll no doubt want to consolidate layers during the imaging process to decrease the file size (see Consolidating Layers later in this chapter).
Creating a New Empty Layer
Here is an another example of redundant Photoshop operations. Two of these operations produce identical results, and one produces similar results with a slight twist. All three create a new layer:
-
From the Layer menu, choose New ’ Layer to bring up the New Layer dialog box. Name the layer and specify its characteristics. Click OK.
-
From the Layers palette menu, choose New Layer to bring up the New Layer dialog box (see Figure 7.14). Name the layer and click OK.
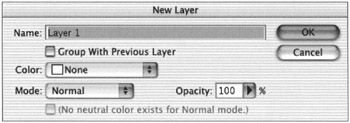
Figure 7.14: The New Layer dialog box -
Click the New Layer
 icon ( next to the trash icon at the bottom of the Layers palette). A new layer, named Layer 1, appears in the stack immediately above the targeted layer. To rename the new layer, double-click its name and enter the new name in the Name field. You can also access the Layer Properties dialog box from the Layer menu or from the Layers Palette menu to rename the layer. Opt/Alt-clicking the New Layer icon will also bring up the dialog box.
Creating a New Layer with Content
There are two potential sources for the content of new layers: elements cut or copied from another layer or Background, and elements dragged and dropped from another document. Whatever its source, the end result isolates the content onto a separate layer so that it can be moved, edited, or rotated in the stack.
Copying an Image to a New Layer
When you choose Layer ’ New ’ Layer Via Copy, the selected portion of the image is duplicated and moved to the same position on a new layer. By default, the first new layer you copy or cut is assigned a number that hasn t been used.
The name that Photoshop assigns to a new layer depends on the technique you choose to create the new layer and the existing content of the Layers palette. It will appear as Layer 0, Layer 1, or some other number. To avoid the confusion of inconsistent labels, rename your new layer immediately upon creating it.
To copy the contents of a layer to a new layer:
-
Target the layer or Background that you intend to copy.
-
Make an accurate selection of the area on the layer or Background by using one of the selection tools or techniques.
-
Choose Layer ’ New ’ Layer Via Copy, or press
 /Ctrl-J. The content within the selection marquee is copied to a new layer and is placed immediately above the layer from which it was copied. The new layer automatically becomes the target layer. In Figure 7.15, I selected just the skull on the Background and copied it to a new layer.
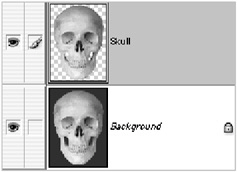
Figure 7.15: Layer ’ New ’ Layer Via Copy -
Double-click the layer name s text to rename the layer.
-
Press Return/Enter to commit the name.
| Note | When you copy or cut to a new layer, inspect the image edges against a contrasting solid fill background. Use one of Photoshop s matting techniques (detailed in Chapter 22) to remove any stray edge pixels. |
Cutting an Image to a New Layer
When you cut a selected portion of an image to a new layer, the content of the selection is either filled with the current background color (if it s on the Background) or replaced by transparency (if it s on a layer). It is transferred to the same position on a new layer.
To cut a portion of an image to a new layer:
-
Target the layer or Background with the element(s) that you intend to cut.
-
Make an accurate selection of the area by using one of the selection tools or techniques.
-
Choose Layer ’ New ’ Layer Via Cut, or press Shift-
/Ctrl-J. The content is cut to a new layer, leaving a transparent hole in the original layer or an area filled with the background color (if it was cut from the Background). The new layer is placed immediately above the targeted layer. Figure 7.16 shows the image of a skull cut to a new layer. On the left, I selected the skull on the Background and then cut it to a new layer. On the right, I selected the skull on a layer and cut it to a new layer.
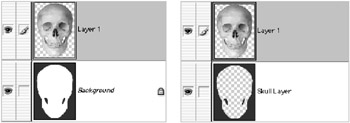
Figure 7.16: When the selection is made on the Background, the cut area fills with the background color (left). When the selection is made on a layer, the selected area creates a transparent hole (right). -
Double-click the layer s name to rename the layer; then press Return/Enter.
Dragging a Layer from Another Document
A layer from an open document (and all of that layer s contents) can be copied to another open document simply by dragging and dropping it. The layer will appear immediately above the targeted layer in the stack. The source document is the document from which you will get the layer. The destination document is where you will put the layer.
To drag a layer from a document:
-
Open the source document and the destination document so that they both appear on-screen.
-
Target the layer or Background on the Layers palette of the source document.
-
Click and drag the layer name or thumbnail from the source to the destination document until you see an outline of the layer. Release your mouse (see Figure 7.17).
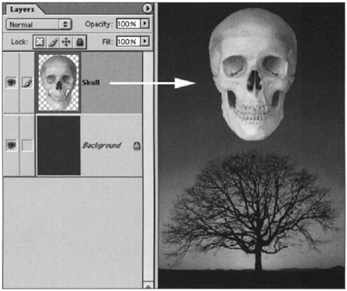
Figure 7.17: You can drag a layer from the Layers palette and drop it on an image that is open on the desktop. -
Name the layer by double-clicking its name.
| Note | The new layer will appear immediately above the targeted layer on the destination document. |
Dragging a Selection from Another Document
The contents of a selection can be copied from an open document and placed in another open document by dragging and dropping. When you drag and drop a selection, a new layer is automatically created in the destination document and will appear immediately above the targeted layer in the stack. Here are the steps:
-
Open the source document and the destination document so that they both appear on-screen.
-
Target the layer or Background on the Layers palette of the source document.
-
Make an accurate selection of the area to be moved.
-
Choose the Move tool. Click and drag the selection from the source document s image window to the destination document s image window until you see a rectangular outline. Release your mouse when the outline appears where you want the selection to be placed (see Figure 7.18).
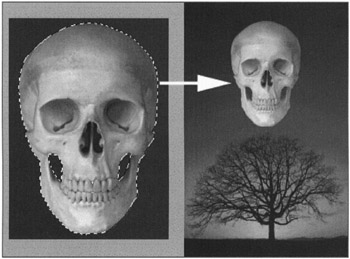
Figure 7.18: You can drag a selection from the image window and drop it on an image that is open on the desktop. -
Name the new layer.
Duplicating Layers
Two techniques produce identical results for creating an exact copy of a layer. When the copy is made, it appears directly above the original layer; its name is the name of the original plus the word copy. The new layer has the same opacity, styles, and blending mode settings as the original. To duplicate a layer, do one of the following:
-
Target the layer to be copied. Choose Duplicate Layer from the Layer menu or from the Layers palette pop-up menu.
-
Drag the layer s name or thumbnail to the New Layer icon in the Layers palette. If you Option/Alt-drag, you ll be able to name the new layer from the Duplicate Layer dialog box that automatically appears (see Figure 7.19). In the Destination field of the dialog box, you can designate any open document, or create a new document in which to duplicate the layer.
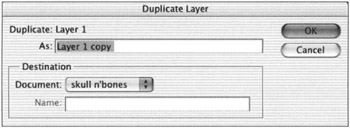
Figure 7.19: The Duplicate Layer dialog box
Removing Layers
You can eliminate layers by using the Layers palette (deleting the contents of that layer in the process). To discard a layer, do one of the following:
-
Target the layer to be deleted. Choose Delete Layer from the Layer menu or from the Layers palette menu.
-
Drag the layer s thumbnail or name to the trash icon in the Layers palette.
-
Target the layer and then click the trash icon, which brings up a window to confirm the deletion (Figure 7.20).
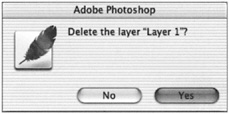
Figure 7.20: The Delete Layer confirmation D ialog box -
Target the layer and then Opt/Alt-click the trash icon to directly delete the layer.
EAN: 2147483647
Pages: 355
- Legal, Regulations, Compliance, and Investigations
- Initiation of the System Authorization Process
- Continuous Monitoring Process
- Appendix C The Information System Security Architecture Professional (ISSAP) Certification
- Appendix E The Information System Security Management Professional (ISSMP) Certification