Applying Selection Techniques
You can modify a selection outline several ways; among them, you can conceal it, transform it, add to it, subtract from it, soften its edges, and eliminate it. These commands are important because they facilitate the process of masking. For example, if you draw a selection incorrectly, instead of redrawing it from scratch, it might be more efficient to make a few alterations to it. What follows are some indispensable outline-altering techniques.
Using the Select Menu
Some selection adjustments can be automatically applied by accessing them from the Select menu or applying a shortcut key command. You will find that you use these commands quite frequently, so in the interest of working efficiently , I recommend that you learn to use the shortcuts. Here are the Select Menu commands and their shortcuts:
Select All ( ![]() /Ctrl-A) This command selects the entire content of an image or a targeted layer. Because you can perform virtually any operation to the entire image in Photoshop when no specific area has been defined by a selection border, this command is used primarily to select the image prior to copying and pasting.
/Ctrl-A) This command selects the entire content of an image or a targeted layer. Because you can perform virtually any operation to the entire image in Photoshop when no specific area has been defined by a selection border, this command is used primarily to select the image prior to copying and pasting.
Deselect ( ![]() /Ctrl-D) Use Select ’ Deselect to deactivate the selection. Another method is to click off the selection anywhere on the image ”except when using the Single Column and Single Row Marquee tools or the Magic Wand tool.
/Ctrl-D) Use Select ’ Deselect to deactivate the selection. Another method is to click off the selection anywhere on the image ”except when using the Single Column and Single Row Marquee tools or the Magic Wand tool.
Reselect (Shift- ![]() /Ctrl-D) Choose this command to reactivate the last deselected selection border.
/Ctrl-D) Choose this command to reactivate the last deselected selection border.
Inverse (Shift- ![]() /Ctrl-I) To deselect the selected portion of the image and select the masked portion, choose Select ’ Inverse. This technique can save time when an image has been photographed on a single-colored background. The background can be selected quickly with the Magic Wand and inverted to select the desired content, as in Figure 6.6.
/Ctrl-I) To deselect the selected portion of the image and select the masked portion, choose Select ’ Inverse. This technique can save time when an image has been photographed on a single-colored background. The background can be selected quickly with the Magic Wand and inverted to select the desired content, as in Figure 6.6.
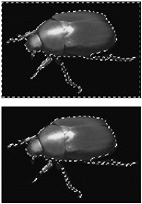
Figure 6.6: After selecting the background (top), the Inverse command deselects that portion of the image and selects the masked portion (bottom).
Show/Hide Selection Edges Use View ’ Show ’ Selection Edges to conceal (and reveal) the marching ants from view while the selection remains active. You can then choose View ’ Extras (or ![]() /Ctrl-H) to perform the operation. This command is useful in seeing changes to the image without the distracting selection border.
/Ctrl-H) to perform the operation. This command is useful in seeing changes to the image without the distracting selection border.
| Note | With the border invisible, you might forget that an area of the image is selected. Photoshop will not perform operations anywhere else on the image until the selection border is deactivated. If you find that the Paintbrush tool is not painting or the Smudge tool not smudging , press |
Modify After a selection has been made, you can alter its dimensions by choosing one of the Select ’ Modify subcommands. Each command changes the selection marquee and alters its dimensions:
-
Border frames the selection and deselects the inside area of the outline, producing a selected border of specific thickness (see Figure 6.7). When you choose Select ’ Modify ’ Border, you can determine the thickness of the border by entering a value in pixels in the Width field.
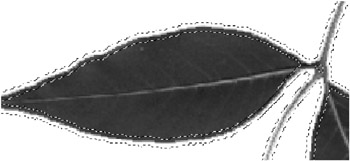
Figure 6.7: The Border command selects only the outermost portion of your selection (here, the pixels immediately inward and outward from the edge of the plant). -
Smooth rounds sharp corners of a selection, eliminating protrusions and stair-stepped areas of the selection border. Choose Select ’ Modify ’ Smooth, and then enter a sample radius value (larger values increase the effect). In Figure 6.8, the sample radius results in cutting off the left tip of the triangle.
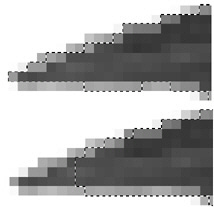
Figure 6.8: The Smooth command rounds off jagged corners, such as the tip of this triangle. -
Expand and Contract both perform in the same way to enlarge or reduce the size of the selection by a specified number of pixels. This command is quite useful for trimming off stubborn, unwanted edge pixels (see the section on matting in Chapter 22, Advanced Layer Techniques ) or tightening up your selection a bit. Choose Select ’ Modify ’ Expand or Contract, and enter a value between 1 and 100 pixels. Click OK to implement the operation.
Grow The value entered in the Tolerance field of the Magic Wand s Options bar determines how much the selection will grow. When you choose Select ’ Grow, the selection marquee expands to include adjacent pixels that are lighter or darker by no more than the tolerance range.
Similar To use this command, a selection must be active. When you choose Select ’ Similar, Photoshop selects all pixels within the image that are the same colors as the pixels within the selected area. The amount selected is controlled by the Tolerance setting in the Magic Wand s Options bar.
Transforming a Selection
After you make a selection, you might want to alter its shape before applying one of Photoshop s many powerful operations to its content. Photoshop gives you the ability to scale, rotate, or move a selection border. To transform a selection, choose Select ’ Transform Selection. A rectangular transformation box appears around the selection border. You can then transform the size, angle, or position of the selection border with the following procedures:
Move To move the selection, place your cursor within the rectangular transformation box; the Move cursor ![]() appears. Press your mouse button and drag the selection into position; then release the mouse.
appears. Press your mouse button and drag the selection into position; then release the mouse.
| Note | The icon in the center of the transformation box represents the point of origin. You can move this icon prior to scaling or rotating the selection to change the point from which the selection will transform. When you want to move the box, however, you place your cursor anywhere in the selection except on the icon. |
Scale To scale a selection border, place your cursor on one of the square handles on the corners ![]() or sides of the box. The Scale cursor appears. Press your mouse button and drag. To keep the selection border in its current proportion, press your Shift key while dragging.
or sides of the box. The Scale cursor appears. Press your mouse button and drag. To keep the selection border in its current proportion, press your Shift key while dragging.
Rotate To rotate a selection, place your cursor outside the box. The Rotate cursor ![]() appears. Press your mouse button and drag to rotate the selection. Holding down the Shift key enables precise rotation in 15-degree increments .
appears. Press your mouse button and drag to rotate the selection. Holding down the Shift key enables precise rotation in 15-degree increments .
Scale and Rotate are demonstrated in Figure 6.9. To implement the transformation, click the check mark or press Return/Enter; the transformation box will disappear. To cancel the transformation, click the Cancel box or press the Esc key.
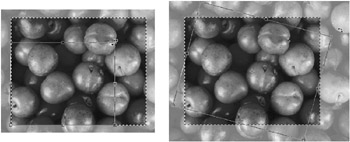
Figure 6.9: Transform Selection techniques: Scale (left) and Rotate (right)
After you ve chosen Select ’ Transform Selection and the transformation box is displayed, you can also apply many more transformations to the selection by choosing Edit ’ Transform. A list of options appears, including Skew, Distort, Perspective, and various precise Rotate commands. You perform these additional functions by repositioning the anchor points of the transformation box. The Flip Horizontal or Flip Vertical commands will mirror the marquee across a horizontal or vertical axis passing through its point-of-origin icon. See Chapter 13, Sizing and Transforming Images for more on this topic.
Applying Other Selection Techniques
After a selection has been made, you can reposition the marquee with or without its contents by using the following techniques:
Move Selection Outline While in any selection tool, click inside the marquee and drag. After you ve relocated the outline, release the mouse.
Nudge Selection Outline While in any selection tool, press the right, left, up, or down arrow keys to move a selection in increments of 1 pixel. Press Shift plus any of the arrow keys to move the selection outline 10 pixels at a time.
Move Selection Contents Choose the Move tool ![]() ; click inside the marquee and drag. After you ve relocated the marquee, release the mouse. You can also move the contents while in any selection tool:
; click inside the marquee and drag. After you ve relocated the marquee, release the mouse. You can also move the contents while in any selection tool: ![]() -click/Ctrl-click inside the marquee and drag. The icon
-click/Ctrl-click inside the marquee and drag. The icon ![]() displays a symbol that looks like scissors, indicating that you are cutting the contents of the selection outline and moving them. After you ve relocated the selection, release the mouse and then the key. The Move tool can be used for transformation operations such as scaling, rotating, and distorting You can read more about the Move tool in Chapter 13.
displays a symbol that looks like scissors, indicating that you are cutting the contents of the selection outline and moving them. After you ve relocated the selection, release the mouse and then the key. The Move tool can be used for transformation operations such as scaling, rotating, and distorting You can read more about the Move tool in Chapter 13.
| Note | After you ve selected an area and moved it once, it floats. That is, it can be moved again by placing a selection tool inside the marquee, pressing the mouse button, and dragging. You no longer need to press |
Nudge Selection Contents You can nudge the contents of a selection in 1-pixel increments: with the Move tool active, press the left, right, up, or down arrow keys. Press Shift and any of the arrow keys to move the selection contents 10 pixels at a time.
Duplicate Selection Contents With the Move tool active, hold down Option-Alt/ ![]() -Ctrl while you click and drag. You ll see a double Move cursor
-Ctrl while you click and drag. You ll see a double Move cursor ![]() , which indicates that you are duplicating the selection. (Or, while any other tool is active, hold down
, which indicates that you are duplicating the selection. (Or, while any other tool is active, hold down ![]() /Ctrl while you drag.) After you ve relocated the copy to the desired position, release the mouse.
/Ctrl while you drag.) After you ve relocated the copy to the desired position, release the mouse.
EAN: 2147483647
Pages: 355