Setting Preferences
When you change Photoshop s preferences, you affect the behavior or the appearance of the program, thereby customizing the interface to best suit your style of working. In the descriptions throughout this chapter, the illustrations are of the default preferences, but I recommend (in parentheses within the text) the preference configuration that is most suitable for the majority of working situations.
You access the preferences through the Photoshop ’ Preferences menu in the Mac and the Edit ’ Preferences menu in Windows, or type ![]() -K (Mac) or Ctrl-K (Win) to display Photoshop s Preferences dialog box. You also have the option of going directly to the preference category you want under the Preferences submenu.
-K (Mac) or Ctrl-K (Win) to display Photoshop s Preferences dialog box. You also have the option of going directly to the preference category you want under the Preferences submenu.
From the dialog box, you can navigate to any of the preference categories by clicking the pop-up list at the top of the dialog box. You can also jump from category to category by clicking the Next or Prev buttons .
General Preferences
When you first open the Preferences dialog box, you see Photoshop s General preference settings (see Figure 5.3), which are global settings that affect most of your working environment.
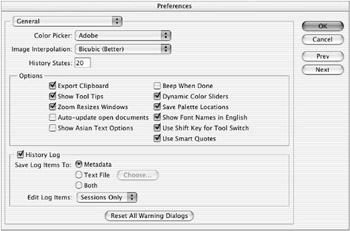
Figure 5.3: The General preferences
| Note | Again: the illustrations are of the default preferences; the settings in parentheses within the text are my recommendation for the majority of working situations. |
These settings include the following:
Color Picker (Adobe) You can specify which color picker to use when choosing a foreground or background color. The color picker you select is also used throughout the program to define preferences, such as the color of your guides and grids. In both Macintosh and Windows, you can choose between the Adobe Color Picker and the operating system s color picker.
Image Interpolation (Bicubic) This sets the global default for how Photoshop resamples, or sizes, images. When you resize an image, pixels are either added (if you increase the image size or resolution) or subtracted (if you reduce the image size or resolution). When adding pixels, the Nearest Neighbor setting, which is the fastest , makes an exact copy of the adjacent pixel. Bilinear uses an average of the two pixels above and below and the two pixels on either side to create gradations for smoother transitions. Bicubic averages the eight closest neighbors and adding a sharpening effect to increase the contrast.
| New | Two new interpolation algorithms have been added to Photoshop CS: Bicubic Smoother and Bicubic Sharper. These methods are designed to replace third-party plug-ins such as LizardTech s Genuine Fractals Print Pro. You can use these methods for upsizing an image with much better results than the original Bicubic resampling. Bicubic Smoother slightly blurs the edges of areas for a more sublimated continuous-tone look. Bicubic Sharper adds an additional sharpen algorithm to better enhance contrast. Both of these new methods require much less time than the third-party plug-in, but for best results, you should experiment and compare. |
Nearest Neighbor is useful for increasing the size of a bitmap or line art image in which all the pixels are either black or white. Nearest Neighbor will preserve the absolute values without producing intermediate gray transitions or anti-aliasing. It s also good for maintaining the integrity of some screen captures when resampling up for print, as image quality might be reduced by the anti-aliasing effect of Bicubic interpolation. For virtually every other application, choose Bicubic interpolation.
History States (20) You can determine the maximum number of states that will appear in the History palette before the earliest one is discarded. History requires RAM to remember stages, or states , in the process of developing an image. Limit the number of states to the default so as not to compromise the efficiency of the program.
Export Clipboard (Off) If you are running more than one program, the content of Photoshop s Clipboard will be transferred to the system s Clipboard. When you switch to another program, those contents can be pasted into a document there. If you copy and paste images within Photoshop only, turn off this option to reduce the amount of time it takes to activate another program.
Show Tool Tips (On) The small, yellow identification tags on the Tool palette that display each tool s name and keyboard shortcut are turned on and off from this setting. The Tool palette displays the same information when the tool items are expanded, so the information is somewhat redundant. It s not a bad idea, however, to get a double hit of this information until you learn what the tools are and how to access them with shortcut key commands. Another reason to keep this check box selected is that the tool tips also appear as short descriptions on many of Photoshop s commands, giving you a clear idea of their purpose.
Zoom Resizes Windows (Off) This preference lets you resize the image window when you use the key commands for zooming in ( ![]() /Ctrl-plus sign) and zooming out (
/Ctrl-plus sign) and zooming out ( ![]() /Ctrl-minus sign). The window will increase in size until it fills the screen vertically or horizontally.
/Ctrl-minus sign). The window will increase in size until it fills the screen vertically or horizontally.
Auto-Update Open Documents (Off) If an image is updated by another program outside of Photoshop, Photoshop will automatically reread and replace the open document with the updated version.
Show Asian Text Options (Off) Clicking this check box displays Chinese, Japanese, and Korean text options in the Paragraph palettes. You need this option only if you are working with Asian characters .
Beep When Done (Off) You can instruct Photoshop to emit a warning signal after it has performed an operation that displays a progress window. This can be helpful if you are away from your computer waiting for a long process (for example, a rotation or resize of a high-resolution image) to be completed.
Dynamic Color Sliders (On) When this check box is chosen , the bars on the Color palette preview the range of potential colors that can be designated, so that you know exactly where to move the sliders to designate a specific foreground or background color. Leave this check box selected to speed the process of determining your colors.
Save Palette Locations (On) If you choose this option, Photoshop will remember the position of your palettes when you quit and then relaunch the program. If the box is not checked, Photoshop restores the palette locations to the default positions .
Show Font Names in English (On) If you have any fonts on your system that do not use Roman characters, such as Asian fonts, their names will be displayed in English in the font list.
Use Shift Key for Tool Switch (Off) With this preference off, in order to switch to a tool or switch among grouped tools, you simply type the shortcut key for that group (L for the Lassos, E for the Erasers, and so forth). Checking this option adds the Shift key to the process, to prevent you from inadvertently switching while using a tool.
Use Smart Quotes (On) This preference instructs the Type tool to automatically place open quotation marks at the beginning of a quote and closed marks at the end of a quote.
| New | Save Log Items To This new item lets you log your editing history to the metadata that is attached to the file, or to a separate text document, or both. Click the Choose button to establish a destination. If you choose Sessions from the list, the log begins and ends when you open and close files. Choose Concise for a brief description of the items in the History palette. Choose Detailed for a more comprehensive description of the steps. You can open the text file in a text editor such as Text Edit for Mac or Notepad for Windows and review the contents. |
Reset All Warning Dialogs This option resets all warning dialog boxes that have a Don t Show Again check box chosen so that the dialogs will appear when activated.
File Handling
The File Handling preferences (see Figure 5.4) let you manage files when you save them either to your disk or to a workgroup server and let you designate whether your saved files will have previews or extensions.
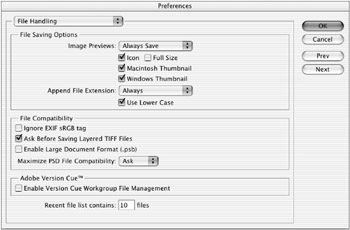
Figure 5.4: The File Handling preferences
These settings include the following:
Image Previews (Always Save) On the Macintosh, the Macintosh Thumbnail and Windows Thumbnail options create previews that will be displayed in the dialog box that you see when you open the image by using File ’ Open. There are two more options in Photoshop for Mac OS: Icon creates a tiny picture that you can view from the desktop for the purpose of identifying an image before you open it, and Full Size creates a preview that can be placed in a desktop-publishing program. These options are not available in the Windows File Handling preferences. The problem with previews is that they produce larger file sizes, so you need to decide whether the convenience of seeing the image prior to opening is worth the memory used.
Append File Extension (Always, Use Lower Case) On the Macintosh version, Append File Extension determines when to add an extension (for example, .tif , .psd , or .eps ) to the filename; your options are Always, Never, or Ask When Saving. The Windows version automatically adds the three-character extension to the filename, and the extension won t hurt a Mac file, so choose Always. You will be able to readily identify the type of image even if it s in a folder on the desktop, and you don t have to worry about adding the extension when saving for a Windows computer or publication to the Web.
This option also enables you to select whether the extension is uppercase or lowercase. (Whichever way you choose here, you have the option to switch the extension s case for each given file as you use the Save dialog boxes.) I recommend that you choose the Use Lower Case option when saving files to the Web because of Unix servers preference for lowercase extensions.
File Compatibility (On) Photoshop offers these options for maintaining compatibility with other software:
-
Ignore EXIF sRGB Tag (Off) Digital cameras often embed metadata. Some of that metadata is EXIF data such as the camera make, model, date/time, shutter speed, flash, and so forth. One section of EXIF metadata is the EXIF Color Space tag. This is not an ICC profile, but an EXIF description of what ICC profile would be manually assigned to the file when opening the image in Photoshop. The EXIF specification has only two options: sRGB or Uncalibrated, with Uncalibrated standing for any color space that is not sRGB. Clicking this check box ignores the sRGB tag and assigns the Uncalibrated color space option to the file.
-
Ask Before Saving Layered TIFF Files (On) Checking this box displays a reminder that your TIFFs are layered before you save them. Because layers increase file size, it s a good idea to keep this option on.
-
Enable Large Document Format (.psb) (Off) Photoshop PSD is limited to 30,000 —30,000 pixels. Large Document Format, or .psb , is essentially the same as PSD but supports up to 300,000 —300,000 pixel resolution documents. This format is readable only by Photoshop CS.
-
Maximize PSD File Compatibility (Ask) Selecting this preference saves a flattened preview with a PSD file. You can choose whether to Never or Always save the preview or to be asked each time you save. This feature is like insurance: it costs to use it but one day it might be needed. Turning it off might compromise compatibility with other software programs and future versions of Photoshop.
| Note | If you do decide to take out the insurance by saving a flat composite layer into the layered file, it is not immediately obvious how to access this flat layer ”as Photoshop defaults to the layers and not this hidden composite used by other software. Choose File ’ Open or use the File Browser to select the file to open. Hold down Shift/Alt when opening the image to Read The Composite Data Instead of the layered data. |
Within this you can choose Always, Never, or Ask when opening or updating images that reside on a managed file server. This pertains to workgroups who often use the same source image for publications . Choose Ask in both instances when checking out or updating to be sure that you don t automatically replace a file.
Recent File List Contains (10) Files You can find a list of the most recent files that have been opened under File ’ Open Recent. Enter a value for the number of the latest documents you would like to see displayed; the maximum is 30.
Display & Cursors
Use the Display & Cursors preferences (see Figure 5.5) to configure the way cursor icons and colors appear on-screen. These preferences do not affect the image data, but they do affect how you see the image.
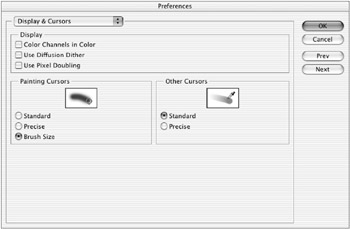
Figure 5.5: The Display & Cursors preferences
These settings are as follows :
Color Channels in Color (Off) By default, color channels appear in black-and-white. Each color channel is actually an 8-bit grayscale image that supports 256 shades of gray. Photoshop will display a channel in red, green, or blue, depending on the color information it represents, if this check box is selected. The black-and-white information of the default is displayed more clearly and is probably more useful to you, so leave the check box unselected .
Use Diffusion Dither (On) This option is used to control the pattern of pixel blending on low-resolution color monitors , or if you re displaying anything less then Millions Of Colors (Mac) or True Color (Win). Dithering is a method of distributing pixels to extend the visual range of color on-screen.
Use Pixel Doubling (On) When moving an image from one file to another, you can speed the process by reducing the resolution display. When you move an image with this box checked, the image will appear jagged and unrefined until it is in position and the operation is complete.
Painting Cursors (Brush Size) To change the display of the painting cursor, click the desired radio button. The Standard option displays the tool icon as the cursor. The Precise option displays crosshairs. Brush Size, the default, displays a cursor that is the size and shape of the brush for the currently selected tool.
Other Cursors (Standard) To change the display of tool cursors that do not use brushes, choose either Standard (the tool icon as the cursor) or Precise (a crosshair icon).
| Note | If you use standard or brush size cursors, you can toggle back and forth to the precise cursor with your Caps Lock key. |
Transparency & Gamut
These settings control the appearance of the transparency display of layers and the color of the CMYK gamut warning (see Figure 5.6).
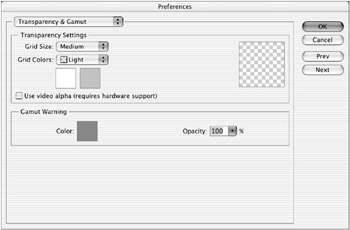
Figure 5.6: The Transparency & Gamut preferences
These settings include the following:
Transparency Settings (Medium, Light) With this option, you can set the default preferences for the transparency display on your layers. Sometimes the default gray checkerboard is not visible because of similar colors within the image. Under Grid Size, choose from a small, medium, or large grid. Grid Colors lets you select from a predefined list of color checkerboards. To choose specific grid colors, click either of the color swatches to display the Color Picker.
Use Video Alpha You can display alpha channels at a predefined opacity if you have the hardware that supports this type of display.
Gamut Warning (Default) When working on RGB images intended for four-color process printing, you ll want to preview the files before converting to CMYK. To see which colors are out of the CMYK gamut, choose View ’ Gamut Warning. The gamut warning displays a colored mask over the areas that are out of range. The Gamut Warning preferences let you determine the color of the mask. Click the color swatch to display the Color Picker. Choose an opacity percentage between 1 and 100 to affect the transparency of the mask.
Units & Rulers
You can establish settings for all measurement systems in Photoshop (see Figure 5.7).
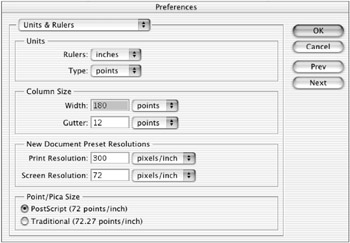
Figure 5.7: The Units & Rulers preferences
These settings include the following:
Rulers (Inches) The Rulers setting enables you to determine which measurement system will appear on the rulers when they are displayed. You can choose pixels, inches, centimeters, points, picas, or percent.
| Note | A shortcut to this preference is to double-click the rulers within the Photoshop workspace. |
Type (Points) You can determine how type size, leading, and other characteristics are displayed in the Options bar and in the Character and Paragraph palettes. Choose points, pixels, or millimeters.
Column Size (Default) If you re importing your image to a desktop-publishing program for publication to a newspaper, newsletter, or magazine, you might want to configure it to a specific column size. You can choose the width of the column and a gutter size so that your image will conform to the column size of the intended publication. You can determine the number of columns in the document when choosing File ’ New or Image ’ Image Size.
New Document Preset Resolutions (300 and 72) This preference enables you to determine the default print and screen resolutions for new documents.
Point/Pica Size (PostScript) This preference determines the size of your type characters. In PostScript type, there are 72 points per inch; in Traditional type, there are 72.27 points per inch. PostScript has clearly become the convention with the advent of desktop publishing and computer typography. Some purists still might prefer the Traditional type option, so it remains available.
Guides, Grid, & Slices
Graphic designers use guides and grids to align visual elements on a page (as described in Chapter 4, Navigation: Know Where to Go ). Slices divide an image into pieces for faster display on the Web.
The Guides, Grid, & Slices preferences (see Figure 5.8) enable you to determine the color and style of your ruler guides and your grid. Under Color, choose from the options list or click the large swatch on the right side of the dialog box to select a specific color from the Color Picker. You can determine the matrix of your grid by entering a value in the Gridline Every field and can set the number of subdivisions in the grid by entering a value in the Subdivisions field. In the slice field, you can specify slice color and whether or not to display their designated number in the layout.
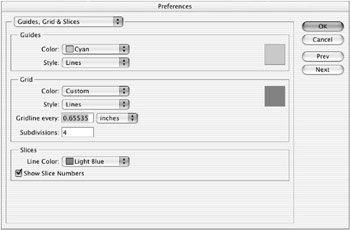
Figure 5.8: The Guides, Grid, & Slices preferences
Plug-Ins & Scratch Disks
Plug-ins are modular mini programs or filters that add functions to Photoshop. You can activate or deactivate third-party plug-ins from the Plug-Ins & Scratch Disks preferences (see Figure 5.9).

Figure 5.9: The Plug-Ins & Scratch Disks preferences
As you are aware, a scratch disk is hard-disk space used as memory. You can designate one or more hard disks in which to process images to increase the processing capabilities of your computer.
The settings in this dialog box include the following:
Additional Plug-Ins Folder (Off) Plug-ins extend Photoshop s capabilities; they include the filters, import/export modules, displacement maps, and third-party programs such as Kai s Power Tools. (See Appendix E for a list and descriptions of the most popular plug-ins.) You load or unload preferences from the Plug-Ins folder in the Photoshop application folder or any other folder on your disk. You can reorganize and load specific plug-ins into the program by checking this box, clicking the Choose button, and locating the desired folder on your disk.
Legacy Photoshop Serial Number Enter the serial number in this field if you use plug-ins that require an old-style Photoshop serial number.
Scratch Disks When Photoshop exceeds the amount of allocated memory, it uses a scratch disk as a source of virtual memory to process images. In the Scratch Disks field, assign the first scratch disk to your fastest hard drive with the most unused disk space. If you have additional hard drives , you can choose second, third, and fourth disks on which to allocate space. When the primary scratch disk is maxed out, the second one will kick in, then the third, and so on. Built-in memory is considerably faster than virtual memory, so you will experience a significant change in Photoshop s performance when you exceed the RAM allocation. Photoshop requires at least three to five times the file size for the amount of empty hard-disk space, so be sure to keep a block of space on your scratch disk(s) free of data. The disk should be defragmented and optimized regularly by using a utility program. Adobe recommends that you avoid working on removable media Zip disks, because they are less stable and much slower than hard disks.
| Note | A warning might appear at the bottom of the Plug-Ins & Scratch Disks dialog box that says changes to the options kick in only after you ve quit and relaunched the program. If you anticipate the need to change the scratch disk, hold down the |
Memory & Image Cache
Image caching accelerates the screen redraw during the editing process. Control your use of this feature in the Memory & Image Cache preferences (shown in Figure 5.10).
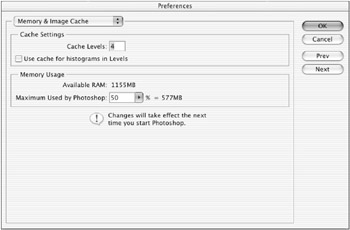
Figure 5.10: The Memory & Image Cache preferences
The preference settings include the following:
Cache Levels (8) This setting specifies how many copies of your image are stored in memory to update the screen more quickly at reduced view sizes. For example, if you adjust the color of an image at 50% view, the adjustment happens much faster because the program has to change only 25% of the pixels. Experiment with the settings for images larger than 15 MB. Eight is the maximum setting, but high settings will deplete your system resources because the smaller previews are stored in memory. If you are working on large images and have sufficient RAM, as most computers do today, set the image cache to eight levels. For smaller images with less RAM, use lower settings.
Use Cache for Histograms in Levels (Off) This preference defines the Levels histogram based on the zoom ratio and the cumulative display of histograms throughout the work session, which compiles a histogram faster but with less accuracy. Do not check this option. For more on histograms, see Chapter 16, Adjusting Tonality and Color.
Memory Usage (50%) This field displays the system s available RAM, the percentage of available RAM allocated to Photoshop, and the same amount in megabytes. The default setting of 50% is a good beginning to operating the software. During a Photoshop work session, if the Efficiency setting (in the status bar at bottom of the image window) ever drops below 100%, increase the percentage of memory by 10% increments until the efficiency remains at the maximum 100%. Never allocate, however, more than 90% of the memory. After you reset the memory allocation, you must quit and relaunch the program for the change to take effect.
| |
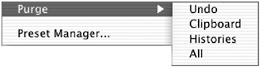
Let s say you ve been working on a file for the past 20 minutes, and you re about to apply the Unsharp Mask filter to give the image that final sparkle before sending it to the printer. You tweak the filter settings to perfection and click the OK button. A dialog box appears that tells you the filter cannot be applied because the scratch disk is full. Before you throw your shoe at the monitor in frustration, try purging the data stored on the scratch disks.
Choose Edit ’ Purge and choose data you would like to delete from the submenu. You can free up the Undo, Clipboard, and History memories individually, or choose All to dump everything. Be careful, though; you cannot undo this operation.
| |
File Browser
| New | The new File Browser preferences (see Figure 5.11) enable you to set specifications for the File Browser display. |
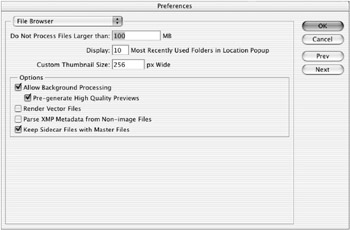
Figure 5.11: File Browser Preferences
The options are as follows:
Do Not Process Files Larger Than (100 MB) It can be time-consuming for the File Browser to create a thumbnail for an excessively large image. Enter a value for the maximum size of an image for which the File Browser will display a thumbnail, extract metadata, or create previews. The default, 100 MB, is a good start.
Display Most Recently Used Folders In Location Popup (10) This setting determines the number of folders to display in the Location pop-up list.
Custom Thumbnail Size (256 px) This option specifies the maximum width of a custom File Browser thumbnail. 256 is a reasonable width for most monitors.
Allow Background Processing (Off) Selecting this option uses extra processing power to regenerate metadata and preview information. Use it only if necessary or you may compromise performance.
High Quality Previews (Off) This setting creates better-quality previews, requiring more disk space and RAM. Turn it on only if necessary or you may compromise performance.
Render Vector Files (Off) Checking this box creates previews from EPS and Adobe PDF vector files. Use this only if you want the browser to display PDF 9Acrobat and EPS (Illustrator) previews.
Parse XMP Metadata from Non-Image Files (Off) Checking this box generates metadata from non-image files.
Keep Sidecar Files with Master Files (Off) This setting pertains to Sidecar files generated by XMP and THM formats. This feature enables you to copy, rename, batch rename, or move Sidecar files and keep them attached to their master files. A sidecar is a file in the same folder as the raw file with the same base name and an .xmp extension. This option is useful for long- term archiving of raw files with their associated settings, and for the exchange of raw files with associated settings in multiuser workflows.
EAN: 2147483647
Pages: 355