Matting and Placing the Flamingo
Matting removes unwanted pixels that result from selecting and cutting or copying an image from another document or layer. Follow these steps to matte and place the flamingo:
-
Open the file Flamingo.psd from the HO8 folder on the CD.
-
Choose the Magnetic Lasso tool
 . Drag around the edge of the flamingo, as in Figure H8.9, until you ve selected it.
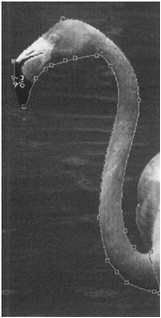
Figure H8.9: Selecting the flamingo with the Magnetic Lasso -
Choose the Move tool and drag the flamingo onto the hotel image. Name the new layer Flamingo .
-
The flamingo is too large, so reduce its size by 50%. Still using the Move tool, check Show Bounding Box in the Options bar. Place your cursor on the upper-left corner of the bounding box, click and drag inward a little bit, and release the mouse. The Options bar now changes to enable you to input numeric values for the transformation (see Figure H8.10).

Figure H8.10: Width and Height fields -
Click the chain icon between the Width and Height fields to constrain the proportion of the flamingo. Enter 50% in the Width field. Click the Commit (check mark) icon on the Options bar to confirm the transformation.
-
Move the flamingo to the second row of windows from the top and align its neck with the eighth window from the left side.
-
Choose Layer ’ Matting ’ Defringe to eliminate the edge pixels. Enter 2 pixels in the dialog box and click OK (see Figure H8.11).
Figure H8.11: Defringe dialog box -
Choose the Eraser tool and erase the bottom part of the flamingo so that it looks as though its neck is sticking out of the window (see Figure H8.12).
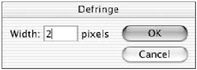
Figure H8.12: The flamingo and the cast shadow -
To enhance the effect, use the Burn tool to darken the bottom part of the flamingo s neck.
-
To further enhance the image, use the cast shadow technique to create a shadow for the flamingo.
-
Save your work.
EAN: 2147483647
Pages: 355