Filter Basics
Filters are nothing more than mathematical formulas that alter the features of pixels or groups of pixels in specified ways. What can be changed for any individual pixel are its brightness value, saturation, and hue, and its position in relation to other pixels. These changes are limited. What allows for the great variation among filter effects is the way they can alter groups of pixels over a specified range, following specific constraints. Some work subtly; others can be brash and flamboyant. Some effects gain strength when used gently and reapplied; sometimes a filter can be mitigated or softened by fading the effect. The Fade command extends the range and usefulness of filters by enabling you to use layer-like blending modes to blend the filter effect back into the original image.
It s beyond the limits of our space here to delineate every possible effect offered by Photoshop s filters. Rather, some of the most useful ones will be discussed in detail. I encourage you to play and experiment with filters to discover for yourself their vast potential. Keep in mind that when you re working with standard, automated special effects, they are available to every person who uses the software. Some of those effects, if applied generically, are immediately recognizable by anyone who s ever used them and can compromise the magic of the image. Be aware of what s available, but practice will indicate which techniques have more range of possibility and staying power; creativity will guide you to apply them in unusual or not-so-obvious ways. Sometimes the most effective special effect is the one that remains invisible.
Activating and Deactivating Filters
By choosing commands from the Filter menu, you can apply a filter to the entire image or confine it to a selected area. The Filter menu provides a long list of submenus, some of them long in turn . You can add or remove filters from these lists by placing items inside, or deleting them from, the Photoshop application s Plug-Ins folder. If you find there are large groups of filters you rarely use, you can save valuable memory space by removing those from the Plug-Ins folder. If a day comes when you can t get away without applying one, just slip it back into the Plug-Ins folder and it s available once again. Plenty of third-party plug-ins are available for special occasions; they can be treated the same way. See Appendix E for a list and descriptions of some of the more popular plug-ins.
| Note | If you hold down |
Filter Previews
When you re applying an effect as powerful and image-altering as some filters can be ”and certain filters are among Photoshop s most memory- intensive functions ”it s good to have some idea of what to expect. Most filters provide a preview inside the dialog box. You can zoom in or out by clicking the + and “ buttons , and drag inside the preview box to scroll to the part of the image you wish to preview. Other filters, such as the majority of corrective filters, enable you to preview the effect in the image window itself; just click the Preview box or button. When the blinking bar below the Preview box disappears, the program has finished building the preview.
The Filter Gallery
| New | Some of Photoshop s filters have been reorganized into a new, elegant interface called the Filter Gallery. Access the gallery from the top of the Filter menu. When you first open the gallery, you ll be presented with three fields, as in Figure 20.1. The left field displays a preview of the current image. Just below the preview field are plus and minus arrows and a view options list that enables you to preview the image in additional view ratios. The middle field displays a list of filter types neatly enclosed in category folders. The right field is inactive. |
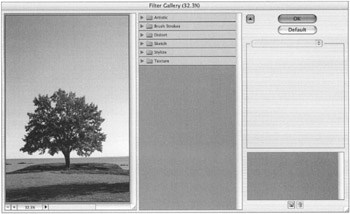
Figure 20.1: The initial Filter Gallery dialog box
The categories include Artistic, Brush Strokes, Distort, Sketch, Stylize, and Texture. Choose a folder by clicking its down arrow or name . You will then be presented with a list of filter names along with thumbnails that illustrate the filter s effect. Click a filter. The right field activates to display the filter s controls, as in Figure 20.2. The image display field on the left now shows the effect on the image of the filter with its current settings.
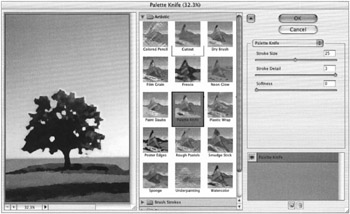
Figure 20.2: The Filter Gallery dialog box after choosing a filter from the Filter list
The bottom area of the control field displays the name of the filter that has been applied. If you want to apply a second pass of the same filter, click the New Filter icon at the bottom of the palette, and the filter is applied again and its name appears a second time in the list (see Figure 20.3). Click the visibility icon next to the filter name to reveal or conceal its effects. The preview will display the results of these applications. To try out the Filter Gallery, open the tree.psd file in the ch20 folder on the Photoshop CS Savvy CD .
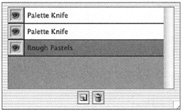
Figure 20.3: You can preview a second pass of the same filter or multiple filters.
| Note | Opt/Alt-click a filter name to add multiple filter entries to the filter list (this could be the same or different filters). Shift-click an entry on the filter list to update the current filter to the filter selected from the middle field. |
Fading Filters
Don t like how strong that filter effect comes on? You can mitigate the effect by using the Edit ’ Fade command (see Figure 20.4). Fade blends the filter effect with the original image, just as you would with a separate layer. Fade offers a dialog box containing the same options you see in the Layers palette ”that is, you can control Opacity from 1% to 100% and use any of the blending modes (with the exception of Behind and Clear). The Fade command is available immediately after a filter is applied. If you take any other action affecting the image, Fade becomes grayed out in the Edit menu.
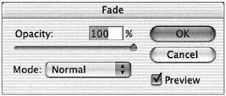
Figure 20.4: The Fade dialog box
| Note | To reapply a filter with the same parameters a second time, simply press |
Filter Types
Rather than go through the list filter by filter, let s divide them up by what they can do. First, we ll look at the constructive filters ”those that are used to modify and enhance images for printing or screen display. Destructive filters are an entirely different animal. These equations can take your image and turn it inside out. Their entire purpose is to displace pixels, more or less radically redistributing image elements. Other filters provide fine-art effects, mainly textures and painterly techniques. In addition to these types, there are filters for preparing images for video, for creating a digital watermark, and custom filters that enable you to create your own effects.
EAN: 2147483647
Pages: 355