Adjusting Contrast and Color
Adjusting Contrast and Color
Adjusting levels by individual channels offers more control than a global adjustment to the RGB channel. You will use this technique on an Adjustment layer to improve the contrast and balance the color and monitor the changes in the new Histogram palette.
-
From the Histogram palette menu, choose All Channels View (see Figure H7.2).
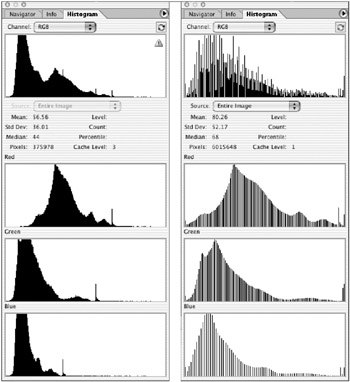
Figure H7.2: The All Channels View of the Histogram palette before (left) and after (right) the adjustment -
Choose Layer ’ New Adjustment Layer ’ Levels. Click OK in the New Layer dialog box.
-
At the top of the dialog box, choose Red from the Channel pull-down menu. Move the Black slider to the right until the input field reads 36. Move the White slider to the right until the input reads 175 (see Figure H7.3a).
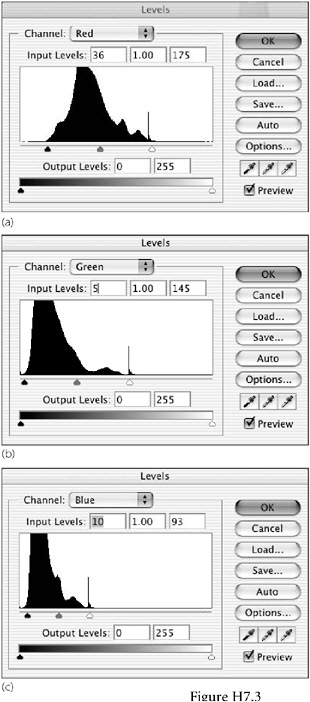
Figure H7.3: The Levels dialog boxes, showing red (a), green (b), and blue (c) levels -
Choose Green from the Channel pull-down menu. Move the Black slider to the right until the input field reads 5. Move the White slider to the left until the input reads 145 (see Figure H7.3b).
-
Choose Blue from the Channel pull-down menu. Move the Black slider to the right until the input field reads 10. Move the White slider to the left until the input reads 93 (see Figure H7.3c).
-
Notice the changes in the Histograms, The brightness values for each channel are spread across a wider range, which has improved the contrast and removed some of the color cast on the image.
-
You ll see a dramatic improvement in the color balance and contrast. Click OK and save the image.
Color Balancing
There is still a slight red cast on the image. You can eliminate that with the Color Balance feature, which was introduced in Chapter 16.
-
Choose Layer ’ New Adjustment Layer ’ Color Balance.
-
In the Color Balance dialog box, click the Highlights radio button (see Figure H7.4a).

Figure H7.4: The Color Balance dialog boxes, showing highlights (a), midtones (b), and shadows (c) -
Move the Cyan “Red slider toward Cyan until it reads “6. Move the Yellow “Blue slider toward Yellow until it reads “6.
-
Click the Midtones radio button (see Figure H7.4b).
-
Move the Cyan “Red slider toward Cyan until it reads “6. Move the Magenta “Green slider toward Green until it reads +4.
-
Click the Shadows radio button (see Figure H7.4c).
-
Move the Cyan “Red slider toward Cyan until it reads “7.
-
Click the Preview box twice to see the before-and-after changes, click OK, and save the image.
EAN: 2147483647
Pages: 355