Adding Missing Elements
Often in old photographs, large areas have been scratched beyond recognition or are missing completely. Based on the severity of the problem, you ll have to decide the best approach to restoration. In many cases, Photoshop s tools and commands can be combined to remedy these problems, but some parts of photographs might be too damaged to restore. If, for example, the face of a person is missing from an image, I recommend that you avoid trying to paint it back in, because this will prove to be a virtually impossible task to accomplish with any credibility. A better approach might be to composite the face from another photograph or, if that s not possible, fill the area with neutral gray.
Cloning
Small areas that are missing can be repaired with the Clone Stamp tool ![]() . I recommend that you first make a rough selection around the area so as to avoid applying the clone to unwanted areas. To practice using the Clone Stamp tool, follow these steps:
. I recommend that you first make a rough selection around the area so as to avoid applying the clone to unwanted areas. To practice using the Clone Stamp tool, follow these steps:
-
Open clone_practice.psd from the ch19 folder on the CD.
-
Choose the Magic Wand tool. Click inside the area to be repaired. Choose Select ’ Modify ’ Expand By: 4 Pixels.
-
Choose the Clone Stamp tool from the Tool palette. Place the cursor on the area of texture below and outside the selection outline. Press the Option (Mac) or Alt (Windows) key and click the mouse to sample the area. (Notice that the cursor turns into a target.) Release the mouse and the key.
-
Choose a soft brush. Place the cursor inside the selection. Click the mouse and drag. Notice that the area that is being cloned displays a small cross, and the area that is being repaired displays a circle as in Figure 19.3.
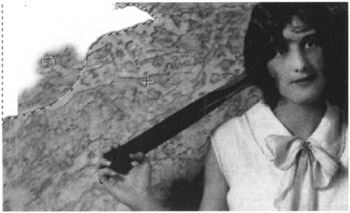
Figure 19.3: Cloning a selected area -
You might have to sample more than once. Place the cursor outside of the marquee, press the Option/Alt key, and click the mouse to sample another area.
-
After you re finished cloning within the selection marquee, deselect the area and clone any disparate edges that might have resulted. Carefully blend the edges of the region with the areas surrounding it.
-
Repeat the process for the other torn areas. Be sure to sample from areas of similar texture and value.
| Note | You can perform this process on an empty layer with the Use All Layers option checked. This technique offers the advantage of sampling from the entire image and cloning to a new layer. |
The Clone Stamp tool provides two options in the Options bar:
Aligned Checked The clone is aligned with the original sample. When you clone and release the mouse and clone again, the alignment on the original sample is maintained .
Aligned Unchecked Each time the mouse is released and the cloning is resumed, the original sample is repeated.
The Clone Stamp tool can also be used to remove unwanted elements or to add texture to the image. Careful observation of variations in color and texture of the image are crucial in determining the best place to sample for cloning.
Applying the Healing Brush
In many ways, the Healing Brush tool ![]() performs like the Clone Stamp. The process of sampling is similar, but the application of the sampled areas to the image differs . When the sampled area is painted onto the target area, it takes on the characteristics of the surrounding pixels, thus creating a seamless blend.
performs like the Clone Stamp. The process of sampling is similar, but the application of the sampled areas to the image differs . When the sampled area is painted onto the target area, it takes on the characteristics of the surrounding pixels, thus creating a seamless blend.
To try out the Healing Brush, follow these steps:
-
Open the heal_me_patch_me.psd file from the ch19 folder on the CD.
-
Zoom in on the scratch above the baby s head.
-
Choose the Healing Brush and a 19-pixel brush from the Brush menu. Press the Option/Alt key and click in the area about a half-inch above the scratch to sample it, as in Figure 19.4.
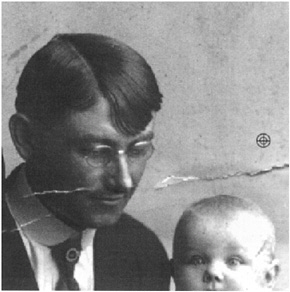
Figure 19.4: First sample the area to be copied . -
Release the Option/Alt key. Move the cursor onto the scratch. Drag the mouse to the left. As you drag, the scratch is replaced by the sample. When you release the mouse, the sample blends seamlessly into the surrounding pixels, as seen in Figure 19.5.
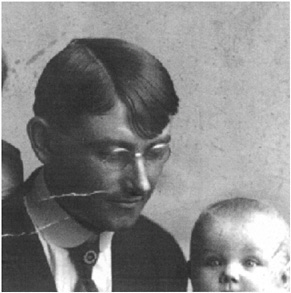
Figure 19.5: The healed image
Using the Patch Tool
The Patch tool ![]() is similar to the Healing Brush, except that it gives you the ability to patch a selected area. This works well on large areas in need of repair. You can either make the initial selection with the Patch tool activated, or you can use any of the other selection tools to make the selection first and then switch to the Patch tool. The tool s performance has been improved in Photoshop CS. A new feature has been added so that as you drag the selection marquee over an area of the image, you see a live preview of the sample in the destination selection area.
is similar to the Healing Brush, except that it gives you the ability to patch a selected area. This works well on large areas in need of repair. You can either make the initial selection with the Patch tool activated, or you can use any of the other selection tools to make the selection first and then switch to the Patch tool. The tool s performance has been improved in Photoshop CS. A new feature has been added so that as you drag the selection marquee over an area of the image, you see a live preview of the sample in the destination selection area.
The Patch tool can be used in any of the following ways, depending on the specifications in the Options bar:
Source Drag the selection marquee over the area from which you want to sample. It will sample the area and automatically copy it over to the area to be patched.
Destination Select the area from which you want to sample. Drag the selection marquee over the area you wish to patch.
Transparent Check this box to better blend the sampled area with the underlying area.
Use Pattern Choose a pattern from the list and click the Use Pattern button to blend the pattern with the initial selection.
To see how the Patch tool works, follow these steps:
-
Open the file heal_me_patch_me.psd on the CD.
-
Choose the Patch tool. Check Source in the Options bar.
-
Drag a marquee around the scratch on the man s face (see Figure 19.6).
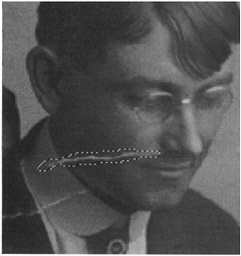
Figure 19.6: Select the image first. -
Place your cursor within the marquee. Drag the marquee slightly to the left and up, as in Figure 19.7. You ll see two marquees; the source and the destination. The image of the source area appears in the destination marquee. Move the marquee until you are satisfied with the destination image. Release the mouse, and it automatically creates a patch from the area you choose, as seen in Figure 19.8.
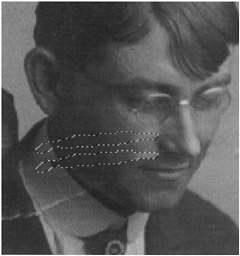
Figure 19.7: Move the selection to the area that you want to sample.
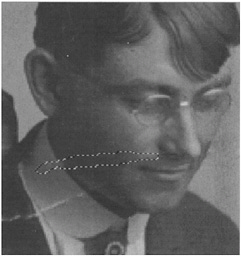
Figure 19.8: The sampled area is patched.
Duplicating and Manipulating Larger Areas
Sometimes the area you need to fix on the image is too big or too inconsistent to clone. Or you might find that it needs more precision than the Clone Stamp tool can offer. If there is a similar area on the image that can be duplicated , try this technique, using the image shown in Figure 19.9.
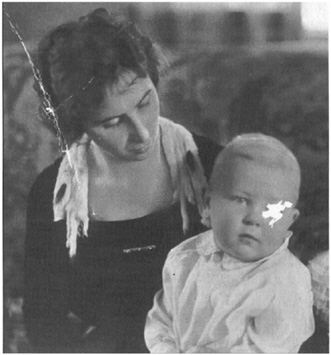
Figure 19.9: Areas of an image that are missing or damaged can be replaced.
Follow these steps:
-
Open duplicate.psd in the ch19 folder on the companion CD.
-
Choose the Lasso tool. In the Options bar, set the feather radius to 10. With the Lasso tool, encircle the missing right eye. The selection should be a little bit larger than the scratch, as shown in Figure 19.10.
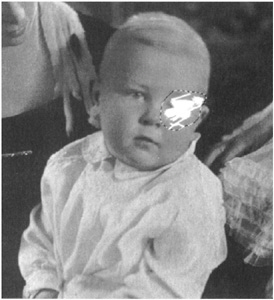
Figure 19.10: The selected area -
Place the cursor inside the selection. Press the mouse button and drag the selection marquee without its contents to the good eye.
-
Choose Layer ’ New ’ Layer Via Copy to copy the contents of the selection to a new layer.
-
Choose Edit ’ Transform ’ Flip Horizontal to flip the eye.
-
Choose the Move tool. In the Options bar, check Show Bounding Box. Drag the eye and place it on the missing area. To rotate it into position, place the cursor outside the bounding box near any corner until you see the Rotate icon. Then click and drag (see Figure 19.11).
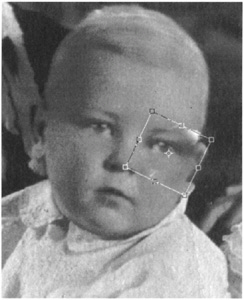
Figure 19.11: The eye, flipped and in position -
When the eye is in position, merge the Background with the new layer. Choose Merge Visible from the Layer Options pull-down menu.
-
Clean up any unrepaired areas with the Clone Stamp tool or the Healing Brush tool.
-
Choose the Rectangular Marquee. Drag a rectangular selection around the baby s head. Choose Filter ’ Liquify. Warp the image slightly so that it is not quite symmetrical with the left eye.
-
Choose the Dodge tool
 . Dodge the areas under the eye to better match the surrounding tones.
 -
Using the Clone Stamp tool, eliminate the scratch on the woman s head.
-
You can eliminate additional debris with the Dust & Scratches filter. Figure 19.12 shows the final result.
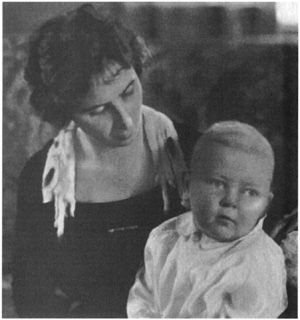
Figure 19.12: The completed image
EAN: 2147483647
Pages: 355