Balancing Color
Balancing Color
After the tonal values have been corrected, you might want to make further adjustments to eliminate color casts, oversaturation, or undersaturation. Color in the image can be balanced by using several methods found in the Image ’ Adjustments menu:
-
Color Balance is used to change the overall color mix in an image.
-
Selective Color adjusts the quantities of cyan, magenta , yellow, or black in specific color components .
-
Levels and Curves adjust the brightness values of individual channels (see the previous sections in this chapter).
-
Hue/Saturation changes the basic color characteristics of the image (see Chapter 17, Modifying and Mapping Color ).
-
Replace Color replaces the hue, saturation, and brightness of specified areas (see Chapter 17).
-
Channel Mixer blends colors from individual channels (see the section titled The Channel Mixer later in this chapter).
-
Match Color enables you to select a color from the content of one selection, document, or layer and apply it to the content of another selection, document, or layer (see Chapter 17).
Color Balance
Color balance is used to adjust the overall mixture of colors in the image and especially to eliminate color casts. To use the Color Balance command, be sure that the composite channel is targeted in the Channels palette. Then follow these steps:
-
Choose Image ’ Adjustments ’ Color Balance to display the Color Balance dialog box (see Figure 16.26). You can also bring this up with the keyboard shortcut
 /Ctrl-B.
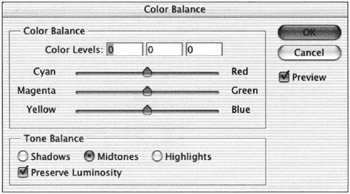
Figure 16.26: The Color Balance dialog box -
Click the Shadows, Midtones, or Highlights radio button to select the tonal range in which you would like to focus your adjustment.
-
Check the Preserve Luminosity box to maintain the tonal balance of the image and affect only the colors.
-
Each color slider represents two color opposites. By increasing the amount of a specific color (by moving the slider toward its name ), you, in effect, decrease its opposite .
To increase the amount of a color in an image, drag a slider toward it. To decrease the amount of a color, drag the slider away from it.
Selective Color
The Selective Color command is designed to adjust CMYK images; however, you can use it on RGB images, too. Selective color lets you determine the amount of cyan, magenta, yellow, and black that will be added to predefined color ranges. This is especially good for prepress professionals who need to control ink densities .
Follow these steps to use this command:
-
Target the composite channel in the Channels palette.
-
Choose Image ’ Adjustments ’ Selective Color; the Selective Color dialog box (see Figure 16.27) appears.
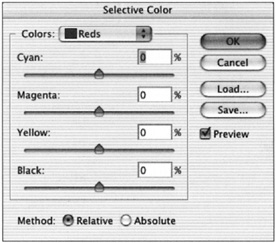
Figure 16.27: The Selective Color dialog box -
From the Colors pop-up list, choose the color range you want to affect. The list shows reds, yellows, greens, cyans, blues, magentas, whites, neutrals, and blacks. Adjust the CMYK sliders to determine how much of each process color the target color will contain. (Some colors might not contain any of the process color, so they will not be affected.)
-
Choose a method:
-
Relative changes the existing quantity of process color by a percentage of the total. For example, if you start with a pixel that is 80% cyan and add 10%, then 8% is added to the pixel (10% of 80 = 8), for a total of 88% cyan. You cannot adjust specular white with this option, because it contains no color.
-
Absolute adds color in absolute values. If, for example, you start with 30% cyan in the pixel and add 10%, you end up with a pixel that is 40% cyan.
-
-
Drag the sliders to the right to increase the amount of the process color component in the selected color, or to the left to decrease it.
The Channel Mixer
The Channel Mixer enables you to adjust the color information of each channel from one control window. You can establish color values on a specific channel as a mixture of any or all of the color channels brightness values.
The Channel Mixer can be used for a variety of purposes, including:
-
Creating an optimal grayscale image from an RGB or CMYK file
-
Making a high-quality sepia tone from a CMYK or RGB file
-
Converting images into alternative color spaces
-
Swapping color information from one channel to another
-
Making color adjustments to images by altering the color information in a specific channel
-
Creating weird-looking stuff
The Channel Mixer does not add or subtract colors per se; it combines values from each channel with those of the target channel. The effect is similar to copying the Red channel, for example, and pasting it on the Blue channel. The Channel Mixer, however, offers much greater control by enabling you to vary the degree of the effect.
To use the Channel Mixer:
-
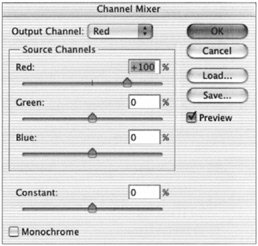
Target the composite channel in the Channels palette.
-
Access the window by choosing Image ’ Adjustments ’ Channel Mixer.
-
Target the channel to be affected by choosing the Output Channel from the pop-up list.
-
Adjust the color sliders to modify the color relations between channels.
Swapping Colors within Channels
You can adjust color information globally on a particular channel or within a selection marquee, so that portions of the image can be quickly altered , corrected, or converted independently while previewing the results.
When you choose a channel by name from the Output Channel pop-up list, the value next to the corresponding Source Channel s color slider reads 100%, which represents the total amount of that color in the image. The values can be increased to 200% or decreased to “200%.
The performance of the Channel Mixer depends on the color mode of the image. When working in CMYK, increasing the numeric value of the color cyan or dragging its slider to the right increases the amount of cyan in the Cyan channel. Decreasing the numeric value or dragging to the left subtracts cyan from the channel. Adjusting the color slider of any other color, such as magenta, while the Cyan channel is targeted changes the amount of the cyan in the Cyan channel based on the relationship between the brightness values of magenta and cyan.
When working in RGB mode, the Channel Mixer performs differently. Increasing the numeric value shifts the selected color toward the color of the selected channel, while decreasing the value shifts the color toward its complement. (As with CMYK, the limits of these changes are 200% and “200%.) You can therefore decrease the value of red if you target the Red channel and move the Red slider to the left, which shifts the color toward cyan ”the complement of red on the color wheel. Targeting the Green channel and moving the Green slider to the left shifts the color toward magenta. Targeting the Blue channel and moving the Blue slider to the left shifts the color toward yellow.
The Constant slider is like having an independent brightness, with an Opacity slider added to the targeted color channel to increase or decrease the channel s overall brightness values. Negative values darken the image, decreasing the brightness of the target channel. Positive values lighten the image, increasing the overall brightness of a channel.
Increasing the brightness of a color channel does not necessarily mean that the image will become lighter. It actually adds more of the channel s color to the image. You can demonstrate this by targeting the Blue channel, for example, and moving the Constant slider to the right. Any image becomes bluer. Drag it to the left, and it becomes more yellow (the complement of blue on the color wheel).
Making Optimal Grayscales
Converting a color image directly to a perfect grayscale was once a hit-or- miss process. With the Channel Mixer, you can easily make a perfect grayscale from an RGB or CMYK image by manual correction and previewing.
When you convert an RGB image to a grayscale, Photoshop uses an algorithm to convert the brightness values from the 16 million colors in its three color channels into 256 shades of gray. By applying the Channel Mixer to the unconverted RGB file, you can control how the image looks prior to the conversion. By moving the sliders, you can emphasize brightness and contrast within the image.
To convert an RGB image to grayscale:
-
Check the Monochrome box in the Channel Mixer.
-
Adjust each of the color sliders until optimal contrast is achieved.
-
Move the Constant slider to darken or lighten the image.
-
When you re satisfied with the results, click OK.
-
Choose Image ’ Mode ’ Grayscale to convert the image.
EAN: 2147483647
Pages: 355
- Cell-Mode MPLS over ATM Overview, Configuration, and Verification
- Case Study-Hub and Spoke MPLS VPN Network Using BGP PE-CE Routing for Sites Using Unique AS Numbers
- Command Reference
- Option 3: Multi-Hop MP-eBGP Between RR and eBGP Between ASBRs
- Case Study 1: Implementing Multicast Support for MPLS VPNs