Adjusting ShadowHighlight
Adjusting Shadow/Highlight
| New | Another new addition to the Adjustments submenu is the Shadow/Highlight command. It enables you to quickly and precisely correct over- and underexposed areas of an image. Choose Image ’ Adjustments ’ Shadow/Highlight, and the dialog box appears (see Figure 16.24). |
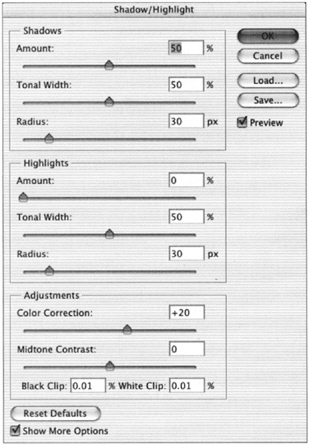
Figure 16.24: The Shadow/Highlight dialog box
Shadow/Highlight corrects each pixel adaptively, according to the luminance of the neighboring pixels. This enables image contrast to be increased in the shadows or highlights without significantly sacrificing contrast in the other tonal regions . This can be essential for bringing out detail in overexposed or backlit images, as in Figure 16.25 (which is also shown in the color section as Figure C19).
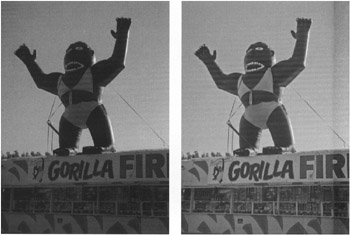
Figure 16.25: The Shadow/Highlight command applied to a backlit image
You can adjust the following shadow and highlight characteristics in the dialog box:
Amount Determines how much the pixels will be affected. Larger values provide greater lightening of shadows or greater darkening of highlights. This slider controls the strength of the adjustment to each pixel.
Tonal Width Sets how much modification will be applied to the different tonal regions. For example, you might want to darken only the lightest highlights or to lighten only the deepest shadows. When correcting shadows, small values of Tonal Width put most of the emphasis on the darker regions of the image; larger values include more of the midtones and highlights.
Radius Determines the neighborhood in which the pixels are affected. Every pixel is modified depending on how dark or light its neighbors are. The size of the neighborhood over which the luminance is averaged depends on the Radius setting. The larger the radius, the larger the extent over which the neighborhood luminance is averaged. As a starting point, I suggest that the radius be set to the approximate size of the subject being corrected.
After you ve applied the Shadow/Highlight command, you might find that the image has acquired an undesirable color cast. Click the Show More Options check box at the bottom of the dialog box and move the Color Adjustment slider to the left to diminish the overadjustment. Moving the slider to the left decreases the saturation of the image. Moving it to the right increases the saturation.
You can also increase the midtone contrast by moving the slider to the right or diminish it by moving it to the left. The Black Clip and White Clip percentage fields enable you to enter a value for the amount that absolute black and specular white will be altered . By entering a value of 5%, for example, the value of 95% black will be increased to 100%, and all other colors will be remapped accordingly so the image will appear darker.
EAN: 2147483647
Pages: 355