Creating the Background
Now that you have the basic character finished, you ll move on to adding a background environment.
Applying Color as a Diagonal Gradient
To begin creating the background setting, you ll use the Gradient tool to place the initial colors for the water:
-
In the Layers palette, target the Background.
-
Click the foreground color swatch in the toolbox to bring up the Color Picker, and choose a shade of light blue. Click the Background color swatch. Choose a medium blue, perhaps with a bit of purple tint, for the background color.
-
Choose the Gradient tool
 (press Shift-G) and click the Linear Gradient icon in the Options bar. Click the Gradient Picker in the Options bar and choose Foreground To Background, as in Figure H3.15.
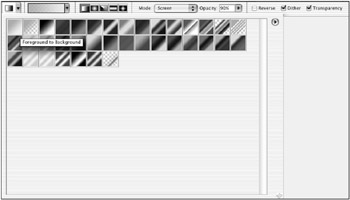
Figure H3.15: Choosing the Foreground To Background option -
Place your cursor in the upper-left corner of the image and press the Shift key to constrain the angle of the gradient to 45 degrees. Click and drag to the lower-right corner.
-
Save.
Using a Pattern Fill for the Water
A pattern fill will now be added to give the background a watery quality while still retaining the gradient effect:
-
From the HO3 folder on the CD, open the file water.psd .
-
Choose Edit ’ Define Pattern. The Pattern Name dialog box will pop up for you to name the pattern ”keep the default water.psd name and click OK.
-
Go back to the Seahorse image, and with the Background still targeted , choose Edit ’ Fill. Choose Pattern as the fill content, and then click the water.psd pattern in the list. Fill in 25% for the Opacity value and click OK.
By choosing a reduced opacity for the pattern fill, you permit the gradient background color to partially show through the pattern, as seen in Figure H3.16.
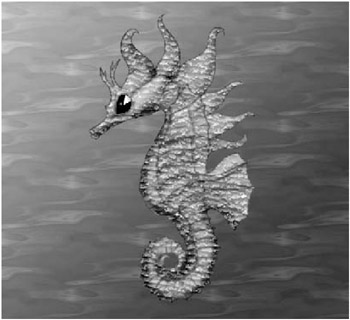
Figure H3.16: The water pattern fill over the gradient -
Press
 /Ctrl-S to save your work.
Forming the Plant Life with Custom Shapes
With the Custom Shape tool, you ll add more details to the image by creating plant life from built-in custom shapes:
-
Target the Plantlife layer.
-
Use the Swatches palette to choose Dark Green as the foreground color.
-
Activate the Custom Shape tool
 (press Shift-U three times or until it appears in the Tool palette). Choose the Fill Pixels icon from the Options bar.
 -
Open the Custom Shapes Picker in the Options bar, click the menu arrow in the upper-right of the picker, and choose Nature from the menu list to replace the current default shapes with the nature shapes.
-
Scroll to the last row of shapes now showing in the Custom Shapes Picker and choose Grass 3 (see Figure H3.17).

Figure H3.17: Choosing from the nature shapes -
Click and drag a few of the grass shapes into your image, making them different heights and widths for variety.
-
Don t forget that if you are dissatisfied with the shapes you produce the first time, you can use the History palette to back up a few steps and try again.
-
Go back to the Custom Shapes Picker and choose Grass 2 this time. Click and drag a few of these grass shapes into your image, making them different heights and widths, as in Figure H3.18. To add variety, you can choose different green colors from the Swatches palette for the different grasses.
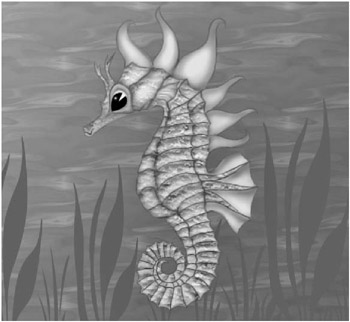
Figure H3.18: By using Photoshop s built-in custom shapes, you add plant life to the waterscape instantly. -
To quickly apply some shading to the grass, choose Layer ’ Layer Style ’ Satin. Move the sliders around to experiment with the effect and click OK.
-
Save.
EAN: 2147483647
Pages: 355