Flylib.com

Books Software


Using Clipping Paths


Using Clipping Paths

The Clipping Path option has essentially the same effect as the Vector Mask option, except that clipping paths are designed to be exported with your image into a vector illustration program (such as Adobe Illustrator) or a page layout program (such as Adobe InDesign) instead of embedded within a Photoshop layer.

To create a clipping path:

  1. Create a path around an area of your image as before by using the Path tools.

    Note  

    Check the Options bar to be sure the Path option is chosen (not shape layers or fill pixels) and the Exclude Overlapping Path Areas option is also chosen (not the add/subtract/intersect options). If these two settings are inactive it often confuses users wishing to create simple compound clipping paths.

  2. From the Paths Palette pull-down menu, choose Save Path, and give it a name .

  3. Choose Clipping Path from the palette menu, and the Clipping Path dialog box appears (see Figure 9.24).

    click to expand
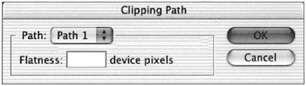
    Figure 9.24: The Clipping Path dialog box

  4. Select the name of the path you want to convert to a clipping path from the Path list. Click OK.

  5. For most paths, leave the Flatness setting blank. When you print the image, the printer s default flatness setting will be used to define the shape. However, if you experience printing problems, try saving the path with new settings (see the Troubleshooting sidebar).

    Note  

    The path name is boldfaced in the Paths palette, indicating that it is a clipping path.

Images containing clipping paths must be saved in either EPS or TIFF format, depending on the program, and therefore can be imported only into programs that support these images. It s best to save a copy of the image so that the original image retains Photoshop s attributes.

To save an image with a clipping path as an EPS:

  1. Choose File Save As. Check the As A Copy box.

  2. From the Format list, choose Photoshop EPS to display the EPS Options dialog box (see Figure 9.25).

    click to expand
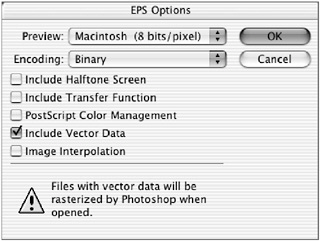
    Figure 9.25: EPS file options

  3. Choose a Preview option, depending on the type of computer and the platform you are using: Macintosh or Windows, 1 bit or 8 bit (see Appendix B, File Formats, for a detailed explanation of the EPS Options dialog box).

  4. For the Encoding type, choose Binary.

  5. Click OK.

  6. Open a document in a desktop-publishing program or vector-drawing program, and place the EPS image. The clipping path will mask out everything outside the path, much the same as the vector mask does within Photoshop.


Creating Lines and Shapes

Photoshop handles lines and shapes in a manner much like Illustrator. Like type, lines and shapes are vector objects (drawn and defined by paths). You draw a predefined shape by using one of the Shape tools, or a custom shape by using the Pen tool. Once drawn, shapes can be edited by adjusting their anchor points with the path -editing tools. When you create a shape on a Shape layer, it appears on an independent layer with a Vector Mask thumbnail next to a Color Fill Layer thumbnail.

The shape also appears as a separate path in the Paths palette. To apply any filter to a shape, it must first be rasterized, or turned into pixels. If you flatten the image, shapes are automatically converted to pixels.

The Shape tool can instantly create precise shapes, such as rectangles, rounded rectangles, ellipses, polygons, lines, and custom shapes that you can edit with the path-editing tools. When you click the Shape tool icon in the Tool palette, it expands to reveal all of the available tools. After you ve chosen a shape from this fly-out, click in the image and drag to size the shape.

The Shape Tool Options Bar

As you choose a different shape from the Tool palette or from the Shape list in the Options bar, the Options bar changes to accommodate specific characteristics of the shape. Figure 9.26 illustrates the differences in the Options bar when the three different drawing options are selected.

click to expand
Figure 9.26: The Options bar of the Shape tools

start sidebar
TROUBLESHOOTING CLIPPING PATH POSTSCRIPT ERRORS

A raster image processor (RIP) is software on a computer, or a device inside an imagesetter or PostScript printer, that interprets a vector curve by connecting a series of straight line segments together. The flatness of a clipping path determines the fidelity of the lines to the curve. The lower the setting, the more lines are produced, and the more accurate the curve.

But if a clipping path is too complex for the printer s capabilities, it cannot print the path and will produce a limit check or PostScript error. Any printer can be jammed up with a complex clipping path, although you might find that a clipping path will print perfectly well on a low-resolution printer (300 ”600 dpi) because that device uses a higher flatness value to define the curve. The same clipping path might not print on a high-resolution imagesetter (1200 “2400 dpi). If you run into printing problems on an image with a clipping path, troubleshoot them in the following ways:

  • Increase the Flatness settings and resave the file. Flatness values range from 0.2 to 100. Enter a flatness setting from 1 to 3 for low-resolution printers and from 8 to 10 for high-resolution printers.

  • Reduce the number of anchor points in the curve by manually eliminating them with the Delete Anchor Point tool.

You can also re-create the path with lower Tolerance settings:

  1. Target the path in the Paths palette.

  2. Click the Load Path As Selection icon at the bottom of the palette.

  3. Click the trash icon to delete the path but leave the selection.

  4. Choose Make Work Path from the palette menu. In the dialog box, decrease the Tolerance to 5 pixels (a good place to start).

  5. Name and save the new work path.

  6. Choose Clipping Path from the palette menu.

  7. Save the file in EPS format.

end sidebar


The Options bar features are as follows :

Options Bar Feature

Function

Shape layers

Makes a shape and a path on a new layer

Paths

Makes the path outline of the shape on an existing layer or Background

Fill pixels

Fills an area with the foreground color in the form of the shape

Shape list

Lets you choose a shape

Custom Shape Options

Lets you enter specifications for the size and proportion of the shape

Style

Attaches a layer style to the Shape layer (available with New Shape Layer)

Shape characteristics

Assigns values for the characteristics of a particular shape or chooses a custom shape

Mode

Lets you select a blending mode for the shape (available only with Create Fill Pixels)

Opacity

Sets the Opacity for the shape by moving the slider (available only with Create Fill Pixels)

Anti-Aliased

Applies an anti-alias to the shape (available only with Create Fill Pixels)

Drawing Shapes

To draw a shape, first choose a foreground color. Click the Shape tool in the Tool palette and choose a tool type from the expanded palette or from the Options bar. Click in the image and drag to form the shape.

Because shapes are vector objects, you can use the Path Selection tool, the Direct Selection tool, or the path-editing tools to move or edit a shape or to add and delete anchor points.

Each shape performs slightly differently. The Options bar of each shape lets you adjust its individual characteristics. For example, you can enter a value for the radius of the corners on the Rounded Rectangle tool, or for the number of sides on the Polygon tool.

The Rectangle Tools and Ellipse Tool

As with the marquee tools, icons on the Shape tool Options bar let you add, subtract, intersect, or exclude areas from a shape as you draw. Clicking the arrow to the right of the Shape tool icons on the Options bar offers additional controls on a pop up list. When you choose the Rectangle, Rounded Rectangle, or Ellipse tool, the down-arrow button on the Options bar offers you these choices:

Unconstrained

Sizes and proportions the shape as you draw

Square (or Circle)

Constrains the shape

Fixed Size

Lets you sets values for the shape s width and height

Proportional

Uses Width and Height fields to define the shape s proportion

From Center

Radiates the shape from a center point

Snap To Pixels

Aligns the shape to the on-screen pixels (Rectangle and Round Rectangle only)

Note  

To constrain the Rectangle or Round Rectangle to a square, or the Ellipse to a circle, hold down the Shift key as you drag.

The Polygon Tool

When the Polygon tool is selected, a Size field in the Options bar enables you to set the shape s number of sides. The Polygon Options panel choices differ from those of the other shapes. Figure 9.27 illustrates the wide variety of shapes you can create by adjusting these settings:

click to expand
Figure 9.27: Polygon examples

Radius

Enables you to enter a corner radius for a round-cornered polygon

Smooth Corners

Rounds the corners of the polygon

Indent Sides By

Enables you to enter a percentage value to curve the sides inward

Smooth Indents

Rounds the indents

The Line Tool

When the Line tool is selected, you can enter a value in the Options bar for the weight of the line in pixels. Choices in the Line Options panel determine the type of arrow that will appear at either end of the line. Select the Start or End check boxes, or both, to produce an arrowhead at the beginning and/or end of the line (see Figure 9.28). Enter values in Width, Length, and Concavity for these characteristics of the arrowhead . Figure 9.29 demonstrates the wide variety of possibilities in these settings.


Figure 9.28: Arrowhead characteristics

click to expand
Figure 9.29: Examples of lines, with and without arrowheads

The Custom Shape Tool

You can generate custom shapes with the Shape tool . With the Custom Shape tool selected, the Options panel displays these options:

Unconstrained

Manually determines the proportion of the shape as you draw

Defined Proportions

Enables you to drag to constrain the proportion of the shape.

Defined Size

Draws the shape at the size it was created

Fixed Size

Enables you to enter values for the shape in the height and width fields

From Center

Radiates the shape from a center point

The Options bar Shape list lets you choose from many predefined custom shapes. You can create additional shapes with the Pen tool and save them to this list (see Figure 9.30).

click to expand
Figure 9.30: The Shape list

The pop up list provides a list of commands that let you Delete, Reset, Load, Save, and Replace custom shapes, plus several palette-viewing options. The options at the bottom rung of the list replace the default list with additional shapes. With the All option, you can view a comprehensive list of all available shapes.

PLACING CUSTOM SHAPES ON AN IMAGE

Applying predefined custom shapes is a snap. First, open an image or create one; then take the following steps:

  1. Choose a foreground color.

  2. Make a new empty layer by clicking the New Layer icon in the Layers palette.

  3. Click the Shape tool in the Tool palette.

  4. In the Options bar, click the Custom Shape icon to display the Shape Options panel. Click the Unconstrained radio button.

  5. In the Options bar, click the Shape list arrow to display the default custom shapes. Click the arrow on the panel to display the list of commands in the pull-down submenu; choose All to load all the additional shapes.

  6. Click a shape in the Shape list. Place your cursor on the image, click, and drag until the shape is the size and proportion you want. To reposition the shape, press the spacebar while dragging. Then release the mouse.

  7. Optionally choose additional shapes from the Shape list and repeat for all the shapes you want on your image layer. Your result might look like Figure 9.31.

click to expand
Figure 9.31: El Jefe adorned with custom shapes

DEFINING CUSTOM SHAPES

To create your own custom shape:

  1. Use one of the Pen tools and draw a shape outline.

  2. Choose Edit Define Custom Shape.

  3. Select the Custom Shape tool. The new shape appears in the Shape list in the Shape tool Options bar.