Creating Lines and Shapes
Creating Lines and Shapes
Photoshop handles lines and shapes in a manner much like Illustrator. Like type, lines and shapes are vector objects (drawn and defined by paths). You draw a predefined shape by using one of the Shape tools, or a custom shape by using the Pen tool. Once drawn, shapes can be edited by adjusting their anchor points with the path -editing tools. When you create a shape on a Shape layer, it appears on an independent layer with a Vector Mask thumbnail next to a Color Fill Layer thumbnail.
The shape also appears as a separate path in the Paths palette. To apply any filter to a shape, it must first be rasterized, or turned into pixels. If you flatten the image, shapes are automatically converted to pixels.
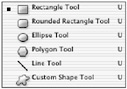
The Shape tool can instantly create precise shapes, such as rectangles, rounded rectangles, ellipses, polygons, lines, and custom shapes that you can edit with the path-editing tools. When you click the Shape tool icon in the Tool palette, it expands to reveal all of the available tools. After you ve chosen a shape from this fly-out, click in the image and drag to size the shape.
The Shape Tool Options Bar
As you choose a different shape from the Tool palette or from the Shape list in the Options bar, the Options bar changes to accommodate specific characteristics of the shape. Figure 9.26 illustrates the differences in the Options bar when the three different drawing options are selected.
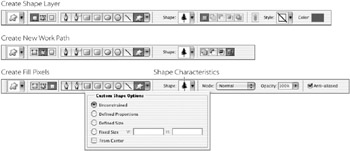
Figure 9.26: The Options bar of the Shape tools
| |
A raster image processor (RIP) is software on a computer, or a device inside an imagesetter or PostScript printer, that interprets a vector curve by connecting a series of straight line segments together. The flatness of a clipping path determines the fidelity of the lines to the curve. The lower the setting, the more lines are produced, and the more accurate the curve.
But if a clipping path is too complex for the printer s capabilities, it cannot print the path and will produce a limit check or PostScript error. Any printer can be jammed up with a complex clipping path, although you might find that a clipping path will print perfectly well on a low-resolution printer (300 ”600 dpi) because that device uses a higher flatness value to define the curve. The same clipping path might not print on a high-resolution imagesetter (1200 “2400 dpi). If you run into printing problems on an image with a clipping path, troubleshoot them in the following ways:
-
Increase the Flatness settings and resave the file. Flatness values range from 0.2 to 100. Enter a flatness setting from 1 to 3 for low-resolution printers and from 8 to 10 for high-resolution printers.
-
Reduce the number of anchor points in the curve by manually eliminating them with the Delete Anchor Point tool.
You can also re-create the path with lower Tolerance settings:
-
Target the path in the Paths palette.
-
Click the Load Path As Selection icon at the bottom of the palette.
-
Click the trash icon to delete the path but leave the selection.
-
Choose Make Work Path from the palette menu. In the dialog box, decrease the Tolerance to 5 pixels (a good place to start).
-
Name and save the new work path.
-
Choose Clipping Path from the palette menu.
-
Save the file in EPS format.
| |
The Options bar features are as follows :
| Options Bar Feature | Function |
|---|---|
| Shape layers | Makes a shape and a path on a new layer |
| Paths | Makes the path outline of the shape on an existing layer or Background |
| Fill pixels | Fills an area with the foreground color in the form of the shape |
| Shape list | Lets you choose a shape |
| Custom Shape Options | Lets you enter specifications for the size and proportion of the shape |
| Style | Attaches a layer style to the Shape layer (available with New Shape Layer) |
| Shape characteristics | Assigns values for the characteristics of a particular shape or chooses a custom shape |
| Mode | Lets you select a blending mode for the shape (available only with Create Fill Pixels) |
| Opacity | Sets the Opacity for the shape by moving the slider (available only with Create Fill Pixels) |
| Anti-Aliased | Applies an anti-alias to the shape (available only with Create Fill Pixels) |
Drawing Shapes
To draw a shape, first choose a foreground color. Click the Shape tool in the Tool palette and choose a tool type from the expanded palette or from the Options bar. Click in the image and drag to form the shape.
Because shapes are vector objects, you can use the Path Selection tool, the Direct Selection tool, or the path-editing tools to move or edit a shape or to add and delete anchor points.
Each shape performs slightly differently. The Options bar of each shape lets you adjust its individual characteristics. For example, you can enter a value for the radius of the corners on the Rounded Rectangle tool, or for the number of sides on the Polygon tool.
The Rectangle Tools and Ellipse Tool
As with the marquee tools, icons on the Shape tool Options bar let you add, subtract, intersect, or exclude areas from a shape as you draw. Clicking the arrow to the right of the Shape tool icons on the Options bar offers additional controls on a pop up list. When you choose the Rectangle, Rounded Rectangle, or Ellipse tool, the down-arrow button on the Options bar offers you these choices:
| Unconstrained | Sizes and proportions the shape as you draw |
| Square (or Circle) | Constrains the shape |
| Fixed Size | Lets you sets values for the shape s width and height |
| Proportional | Uses Width and Height fields to define the shape s proportion |
| From Center | Radiates the shape from a center point |
| Snap To Pixels | Aligns the shape to the on-screen pixels (Rectangle and Round Rectangle only) |
| Note | To constrain the Rectangle or Round Rectangle to a square, or the Ellipse to a circle, hold down the Shift key as you drag. |
The Polygon Tool
When the Polygon tool is selected, a Size field in the Options bar enables you to set the shape s number of sides. The Polygon Options panel choices differ from those of the other shapes. Figure 9.27 illustrates the wide variety of shapes you can create by adjusting these settings:
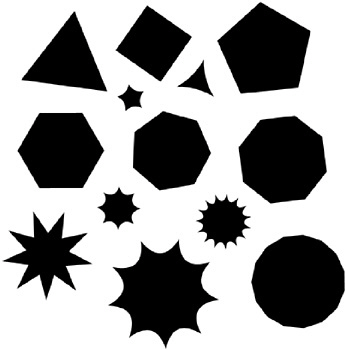
Figure 9.27: Polygon examples
| Radius | Enables you to enter a corner radius for a round-cornered polygon |
| Smooth Corners | Rounds the corners of the polygon |
| Indent Sides By | Enables you to enter a percentage value to curve the sides inward |
| Smooth Indents | Rounds the indents |
The Line Tool
When the Line tool is selected, you can enter a value in the Options bar for the weight of the line in pixels. Choices in the Line Options panel determine the type of arrow that will appear at either end of the line. Select the Start or End check boxes, or both, to produce an arrowhead at the beginning and/or end of the line (see Figure 9.28). Enter values in Width, Length, and Concavity for these characteristics of the arrowhead . Figure 9.29 demonstrates the wide variety of possibilities in these settings.
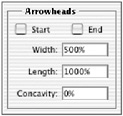
Figure 9.28: Arrowhead characteristics
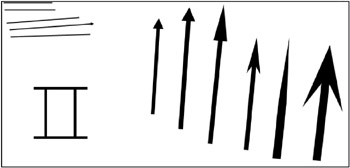
Figure 9.29: Examples of lines, with and without arrowheads
The Custom Shape Tool
You can generate custom shapes with the Shape tool ![]() . With the Custom Shape tool selected, the Options panel displays these options:
. With the Custom Shape tool selected, the Options panel displays these options:
| Unconstrained | Manually determines the proportion of the shape as you draw |
| Defined Proportions | Enables you to drag to constrain the proportion of the shape. |
| Defined Size | Draws the shape at the size it was created |
| Fixed Size | Enables you to enter values for the shape in the height and width fields |
| From Center | Radiates the shape from a center point |
The Options bar Shape list lets you choose from many predefined custom shapes. You can create additional shapes with the Pen tool and save them to this list (see Figure 9.30).
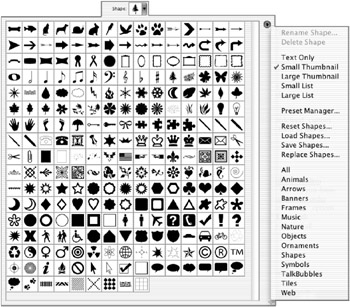
Figure 9.30: The Shape list
The pop up list provides a list of commands that let you Delete, Reset, Load, Save, and Replace custom shapes, plus several palette-viewing options. The options at the bottom rung of the list replace the default list with additional shapes. With the All option, you can view a comprehensive list of all available shapes.
PLACING CUSTOM SHAPES ON AN IMAGE
Applying predefined custom shapes is a snap. First, open an image or create one; then take the following steps:
-
Choose a foreground color.
-
Make a new empty layer by clicking the New Layer icon in the Layers palette.
-
Click the Shape tool in the Tool palette.
-
In the Options bar, click the Custom Shape icon to display the Shape Options panel. Click the Unconstrained radio button.
-
In the Options bar, click the Shape list arrow to display the default custom shapes. Click the arrow on the panel to display the list of commands in the pull-down submenu; choose All to load all the additional shapes.
-
Click a shape in the Shape list. Place your cursor on the image, click, and drag until the shape is the size and proportion you want. To reposition the shape, press the spacebar while dragging. Then release the mouse.
-
Optionally choose additional shapes from the Shape list and repeat for all the shapes you want on your image layer. Your result might look like Figure 9.31.

Figure 9.31: El Jefe adorned with custom shapes
DEFINING CUSTOM SHAPES
To create your own custom shape:
-
Use one of the Pen tools and draw a shape outline.
-
Choose Edit ’ Define Custom Shape.
-
Select the Custom Shape tool. The new shape appears in the Shape list in the Shape tool Options bar.
EAN: 2147483647
Pages: 355
- Structures, Processes and Relational Mechanisms for IT Governance
- Linking the IT Balanced Scorecard to the Business Objectives at a Major Canadian Financial Group
- Measuring and Managing E-Business Initiatives Through the Balanced Scorecard
- Technical Issues Related to IT Governance Tactics: Product Metrics, Measurements and Process Control
- The Evolution of IT Governance at NB Power