Installing Exchange (a Quick-Start Guide)
| | ||
| | ||
| | ||
Exchange installation is a big deal that shouldn't be undertaken lightly. There are a lot of steps involved. A lot . Heck, there are whole books just about Exchange, and installation is a big chunk of those books. The following are some of the best books on Exchange installation and care and feeding.
-
Learning Exchange Server 2003 by Bill Boswell (who is also the technical editor of this book), Addison-Wesley 2004, www.amazon.com
-
Mastering Microsoft Exchange Server 2003 by Barry Gerber, Sybex 2003, www.sybex.com
-
Microsoft Exchange Server 2003 With SP1 by Tony Redmond, Digital Press 2004, www.amazon.com
To that end, we're not going to step through an entire Exchange installand we're certainly not going to describe detailed administration, care and feeding, or many other very important day-to-day topics. Our goal here is Linux integration. We will, however, point out specific configuration options we've chosen along the way and add some commentary to some installation steps.
Exchange Editions
Exchange Server comes in two flavors, Standard and Enterprise, and it's a devil of a time trying to figure out on Microsoft's website what the difference between them is. Here is a table that spells out which version does what:
| Feature | Exchange Standard Edition | Exchange Enterprise Edition |
|---|---|---|
| Storage Space | Maximum 16GB | Basically unlimited |
| Multiple store support | No (only one storage group with one mailbox store and one public folder store) | Yes (up to four storage groups with up to 20 mailbox and public folder stores) |
| Interoperability | No x.400 support | x.400 support included |
| High Availability | No clustering support | Clustering support |
For the purposes of this book, you can't go wrong with either Exchange version. You can have Microsoft send you a trial CD, or you can download the bits yourself. Track down a trial version at www.microsoft.com/exchange/evaluation/trial/default.mspx .
Server Setup Suggestions
In the real world, you'd work with an Exchange expert to help you plan your server configuration. There's a lot of robust hardware you can choose from: Intel Xeon or AMD Opteron processors, RAID arrays, tape backup, UPS, etc. For our purposes, we're not that picky. In our test lab, we'll be setting up Exchange on a simply configured machine:
-
Windows 2003 preloaded and joined to the ad.corp.com domain. We'll call it Exchange2003.ad.corp.com .
-
Pentium 4, 800Mhz
-
512MB of RAM
-
A disk to hold the Exchange mailbox databases; we'll choose a D: drive with 8GB free
And that's it.
Again, when it comes to planning your real Exchange setup, be sure to check out the references at the beginning of the section.
Extending the Active Directory Schema for Exchange
Exchange and Active Directory work together. You simply cannot have Exchange without Active Directory. This is because Exchange stores all of its configuration and mail routing information in Active Directory. To that end, the Active Directory schema must be extended to accept the Exchange object classes and attributes. To do this, two things must occur:
-
You must perform the schema extension as a member of the Schema Admins group. The Administrator account in corp.com is a member of this group by default.
-
You must perform the schema extension on the Domain Controller which holds the "Schema Master" role. windc1.ad.corp.com will have this role by default.
Again, because this isn't an Exchange-specific book, we cannot delve into each of these topics in detail. The simplest way to extend the schema is to kick off Exchange setup.
First Time Running Setup: Extending the Schema for the Forest
On windc1.ad.corp.com , log in as Administrator, insert the Exchange Server CD into the CD-ROM reader and run setup /forestprep . This will extend the schema. This step needs to be done only once, and it affects all domains.
When you run this step, you'll be asked which account will be the "Full Exchange Administrator." In our examples, we'll stay with the default of the domain Administrator account.
Second Time Running Setup: Extending the Schema for the Domain
Stay logged on at windc1.ad.corp.com as Administrator. From the Exchange Server CD, run setup /domainprep . This will extend the schema attributes for the ad.corp.com domain specifically . If you had more than one domain, you would perform this step multiple times.
Third Time Running Setup: Installing Exchange on the Exchange Server
Log on to the server you designated as the Exchange server. In our examples, we'll use a machine named Exchange2003.ad.corp.com . Insert the Exchange CD-ROM and double-click "Setup" to run the rest of the setup graphically.
Follow the bouncing ball. That is, select the "Exchange Deployment Tools," then follow the guided installation to install your first Exchange 2003 server. You've already performed some of the steps (i.e., Forestprep and Domainprep), and it suggests some other tests for good measure. The final step helps you launch the graphical Installation Wizard setup. In our examples, we'll be installing Exchange to the D: drive (instead of the C: drive) and we'll create a new Exchange Organization called CORP.
Common Exchange Tasks
As stated, we simply don't have room to go over all the possibilities on configuring Exchange. However, to get you started, you should know how to use two tools: Active Directory Users and Computers (to mail-enable your users) and the Exchange System Manager (ESM) console.
Using Active Directory Users and Computers to Mail-Enable Accounts
Now that Exchange is loaded, a whole lot of "nothing" has happened . That is, in order for users to actually get Exchange mail, you have to mailbox-enable their accounts. You do this using Active Directory Users and Computers. Specifically, right-click a user 's account and select "Exchange Tasks," as shown in Figure 6.4.
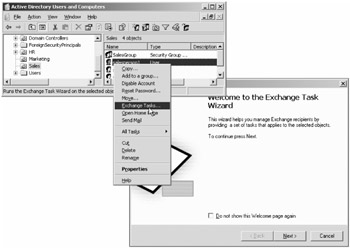
Figure 6.4: Use Active Directory Users and Computers and right-click any user for their "Exchange Tasks."
A wizard launches and presents some options. Specifically, you're after the "Create Mailbox" option. You can zip through the wizard, taking the defaults, and a user will be configured to have a mailbox on the Exchange server.
Use this process to mailbox-enable salesperson1 and salesperson2 .
Note that the "Exchange Tasks" fly-out menu in Active Directory Users and Computers is only available on machines on which you've loaded the Exchange System Management Tools. Of course, you did that on the machine running Exchange 2003 but not on windc1.ad.corp.com . I suggest you use the Exchange Setup Wizard to also install the Exchange System Management Tools on windc1.ad.corp.com , as shown in Figure 6.5.
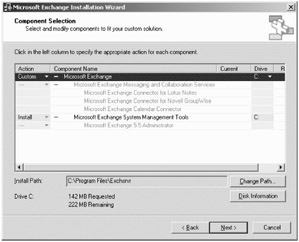
Figure 6.5: To get the "Exchange Tasks" fly-out on Active Directory Users and Computers at the domain controller, load the Exchange System Management Tools where you do your management.
Enabling Pop and IMAP Access to Exchange for Linux Clients
Not every environment has a separate Linux mail server for Linux clients to talk to. In some cases you may wish to allow Linux or other non-Windows clients to check mail directly on an Exchange server. We can easily enable this by turning on support for POP and IMAP on the Exchange server. Although this doesn't grant Linux clients access the full rich collaboration capabilities that you get by running Outlook with Exchange, it works well for simply reading e-mail.
We'll enable support for POP and IMAP with four commands on the command line of our Exchange server. Using a command prompt, type:
sc config pop3svc start= auto sc config imap4svc start= auto sc start pop3 sc start imap4
Note, that there's a space after the equal sign in the preceding code.
| Note | Windows refers to these protocols as POP3 and IMAP4 to distinguish them from older versions of POP and IMAP. |
Linux clients can now talk to the Exchange server exactly as they would talk to a Linux-based mail server. Here are the general options to specify in your Linux e-mail client:
| Option | Setting |
|---|---|
| Incoming Mail Server | exchange2003.ad.corp.com |
| Outgoing Mail Server | exchange2003.ad.corp.com |
| Incoming Server Type | IMAP4 |
| Account Name | salesperson1 |
| E-mail Address | salesperson1@ad.corp.com |
| Real Name | Sales Person One |
Testing Exchange Is Working (Loading Outlook 2003 on a Windows Client System)
The most efficient way to make sure Exchange is working properly is to install Outlook 2003 on a Windows XP system. Outlook is part of Microsoft Office 2003. If you don't have a licensed copy, you can download a trial version of the whole Office 2003 Standard Edition (which includes Outlook) from www.microsoft.com/office/trial/default.mspx .
| Tip | After you've installed Outlook and/or Office, be sure to update it at www.officeupdate.microsoft.com to install the latest patches. |
Once Outlook is loaded on your client machinesay, xppro1.ad.corp.com you'll be able to configure Outlook for two users: salesperson1 and salesperson2 . Then, while logged on as salesperson1 , you can send mail to salesperson2 and vice versa.
The first time you fire up Outlook for each user, you'll be prompted with a wizard to help you get the user connected to the Exchange server.
After you configure Outlook, the main window opens. Create a new e-mail message; clicking the "To" button opens the Global Address List (GAL) from which you can select one or more recipients, as shown in Figure 6.7.
Try sending e- mails back and forth from salesperson1 and salesperson2 .
| | ||
| | ||
| | ||
EAN: N/A
Pages: 71
- EIGRP PE-CE Routing Protocol Overview, Configuration, and Verification
- TE Basics
- Implementing MPLS QoS for Layer 2 VPN Implementations
- Case Study 2: Implementing Multi-VRF CE, VRF Selection Using Source IP Address, VRF Selection Using Policy-Based Routing, NAT and HSRP Support in MPLS VPN, and Multicast VPN Support over Multi-VRF CE
- Case Study 3: Implementing Layer 2 VPNs over Inter-AS Topologies Using Layer 2 VPN Pseudo-Wire Switching