Linux As a Departmental Mail Server
| | ||
| | ||
| | ||
Linux can serve as a departmental mail server. To demonstrate this, we'll turn linserv1.corp.com (the Linux-based authentication and file server we built over the last several chapters) into a Linux- based mail server that hosts mailboxes and provides access to Linux and Windows e-mail clients .
Recall that in Chapter 2, we loaded OpenLDAP on linserv1.corp.com and created several LDAP users: nurse1, nurse2, doctor1 , and doctor2 . The idea was that these users logged on via Linux's LDAP client, via Windows and pGina's LDAP client, or even via ordinary Windows NT-style authentication as part of a Samba-based Linux PDC.
These same LDAP accounts that we created in Chapter 2 will now also be valid destinations for e-mail. It will be easy for these users to send and receive e-mail from Windows clients such as Microsoft Outlook and Eudora as well as Linux clients such as KMail, Balsa, Evolution, and Mozilla Thunderbird.
Several mail server software programs are available for Fedora Linux. These are divided into three categories:
-
Mail Transfer Agent (MTA) software Responsible for e-mail delivery. MTAs are what most people mean by "mail servers." These are programs that deliver e-mail from one server to another. When you send e-mail, your client software hands the message off to an MTA, and your client software's responsibility ends there. The MTA is responsible for managing a queue of outgoing messages and delivering them to other MTAs for other domains. The MTA is also responsible for delivering incoming mail from local clients and other MTAs to individual user mailboxes.
-
Post Office Protocol (POP) software The original option for users to download their e-mail. POP does not offer an option of keeping multiple folders on the server. There is just one inbox. Typically users download and delete all messages from the inbox each time they check mail.
-
Internet Message Access Protocol (IMAP) software Another popular way for e-mail clients to get their e-mail. We prefer IMAP to POP because IMAP allows users to leave their mail at the server so they can access their mail from multiple locations. Also, IMAP users can have multiple mail folders on the server, making it simpler to create structured individual storage.
We chose to use Postfix for the MTA, which is a change from the default Fedora MTA, Send- mail. See the sidebar "Why We Chose Postfix" for the reasons we're changing.
For POP and IMAP services, we're using Fedora's standard Dovecot POP/IMAP server.
| |
By default, when you install a mail server, Fedora Linux installs the Sendmail MTA . Sendmail is a fine mail server with a long history and a strong reputation.
However, we prefer Postfix.
That's because Postfix is ultimately simpler to configure and is not weighed down with features relating to archaic mail protocols that are no longer used, such as UUCP. Considerable experience has taught us that Postfix is every bit as robust and a great deal easier to work with than Sendmail.
Finally, Postfix is the recommended mail server component for the OpenXChange project, an open -source Exchange alternative that is still under development. While OpenXChange is not ready for inclusion as a recommended solution in this book, it is a promising project and we aim to use components that are compatible with it.
| |
Installing Postfix on linserv1.corp.com
Since Fedora installed Sendmail rather than Postfix by default when we originally configured linserv1.corp.com in Chapter 1, we'll take a moment to correct that problem by installing the MTA of our choice. At the same time, we'll make sure that other required packages are installed. We'll use the Add/Remove Applications tool, which we've seen several times before. Follow these steps to install Postfix on linserv1.corp.com :
-
Pull down the "Applications" menu.
-
Select System Settings
 Add/Remove Applications.
 -
There will be a delay while the Add/Remove Applications tool determines what packages are already installed.
-
When the "Add or Remove Packages" screen appears, scroll down to "Mail Server," make sure the appropriate box is checked, and click "Details."
-
If the "Extra Packages" list is not expanded, click the triangle to expand it.
-
Check the box for "Postfix."
-
Check the box for "Dovecot" if it is not already checked.
-
Click "Close."
-
Click "Update."
Configuring Postfix on linserv1.corp.com
We're ready to configure Postfix to serve as our MTA. We can do that using Webmin, which provides a friendly interface to all but one of the options we need to configure.
Stopping Sendmail and Starting Postfix and Dovecot
First we'll tell Fedora to stop running Sendmail (both now and on future reboots) and to start running Postfix as well as the Dovecot POP/IMAP server. We do this with the familiar chkconfig and service commands. As root on linserv1.corp.com , enter these commands to disable Sendmail and enable Postfix:
chkconfig --del sendmail service sendmail stop chkconfig --add postfix chkconfig postfix on service postfix start chkconfig --add dovecot chkconfig dovecot on service dovecot start
Leveraging Webmin to Configure Postfix
Now we're ready to use Webmin to do most of our configuration work. For the most part, Fedora's standard installation of Postfix works well for our needs. Postfix is pretty bright. It automatically recognizes all valid accounts on linserv1.corp.com and accepts e-mail for all of them. Remember, we're already using linserv1.corp.com for some LDAP accounts, as well as for accounts in /etc/passwd . Postfix will accept e-mail for any of these accounts and deliver it to mailboxes set up in the /var/spool/mail directory, creating them on first use.
Dovecot is configured right out of the box to allow users to check their mailboxes using any POP or IMAP client.
We need to leverage Webmin to do three things:
-
We'll configure Postfix to add an @corp.com address to outgoing mail. That way messages to the outside world appear to come from nurse1@corp.com , not nurse1@linserv1.corp.com .
-
We'll tell Postfix to accept incoming mail for the whole corp.com domain, not just for addresses @linserv1.corp.com .
-
We'll tell Postfix to accept incoming e-mail over all network interfaces, including the local network interface. By default, Postfix accepts mail only from the server itself, which is not very useful yet! But it's easy to fix.
To configure Postfix as a departmental mail server, follow these steps:
-
Log into Webmin on linserv1.corp.com using the usual URL: https ://linserv1.corp.com:10000 .
-
Click "Servers."
-
Click "Postfix Configuration."
-
Click "General Options."
-
For "What domain to use in outbound mail," pick "Use domainname," as shown in Figure 6.2.
-
For "What domains to receive mail for," pick "Whole domain."
-
Scroll down to locate "Network interfaces for receiving mail" and pick "All" as shown in Figure 6.3.
-
Scroll down and click "Save and Apply."
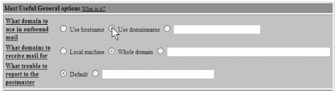
Figure 6.2: Using Webmin to configure the "What domain to use in outbound mail" and "What domains to receive mail for" options for the Postfix departmental mail server
Figure 6.3: Using Webmin to configure the "Network interfaces for receiving mail" option for the Postfix departmental mail server
Now the Linux-based departmental mail server is ready to test!
Testing the Linux-Based Departmental Mail Server
Testing the mail server is straightforward. Any e-mail client that supports POP or IMAP can be configured to work with linserv1.corp.com . Just set the following options as shown in the e-mail client program of your choice. Preferably, you should try this on a workstation in the corp.com organization (Windows or Linux.) But the connection should work regardless of what domain your client machine is a member of.
Here are the general options to specify using your e-mail client:
| Option | Setting |
|---|---|
| Incoming Mail Server | linserv1.corp.com |
| Outgoing Mail Server | linserv1.corp.com |
| Incoming Server Type | IMAP |
| Account Name | nurse1 |
| E-mail Address | nurse1@corp.com |
| Real Name | Nurse One |
| Warning | In Chapter 2, we created accounts named nurse1, nurse2, doctor1 , and doctor2 in the "Administering Users and Groups LDAP Users and Groups LDAP Module" section. If you did not do so then, refer back to that section and take care of it now. To successfully complete all of the exercises in this chapter, it is necessary to store these accounts in an LDAP database as described in Chapter 2. |
Yes, you may use POP if your e-mail client does not support IMAP. We recommend IMAP because of its support for keeping multiple personal e-mail folders on the server. Virtually all modern e-mail clients support IMAP.
Now set up a second e-mail client on a second workstation, accessing the nurse2 account:
| Option | Setting |
|---|---|
| Incoming Mail Server | linserv1.corp.com |
| Outgoing Mail Server | linserv1.corp.com |
| Incoming Server Type | IMAP |
| Account Name | nurse2 |
| E-mail Address | nurse2@corp.com |
| Real Name | Nurse Two |
Now you're ready to send e- mails back and forth between nurse1 and nurse2 . Just send messages from nurse1@corp.com to nurse2@corp.com and vice versa.
| | ||
| | ||
| | ||
EAN: N/A
Pages: 71