Authentication to NIS
| | ||
| | ||
| | ||
NIS was one of the first solutions to the shared authentication problem, and it is one of the simplest. A client asks the NIS server for the equivalent of the desired line of /etc/passwd or /etc/ group or, in more recent years , /etc/shadow , and the NIS server coughs it up. Not much to it. And there's a lot to be said for simplicity.
Unfortunately , NIS is built on RPC (Remote Procedure Call), an older system of communication between programs on different computers. RPC is old enough that it predates modern firewalls, and it is not compatible with firewalls that rely on simple port filtering.
In general, NIS is designed with an older "trusted host" security model in mind. The trusted host way of thinking goes like this: all the workstations on the local network have been locked down and can be trusted. In this philosophy, no one would ever put a rogue machine on the LAN. And you certainly would never want NIS access over that newfangled Internet, so why worry about solutions for less trustworthy clients ? These were reasonable assumptions when NIS was born. They are less so today.
As stated, NIS is old, crusty, and insecure but still in heavy use around the world. With that in mind, you might very well have to get both your Linux and Windows to authenticate to an existing NIS structure. It's likely not a good choice to bring up a new NIS structure from scratch when there are so many better options. But you can if you want to.
| Note | Historically, NIS was known as "Sun Yellow Pages." So, many of the commands and services were created with 'yp' as an obvious prefix. While the metaphor was effective, it eventually ran afoul of Sun's legal department and was renamed NIS, but most of the NIS- related programs are still named with the yp prefix. |
In this next section, we'll show you how to set up a Linux-based NIS serverbut you'll be doing it only so you can test other components later (such as having Windows authenticate to NIS). Figure 2.1 shows a typical NIS setup. That is, there must be a master NIS server (which you'll be setting up on your Linux server) and, optionally , one or more read-only slave NIS servers. Slave servers are usually spread across the environment (but you won't be setting them up for the examples in this book). You will, of course, have clients that will authenticate to your NIS structure: Linux and Windows clients.
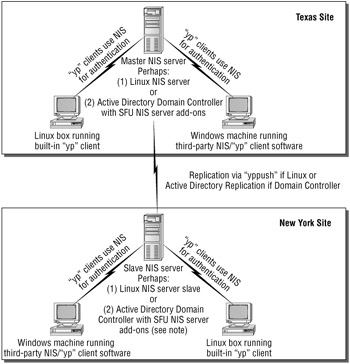
Figure 2.1: Here's what a typical enterprise NIS structure might look like.
| Note | Yes, as you can see in Figure 2.1, it's possible to have an Active Directory Domain Controller pretend to be a NIS server. We'll talk about that in the next chapter. |
Outside of the lab environment, if you already have a NIS infrastructure in place (on Linux, Sun, or something else), you'll likely want to skip the creation of a NIS server and proceed to making your clients talk with your existing NIS server.
Creating a Linux-Based NIS Server
Creating a Linux-based NIS server is straightforward. You'll start out by disabling the Linux firewall (NIS doesn't play well with it), then you'll install the NIS server components.
Installing the NIS Server Components on Linux
First, you must disable the firewall software on the Linux server. This is necessary because NIS relies on the RPC (Remote Procedure Call) standard, a system that involves unpredictable TCP/IP port numbers . Rather than listening for connections at a well-known port, an RPC service registers for a port number when the service starts. While some types of firewalls can indeed cope with this by directly understanding RPC messages, the simple firewall provided with Fedora Core 3 doesn't cut it. Systems relying on NIS should definitely use it only behind a firewall, trusting only systems on the same network.
To disable the firewall for NIS:
-
From the Applications menu, select System Settings
 Security Level.
 -
Click the "Disable Firewall" button to turn off the firewall.
| Note | If you install an NIS server purely as an experiment, we suggest you reenable your firewall later when you have finished your exploration of NIS. |
Next, you will need to install the NIS server software itself. You did not do this in Chapter 1 because we don't really want to implement NIS as part of a Linux server environment when better alternatives are available. However, for this set of experiments, here's how to install the NIS server software on a Linux server:
-
From the Applications menu, select System Settings
 Add/Remove Applications.
 -
In the "Package Management" dialog, scroll to "Network Servers" and click the "Details" button to the right. Select " ypServ " (the NIS server software) from the package list. You may need to scroll down.
-
Click "Update." When the "Completed System Preparation" window opens, click "Continue."
-
When installation is complete, close the Add/Remove Applications tool.
Configuring the Server
Webmin, the web-based configuration program you installed in Chapter 1, comes in quite handy for NIS configuration. First, you'll need to install the NIS configuration module, a standard Webmin module available from the Webmin website. Webmin itself offers an interface to fetch such modules automatically, so you don't need to browse the Webmin web site manually.
Begin by logging into Webmin in the usual fashion by opening a browser and pointing it toward https ://linserv1.corp.com:10000 (don't forget the s in https ). In the "Webmin interface," click "Webmin Configuration," then "Webmin Modules." Then select the "Install Standard Module" radio box and click the " " browse button next to it. From the list of modules that appears, select "NIS Client and Server." Then click "Install Module" to carry out the installation. A progress display will appear.
When installation has completed, click "NIS Client and Server" at the bottom of the progress display page. Or, the next time you want to configure the NIS server, select the "Networking" button at the top of Webmin, then click "NIS Client and Server."
To configure the NIS server software:
-
Click the "NIS Client and Server" button in the Networking page.
-
Click the "NIS Server" button.
-
Select the radio box labeled "Enable NIS Server."
-
In the "Serve NIS domain" field, select the radio button near the empty field, then enter the name you want to give the NIS domain. For the examples, enter nis.corp.com , but even a "short" name is acceptable. We chose the NIS "domain name" nis.corp.com for consistency with the way we name domains in other authentication systems discussed in this book. However, a NIS domain name need not resemble a fully qualified DNS name. Simply corp or nis would have worked as well. In this respect, NIS domain names are not unlike traditional NT NetBIOS names .
-
Select the "Master NIS Server" radio box.
-
At this point, you'll edit the NIS Tables list box. Specifically, you want to specify that only certain tables are to be selected. Hold down the Ctrl key and click to select these three tables:
passwd group shadow
| Note | Historically, NIS was also used to share the IP addresses of various hostnames. It was a sort of "poor-man's DNS" solution that is no longer necessaryin fact, it only creates confusion and lost time for administrators trying to configure an NIS server. |
You're almost there! Click "Save and Apply" to move on.
| |
NIS is insecure because of a fundamental design flaw: the server does not validate the user's login attempt. Instead, the NIS server just publishes the data in the passwd and shadow tables. Clients request the user information, including the password hash, for the user who wishes to log in. Then the client, not the server, hashes the user 's password attempt to see if it matches the password hash the server returns.
This is more secure than sending passwords to the server in cleartext for verification, of course. And, at the time NIS was designed, this may have seemed like the only viable alternative because SSL (Secure Sockets Layer) was not yet available. However, it is a bad design for a modern network where client computers cannot always be trusted. A misbehaving client machine can choose to hold on to the password hash and keep throwing variations on dictionary words at it locally, with no restriction on speed, until an account is successfully cracked.
You can lock things down by IP address, which does prevent this behavior from outside the local network. But within the local network, bear in mind that anyone with a network sniffer can still grab the password hashes as they fly by.
NIS servers do offer one feature that may appear to solve this problem, but truthfully it doesn't. The feature is this: you can lock things down so that when queries are not made from a "privileged" port number on the client, bogus information is returned for the password field of the shadow table. This may appear to solve the problem, but actually you are still trusting the client computer to use a privileged port number for legitimate login attempts only. Read that again: you are trusting the client computer to be the good guy.
Sure, only the root account can open a connection from a privileged port on most Unix operating systems. But this does you no good if the user has obtained root access to just one workstation. A user could just bring their own Linux laptop in, and, bam! They're root!
All you've done here is prevent non-root users on workstations that have not been physically compromised or otherwise subverted from using commands like ypcat to list the password hashes. But all it takes is one physically compromised or hacked client system, and the password hashes can be readily mirrored.
There are only two solutions that provide some real protection against rogue client systems: enforcing very strict password selection policies so that dictionary attacks will consistently fail, or not using NIS.
Still, we'll do the best we can to help you slow hackers down. First, you'll limit the range of IP addresses that can access the NIS server, and you'll implement the restriction to privileged ports only. This is no help at all with compromised clients or rogue PCs on the LAN or with network sniffers, but it does raise the bar a bit higher by requiring that someone add a PC, use a sniffer, or obtain root access to a workstation. And, of course, it does keep external Internet traffic out entirely.
To restrict usage of the NIS server to clients from the private (trusted) network:
-
Use Webmin, then select Networking
 NIS Client and Server
  Server Security.
 -
Select the radio button next to "Netmask" and enter the network number and netmask for your internal network. For example, if you use a private IP network such as 192.168.0.0, you would enter a netmask of 255.255.0.0 and a network/host address of 192.168.0.0 .
Or you could enter each client IP addresses, one at a time. This will get frustrating fast, but that's the breaks. To do so, in the Netmask section, select the "Single Host" radio button and in the "Network/host address" field, enter the IP address of the system you want to allow. Then click "Save and Apply." When you do, you'll be sent back one full screen and you must re-select "Server Security." (Frustrating, I know.) Repeat.
-
Now you'll limit access to the password hash field to connections from privileged ports. As stated, this is only a measure to keep well-behaved client operating systems in line, and it provides no protection from rogue or compromised clients. This is referred to as mangling the password field and only affects non-root users on well-behaved clients who are attempting to use the ypcat command to dump the shadow table. To do this, you leverage a different Webmin module. It's called NIS Server Security and is located in Networking
 NIS Client and Server
  Server Security, as shown here.
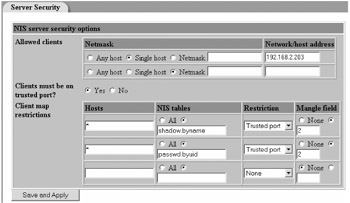
-
Select "Yes" for the "Clients must be on trusted port?" option and ensure "Mangle field" is set to 2. Column 2 of the shadow file contains the password hash, so you're blocking that field from being displayed. In essence, non-root users on well-behaved Unix clients cannot see the shadow file; hence, they cannot hack at it. There's no penalty for selecting "All" in the NIS Tables column; you're just hiding, er, mangling column 2 from all tables that NIS is using. Since column 2 is the password field in all of the standard /etc/passwd -like files that NIS is modeled upon, there's no harm in doing so.
| |
Launching the NIS Server
The NIS server is ready to run. At the terminal prompt, as root, enter the following commands. The first command ensures that the NIS server software will be launched at boot time; the second launches it now so that rebooting is not immediately necessary:
chkconfig --add ypserv service ypserv start
Creating Unix Users and Groups with Webmin
Naturally, you'll want to test our NIS server. While Webmin provides a separate interface to add new accounts from within the NIS "Servers and Clients" module, NIS operates simply by publishing the server's /etc/passwd file, converting its contents into a simple database format at regular intervals. Therefore, we recommend that you add new accounts via the Webmin's standard "Users and Groups" module, already installed and accessible by clicking the "System" button.
Since this is the first time you've created users and groups with Webmin, it's worth touching on two oddities . First, although the "Users and Groups" page contains the phrases "Local Users" and "Local Groups," you are exporting these via NIS, so they are more than just "local" in reality. Second, there's a potentially confusing distinction made between "normal passwords" and "pre-encrypted passwords." When you select "Normal Password," you are really asking the system to hash the password for you. That's the easiest way to set up a password.
To create users and groups with Webmin:
-
Open Webmin. Select "System" and locate "Users and Groups." Click the "Create a New Group" link. For the group name, enter eastsales , then click "Create." Repeat this process to create westsales .
-
Next, you'll add actual user accounts, two for each group. Click the "Create a new user" link, then enter the username eastman1 . In the password field next to the "Normal Password" radio button, which should already be selected, enter p@ssw0rd . Enter the real name East Man One . You may accept the defaults for the remaining fields.
-
Under "Group Membership/Primary group," select "Existing group" and use the provided " " browsing button to locate and select the eastsales group.
Finally, click "Create." Then repeat the process for eastman2, westman1 , and westman2 , placing westman1 and westman2 in the westsales group.
Authenticating Linux Clients to the NIS Server
Your NIS server is ready to go; time to test it by convincing your client system to allow logons via the accounts you just created. First, as with the NIS server system, you must unfortunately disable the Fedora firewall. You can do this by selecting Applications ![]() System Settings
System Settings ![]() Security Level and then selecting the "Disable Firewall" option in the dialog box that follows . If you are not committed to actually using NIS, we recommend reenabling the firewall when you are through experimenting with NIS.
Security Level and then selecting the "Disable Firewall" option in the dialog box that follows . If you are not committed to actually using NIS, we recommend reenabling the firewall when you are through experimenting with NIS.
To configure your Linux client to authenticate to NIS:
-
From the "Applications" menu, select System Settings
 Authentication.
 -
In the "Authentication Configuration" dialog box (seen in Figure 2.2), the "User Information" tab should be automatically selected. On this tab, select "Enable NIS," then "Configure NIS." In the NIS Domain field, enter nis.corp.com . In the NIS Server field, enter linserv1.corp.com . Or leaving the NIS Server field blank will tell the client to broadcast for the server.
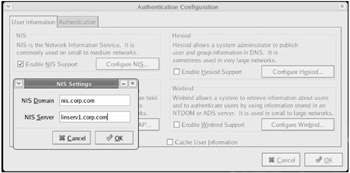
Figure 2.2: In the "NIS Settings" dialog, enter the NIS Domain and NIS Server names.
| Note | Under the hood, these steps add NIS to the list of authentication services to be consulted for password file information via the /etc/nsswitch.conf configuration file. They also enable NIS as an authentication mechanism in /etc/pam.d/system-auth , which controls the mechanisms that are allowed to authenticate logins. |
Next, you must enable and launch the ypbind service, which takes care of communication with the NIS server. To do so, enter the following two commands as root at the terminal prompt:
chkconfig --add ypbind service ypbind start
You're almost ready to go. If you tried a login now, it would succeed, but the user would have no home directory to log into. This can be addressed by enabling the pam_mkhomedir.so module, which automatically creates a home directory when it does not already exist for users whose login credentials are valid.
Remember, earlier we described three typical ways users log on and interact with the system:
-
The shell, logging in at the console without a GUI
-
Remote encrypted shell (via SSH)
-
The GNOME interface (the usual gdm login manager)
Therefore, you need to tell each of these authentication mechanisms how to create home directories. The line you'll add is
session required pam_mkhomedir.so skel=/etc/skel umask=0077
| |
Here's the skinny on skel . Sometimes administrators want a newly created user directory to be prepopulated with files. By setting the skel option to a directory that contains such files, the administrator can arrange for those files to be automatically copied to the home directory of a new user. On a freshly configured Fedora client, /etc/skel is an empty directory, so the new home directory starts out empty. That's fine for our purposes.
The umask option determines the initial permissions of the newly created home directory. Unfortunately, it doesn't accept the relatively friendly "symbolic" syntax we've been using to assign permissions with the chmod command. For instance, in other parts of the book, we've suggested you use the syntax chmod a+rx filename . This sets "All" users' "Read" and "Execute" permissions on the filename. This is very clear and shows "who" gets permission and "how" much permission they get.
However, there's an alternate way of expressing the "who" and the "how." It's called the octal format, and it is mandatory for the umask option. Most Linux administrators who choose to use this syntax with the chmod command just have a bunch of the umask s memorized.
For instance, it's enough to know that a umask of 0077 means that the file or directory will be readable, writable, and executable (for a directory, this means the directory can be descended into) by the owner and by users who are members of the owner's default Unix group but not by "others." In other words, a umask of 0077 is like specifying three separate chmod commands: a-rwx,g+rwx,u+rwx in the symbolic syntax.
Another useful value for the umask argument is 0007 , which means that only the owner can read, write, or descend into the directory and is equivalent to a-rwx,u+rwx .
For the geek in all of us, here's how the umask is calculated in octal (where a digit cannot be larger than 7).
-
1 represents "executable"
-
2 represents "writable"
-
4 represents "readable"
-
These three can be added together in any combination.
-
The rightmost digit represents permissions for the owner. The second digit counting from the right represents permissions for members of the group that owns the file. The third digit from the right represents permissions for everyone else. Zero is the only practical value for the leftmost digit in this context.
-
For more information about setting permissions in this "old school" numerical way, try reading the online documentation for the chmod command. The man chmod command will show it to you.
| |
Simply append the preceding line to the following three files:
-
/etc/pam.d/login
-
/etc/pam.d/sshd
-
/etc/pam.d/gdm
Each file controls policies for how clients log on to the Linux machine. The /etc/pam.d/login is for plain-text console and serial logins, /etc/pam.d/sshd is for SSH encrypted shell logins, and /etc/pam.d/gdm is how most users graphically log on via the Fedora Gnome desktop.
Now you're ready to log on via NIS. To test the system, log out of your Linux client system via the "Actions" menu, then log in again using the username eastman1 and the password p@ssw0rd . You will be notified that a home directory has been created, and logon will then proceed as normal.
If It Doesn't Work
Here are some things to check if you cannot authenticate a Linux client to NIS:
-
The most common cause of failure is the firewall, so ensure port filtering is off. For good measure, if you can, turn off SELinux. Double-check that you have followed the preceding instructions with regard to disabling the Fedora firewall and the SELinux subsystem on both the client system and the server.
-
Be sure that you have actually started the ypserv service on the server. You can use the command ps -A grep yp grep -v grep (as one line) to show whether the ypserv process is running. The ps command lists currently running programs. The -A option makes sure that all programs are included. The grep command searches its input for a particular string, and grep with the -v option searches for lines that don't contain a string. You do this to avoid confusion by not including the grep commands themselves in the final output.
-
Be sure that you have started the ypbind service on the client. You can use the ps command in the previous point to check.
Authenticating Windows Clients to the NIS Server
Out of the box, there isn't a way for Windows XP machines to authenticate to a NIS server. There are, however, multiple add-ons that can do the job.
One option is a freebie called pGina. The other option is to leverage commercial software. One package we'll demonstrate is WRQ's Reflection 12 Client for NFS. There are other options available, but we'll only discuss these here.
Windows to NIS Authentication via pGina and the NIS Plug-In
Windows has a way to inject additional (or alternate) methods of authentication via the pluggable "GINA" module. GINA is the code you see when you are asked to press Ctrl+Alt+Del upon startup. Out of the box, GINA is coded to talk to NT Domain Controllers, Active Directory Domain Controllers, and other things which talk "Windows." If you could just replace that code with something that could natively talk to NIS, you'd be in business.
Indeed, you are in business: that "something" is called pGina, and it's downloadable via http://pgina.xpasystems.com/ . pGina is a framework that allows for multiple GINA plug-ins allowing nonnative authentications, including NIS (which you'll use now), LDAP (which you'll use in a little bit), and some other optional authentication possibilities.
The Windows download of pGina and installation is very straightforward: just download it, run it while logged in as a local administrator to install it, and take all the defaults. Once installed, you'll also need to download and install the required plug-in(s).
| Note | This particular plug-in will install a Windows service called ypbind that is needed to run the NIS client piece for pGina. The service provides a way for this Windows client to broadcast and find your NIS server. |
Once the plug-in is downloaded and installed, you're ready to configure pGina for NIS authentication.
To configure a Windows client using pGina for NIS authentication:
-
Select Start
 Programs
  pGina
pGina  Configuration Tool to run the pGina configuration tool.
 -
Once launched, locate the "Plugin" tab and click "Browse." Enter the path to the .dll that you just installed that performs the NIS function. The default location is c:\pGina\plugins\NISplugin.dll , as shown in Figure 2.3.
-
On the "Plugin" tab, click the "Configure" button. In the dialog box named, appropriately, "Dialog," enter the name of your NIS domain ( nis.corp.com in the example). You'll also see a text box in which to enter the "Password Map" file. Enter passwd.byname , as shown in Figure 2.3. This is the table in NIS that is used when you pass in a username at logon time. Once you pass in a valid username and password, NIS will return a password hash (not the password itself). If the password hashes match, you're in!
-
At the "Dialog" dialog box, click "Save." At the "pGina Configuration" window, click "OK."
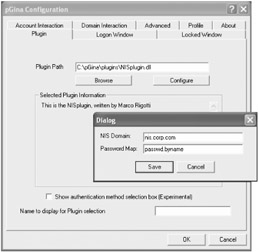
Figure 2.3: Set up pGina's NIS plug-in for your NIS domain.
Now reboot your Windows machine to ensure the settings stick (logging off isn't enough). When you next press Ctrl+Alt+Del to log on, you'll be presented with a very different picture than usual, as shown in Figure 2.4.
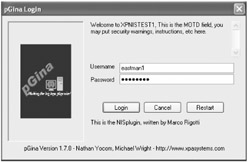
Figure 2.4: You can now use NIS to authenticate Windows clients.
| Tip | pGina can be used as either the only authentication mechanism (as presented here), or in addition to a regular Active Directory domain login. The pGina documentation is pretty thin, but it does describe how to do this. Don't forget to actually join your XP client workstation to the Active Directory domain, however, or Active Directory authentication won't work. |
| |
pGina is great in concept, but working with it and troubleshooting it can be a challenge. In our opinion, pGina and the plug-ins have that "not quite ready for prime-time" feel. With that said, there are lots of installations (universities, mostly) currently running pGina the way it was intended.
When it comes to troubleshooting pGina, here are our top three tips:
-
There is a new Windows Event log available for pGina events, but in our testing all events had the same ID and had little useful information. Nonetheless, you may discover why pGina isn't functioning by digging into the Windows Event Log and finding a gem.
-
The "Plugin Tester" tool (located in the pGina group in the start menu) can help you bang against an authentication source (such as LDAP or NIS) without having to log out and use the Ctrl+Alt+Del screen over and over again after you make a simple configuration change.
-
An ongoing support message board is located at http://forums.xpasystems.com . Here you can post your questions about pGina as well as the available plug-ins. This is your best bet. It's heavily trafficked by the guys who wrote pGina, and they're pretty willing to help.
| |
Windows to NIS Authentication via WRQ Reflection 12 Client for NFS
There are several commercial packages which additionally assist Windows machines to authenticate to NIS servers.
One package is by the WRQ company and is called the Reflection NFS Client. Yes, it's called the NFS client, but it does both NFS and NIS. You can learn more about it at www.wrq.com/products/reflection/nfs_client . There's a free trial available if you want to give it a test drive.
To configure the WRQ Reflection 12 Client for NIS authentication, enter the WRQ Reflection NFS utility (as seen in Figure 2.5) from the Start ![]() Programs menu. Once launched, Select View
Programs menu. Once launched, Select View ![]() Settings. Select the "NFS General" tab and select "Use NIS for authentication" (not shown). Then, on the "NIS" tab, enter the name of the NIS domain, as well as how you want to locate the NIS server (by Hosts name or by Broadcast). Then click "OK" and reboot your machine.
Settings. Select the "NFS General" tab and select "Use NIS for authentication" (not shown). Then, on the "NIS" tab, enter the name of the NIS domain, as well as how you want to locate the NIS server (by Hosts name or by Broadcast). Then click "OK" and reboot your machine.
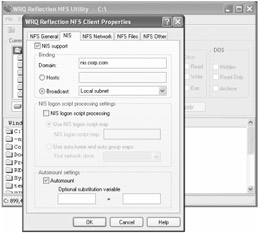
Figure 2.5: Use the WRQ Reflection NFS client utility to configure your NIS settings.
Once you reboot, first log on to the local machine (or Windows domain) normally, then you'll be presented with the "NFS Logon: Primary" window asking you for your NIS credentials, as shown in Figure 2.6.
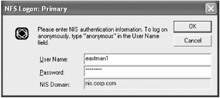
Figure 2.6: Enter your NIS username and password credentials.
Of course, as commercial software, this utility has a bajillion features and has lots of support options. It's available from WRQ at www.wrq.com .
Checkout: Using NIS for Authentication
In this section, you've set up your Linux machine to be an NIS server. You've already authenticated both Linux Clients and Windows Clients to NIS.
Here's a quick rundown of how you did it.
To configure your
-
NIS Server: NIS Server doesn't like firewalls, so you turned off both the regular port-filtering firewall and the SELinux subsystem.
-
You used the Add/Remove Applications utility to add the NIS software, ypServ .
-
You used Webmin to configure the NIS server. You made the Linux server a Master NIS server, and called it nis.corp.com (but you could have called it anything, including a short name, such as NIS).
-
You added NIS to start at boot time with the command chkconfig --add ypserv and started it with service ypserv start .
-
Optionally, you hardened NIS with Webmin by specifying which client computers can connect. Additionally, you hardened NIS by specifying that two NIS tables ( shadow.byname and passwd.byuid ) are not readable by anyone other than programs or users who act as root.
-
You used Webmin to add some test users and groups via the Users and Groups interface.
To get a Linux client to authenticate to your NIS server, you:
-
Used the "Authentication Configuration" dialog box and pointed it to the NIS domain (and optionally the NIS server).
-
You instructed the NIS client to start at boot time with the command chkconfig --add ypbind and started it with service ypbind start .
-
You changed the three usual login methods, the shell, the encrypted SSH shell, and the graphical GNOME interface to authenticate to your NIS repository.
To get a Windows client to authenticate to your NIS server, you:
-
Downloaded and installed the pGina tool.
-
Loaded the pGina NIS plug-in and specified the NIS domain name and password map file.
-
Alternatively, you used a commercial third-party tool, such as WRQ Reflection 12, and specified the NIS domain name.
| | ||
| | ||
| | ||
EAN: N/A
Pages: 71