Using the Address Selector
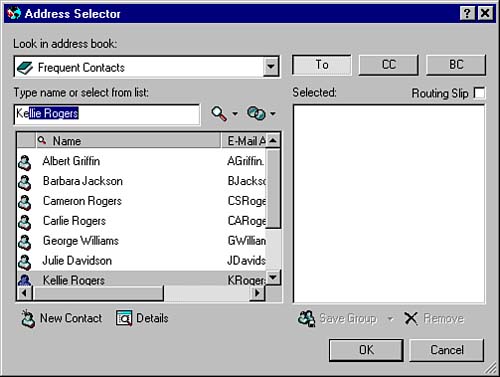
| The Address Selector's functionality is very similar to the Address Book's functionality. Many of the same tasks can be accomplished in the Address Selector. The Address Selector is simply a modified view of the Address Book, optimized to perform the tasks most commonly used when addressing messages. The Address Selector only appears when you are generating a message in GroupWise, when you select the Address function from the Toolbar or from the Actions menu, and in other areas within the GroupWise client program when you need to select users. The Address Selector is shown in Figure 4.9. Figure 4.9. The Address Selector displays when you're addressing GroupWise messages. The Novell GroupWise address book is the default address book that is displayed. You can select any of your other address books by clicking the drop-down menu. TIP When addressing a message, if you are sure about how to spell a user's name and don't want to use the Address Selector, you can simply begin typing the user's name in the To, CC, or BC field, and GroupWise uses the Name Completion feature to make a best guess about which user you want. When the correct name appears, simply tab to the next field. To address a message with the Address Selector, use the arrow keys or the scrollbar to locate an addressee and then double-click the user's name to insert that name in the Address Book's To field. Insert any additional names and then choose OK to return to your message. The recipients are inserted in the message's To field. Instead of trying to scroll through a long address book, you can quickly find an addressee by simply beginning to type the person's name. The address list quickly highlights the name that most closely matches what you type. The right column (where the users are listed when you select them from the Address Book) defaults to the To field. GroupWise assumes that most users you send the message to are the primary recipients and should be added to the message's To field. Consequently, when you select users from the address list, they are listed in the To field by default. To add BC or CC recipients, click the corresponding button before adding users. If you have a user in the To field who needs to be moved to either the CC or BC field, you can right-click the user name and choose the appropriate field from the QuickMenu. Alternatively, you can hold the Ctrl button down, select multiple names that need to be moved to either CC or BC, and then click the CC or BC button. TIP If you want to route the message to the recipients in a sequential order, click the Routing Slip check box above the To field in the address book. You can then click and drag the recipient names to your desired routing order. This lets you create a simple workflow formessages or documents that should go to recipients in a specific order. (Note: If the Routing Slip option is selected, you cannot create new personal groups, as explained in the next subsection.) |
EAN: 2147483647
Pages: 191