Flylib.com

Books Software


Security Options


Security Options

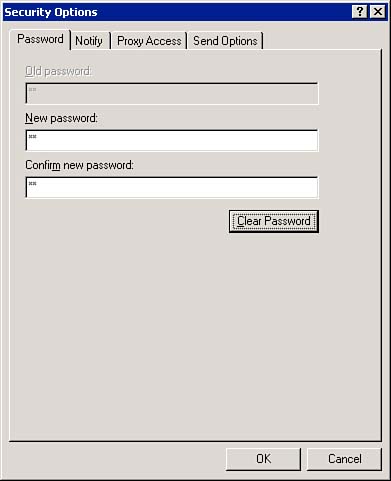
When you double-click the Security icon, you see the Security Options dialog box. These options affect your entire Mailbox. You can also set up the encryption and digital signature default options using the Send Options tab. Remember, this tab is a duplicate of the Security tab under Send Options.

Password

One of the most important security options is found on the Password tab, which is shown in Figure 11.12. This password is used to enter your Mailbox when GroupWise is started, with the Web access gateway, routed item completion, and Remote Mode configuration.

Figure 11.12. This dialog box controls the password for your Mailbox.

graphics/11fig12.jpg

To set a password on your Mailbox, follow these steps:

  1. Double-click the Security icon and click the Password tab once.

  2. If you are changing a password, enter your old password in the Old password field.

  3. Type a password in the New password field and in the Confirm new password field. Click OK to set the password. The next time you start GroupWise, you must type in your password.

  4. Click the Clear Password button if you want to erase your password.

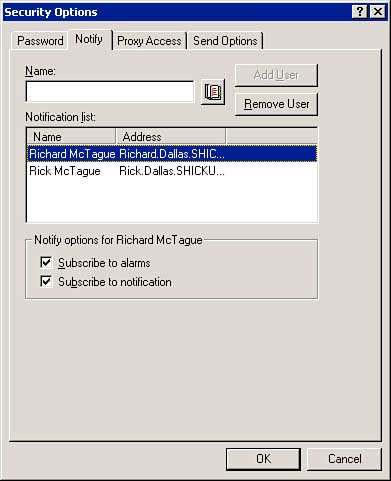
NOTE

Keep in mind that your password is case sensitive. Also, even though the administrator can reset it, you should be sure to record your password somewhere secure.


Once you have set up your password, you can move ahead to configuring the Notify options.

Notify

The Notify tab enables you to use the Notify program to alert you when you receive a message or when someone else receives a message. You can also be alerted by alarms set in your own Calendar as well as in other peoples' Calendars. As with the Proxy feature, the other person must grant you the right to subscribe to notifications or alarms within his or her Calendar. (See "Proxy" in Chapter 8 for instructions on granting access to your Mailbox.) The Notify tab's options are shown in Figure 11.13.

Figure 11.13. You can use Notify to be alerted to other user 's email messages and appointments.

graphics/11fig13.jpg

To receive notification when someone else receives a message (or to be alerted for another person's alarms), follow these steps:

  1. Click the Address Book icon to the right of the Name field. Select a user from the list and click OK. Alternatively, you can type the name of the user in the Name field and click Add User.

  2. With that person highlighted in the Notification List, check the Subscribe to alarms or Subscribe to notification box. Notice that your name is already on the list.

  3. Click OK to apply your change. Your Notify program will now alert you for messages and/or alarms for both yourself and the other users you selected.

In the next section, you establish the rights other people have to your Mailbox through Proxy.

Proxy Access

Proxy Access establishes the rights that other users have to your Mailbox when they use Proxy. This is explained in detail in Chapter 8.

Send Options

The Send Options tab of the Security Options dialog box is described in the "Security" section earlier in this chapter.


Certificates

Certificates are used to encrypt, decrypt, digitally sign, and verify messages both internally in your GroupWise system and over the Internet. The Certificates option enables you to set and manage certificates (yours and recipients) for use in GroupWise.

Your public certificate is used to sign messages and to send to others to allow them to verify your signature on the message. Certificates have two elements: a public key and a private key. From the perspective of encrypting and sending a message, once you have imported another user's public certificate, you can encrypt and send messages to that user, using the public key element from the certificate. When the other person receives the encrypted message, that user will use the private key element in his or her certificate to decrypt the message.

From the perspective of receiving an encrypted message, you must have already sent your certificate to the sender. That person will use his or her public key element of your certificate to encrypt the message, and you will use the private key element of your certificate to decrypt the message.

NOTE

A further discussion of how to obtain a certificate file and the details of public and private keys is beyond the scope of this book.


My Certificates

The My Certificates dialog box, shown in Figure 11.14, enables you to obtain a certificate, import an existing certificate, or view and manage the properties of your certificate. This dialog box will show a list of your certificates.

Figure 11.14. This dialog box is where you configure your certificates to use in encryption.

graphics/11fig14.jpg

You will find the following features on the My Certificates dialog box:

  • Get Certificate ” Clicking this button will start your Web browser and point to the Novell GroupWise Certificate page (www.novell.com/products/groupwise/certified.html), where you can get information on supported certificates.

  • Edit Properties ” This button enables you to edit the properties of your certificate.

  • Import ” Clicking this button will enable you to browse to the file location of your certificate. Certificate files end with a .p12 or .pfx extension. You will also need to enter your certificate password. The Allow Export of Private Key in the Future option is needed for exporting the private key portion of your certificate to a file for backup or other purposes.

    Once you click OK in the Import My Certificate screen, you will be asked to set the security level in the Private Key Container dialog box. Low grants others permission to use your certificate without notification. Medium (the default) requests your permission when the certificate is going to be used, and High requests your permission with your password.

  • View Details ” This button enables you to see the detailed information about your certificate.

  • Set As Default ” If you have multiple certificates, use this button to designate the default certificate for encrypting and signing messages.

  • Certification Path ” This button shows the list of Certificate Authorities (CAs) that provided you with the certificate.

  • Export ” This button enables you to export the selected certificate to a file.

  • Remove ” This button enables you to remove the selected certificate from use in GroupWise.

These options are needed for most certificate configurations.

Certificate Authorities' Certificates

Clicking the Certificate Authorities' Certificates button brings up a dialog box that displays "Intermediate" and "Root" certificates. These are preconfigured lists of Certificate Authorities used worldwide to enable encryption and digital signatures.