Editing a Text Document: The CapsEditor Sample
 | |||||||||||
| Chapter 19 - Graphics with GDI+ | |
| bySimon Robinsonet al. | |
| Wrox Press 2002 | |
We now come to the extended example in this chapter. The CapsEditor example is designed to illustrate how the principles of drawing that we've learned up till now need to be applied in a more realistic example. The example won't require any new material, apart from responding to user input via the mouse, but it will show how to manage the drawing of text so that the application maintains performance while ensuring that the contents of the client area of the main window are always kept up to date.
The CapsEditor program is functionally quite simple. It allows the user to read in a text file, which is then displayed line by line in the client area. If the user double-clicks on any line, that line will be changed to all uppercase. That's literally all the sample does. Even with this limited set of features, we'll find that the work involved in making sure everything gets displayed in the right place while considering performance issues is quite complex. In particular, we have a new element here, that the contents of the document can change - either when the user selects the menu option to read a new file, or when they double-click to capitalize a line. In the first case we need to update the document size so the scrollbars still work correctly, and we have to redisplay everything. In the second case, we need to check carefully whether the document size is changed, and what text needs to be redisplayed.
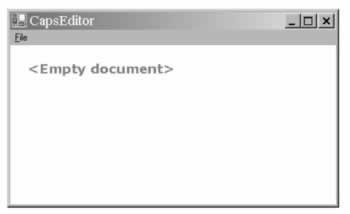
We'll start by reviewing the appearance of CapsEditor . When the application is first run, it has no document loaded, and displays this:
The File menu has two options: Open and Exit . Exit exits the application, while Open brings up the standard OpenFileDialog and reads in whatever file the user selects. The next screenshot shows CapsEditor being used to view its own source file, Form1.cs . I've also randomly double-clicked on a couple of lines to convert them to uppercase:

The sizes of the horizontal and vertical scrollbars are, by the way, correct. The client area will scroll just enough to view the entire document. CapsEditor doesn't try to wrap lines of text - the example is already complicated enough without doing that. It just displays each line of the file exactly as it is read in. There are no limits to the size of the file, but we are assuming it is a text file and doesn't contain any non-printable characters .
We'll start off by adding a using command:
using System; using System.Drawing; using System.Collections; using System.ComponentModel; using System.Windows.Forms; using System.Data; using System.IO; This is because we'll be using the StreamReader class which is in System.IO . Next we'll add in some fields to the Form1 class:
#region Constant fields private const string standardTitle = "CapsEditor"; // default text in titlebar private const uint margin = 10; // horizontal and vertical margin in client area #endregion #region Member fields private ArrayList documentLines = new ArrayList(); // the 'document' private uint lineHeight; // height in pixels of one line private Size documentSize; // how big a client area is needed to // display document private uint nLines; // number of lines in document private Font mainFont; // font used to display all lines private Font emptyDocumentFont; // font used to display empty message private Brush mainBrush = Brushes.Blue; // brush used to display document text private Brush emptyDocumentBrush = Brushes.Red; // brush used to display empty document message private Point mouseDoubleClickPosition; // location mouse is pointing to when double-clicked private OpenFileDialog fileOpenDialog = new OpenFileDialog(); // standard open file dialog private bool documentHasData = false; // set to true if document has some data in it #endregion
Most of these fields should be self-explanatory. The documentLines field is an ArrayList that contains the actual text of the file that has been read in. In a real sense, this is the field that contains the data in the "document". Each element of documentLines contains information for one line of text that has been read in. Since it's an ArrayList , rather than a plain array, we can dynamically add elements to it as we read in a file. You'll notice I've also liberally used #region preprocessor directives to block up bits of the program to make it easier to edit.
I said each documentLines element contains information about a line of text. This information is actually an instance of another class I've defined, TextLineInformation :
class TextLineInformation { public string Text; public uint Width; }
TextLineInformation looks like a classic case where you'd normally use a struct rather than a class since it's just there to group together a couple of fields. However, its instances are always accessed as elements of an ArrayList , which expects its elements to be stored as reference types, so declaring TextLineInformation as a class makes things more efficient by saving a lot of boxing and unboxing operations.
Each TextLineInformation instance stores a line of text - and that can be thought of as the smallest item that is displayed as a single item. In general, for each similar item in a GDI+ application, you'd probably want to store the text of the item, as well as the world coordinates of where it should be displayed and its size (the page coordinates will change frequently, whenever the user scrolls , whereas world coordinates will normally only change when other parts of the document are modified in some way). In this case we've only stored the Width of the item. The reason is because the height in this case is just the height of whatever our selected font is. It's the same for all lines of text so there's no point storing it separately for each one; we store it once, in the Form1 . lineHeight field. As for the position - well in this case the x coordinate is just equal to the margin, and the y coordinate is easily calculated as:
margin + lineHeight*(however many lines are above this one)
If we'd been trying to display and manipulate, say, individual words instead of complete lines, then the x position of each word would have to be calculated using the widths of all the previous words on that line of text, but I wanted to keep it simple here, which is why we're treating each line of text as one single item.
Let's deal with the main menu now. This part of the application is more the realm of Windows Forms - the subject of Chapter 7, than of GDI+. I added the menu options using the design view in Visual Studio .NET, but renamed them as menuFile , menuFileOpen , and menuFileExit . I then added event handlers for the File Open and File Exit menu options using the Visual Studio .NET Properties window. The event handlers have their VS .NET-generated names of menuFileOpen_Click() and menuFileExit_Click() .
We need some extra initialization code in the Form1() constructor:
public Form1() { InitializeComponent(); CreateFonts(); fileOpenDialog.FileOk += new System.ComponentModel.CancelEventHandler( this.OpenFileDialog_FileOk); fileOpenDialog.Filter = "Text files (*.txt)*.txtC# source files (*.cs)*.cs"; } The event handler added here is for when the user clicks OK on the File Open dialog. We have also set the filter for the open file dialog so that we can only load up text files - we've opted for .txt files as well as C# source files, so we can use the application to examine the sourcecode for our samples.
CreateFonts() is a helper method that sorts out the fonts we intend to use:
private void CreateFonts() { mainFont = new Font("Arial", 10); lineHeight = (uint)mainFont.Height; emptyDocumentFont = new Font("Verdana", 13, FontStyle.Bold); }
The actual definitions of the handlers are pretty standard stuff:
protected void OpenFileDialog_FileOk(object Sender, CancelEventArgs e) { this.LoadFile(fileOpenDialog.FileName); } protected void menuFileOpen_Click(object sender, EventArgs e) { fileOpenDialog.ShowDialog(); } protected void menuFileExit_Click(object sender, EventArgs e) { this.Close(); }
We'll examine the LoadFile() method now. It's the method that handles the opening and reading in of a file (as well as ensuring a Paint event gets raised to force a repaint with the new file):
private void LoadFile(string FileName) { StreamReader sr = new StreamReader(FileName); string nextLine; documentLines.Clear(); nLines = 0; TextLineInformation nextLineInfo; while ( (nextLine = sr.ReadLine()) != null) { nextLineInfo = new TextLineInformation(); nextLineInfo.Text = nextLine; documentLines.Add(nextLineInfo); ++nLines; } sr.Close(); documentHasData = (nLines>0) ? true : false; CalculateLineWidths(); CalculateDocumentSize(); this.Text = standardTitle + " - " + FileName; this.Invalidate(); }
Most of this function is just standard file-reading stuff, as covered in Chapter 12. Notice how as the file is read in, we progressively add lines to the documentLines ArrayList , so this array ends up containing information for each of the lines in order. After we've read in the file, we set the documentHasData flag, which indicates whether there is actually anything to display. Our next task is to work out where everything is to be displayed, and, having done that, how much client area we need to display the file - the document size that will be used to set the scrollbars. Finally, we set the title bar text and call Invalidate() . Invalidate() is an important method supplied by Microsoft, so we'll break for a couple of pages to explain its use, before we examine the code for the CalculateLineWidths() and CalculateDocumentSize() methods .
The Invalidate() Method
Invalidate() is a member of System.Windows.Forms.Form that we've not met before. It marks an area of the client window as invalid and, therefore, in need of repainting , and then makes sure a Paint event is raised. There are a couple of overrides to Invalidate() : you can pass it a rectangle that specifies (in page coordinates) precisely which area of the window needs repainting, or if you don't pass any parameters it'll just mark the entire client area as invalid.
You may wonder why we are doing it this way. If we know that something needs painting, why don't we just call OnPaint() or some other method to do the painting directly? The answer is that in general, calling painting routines directly is regarded as bad programming practice - if your code decides it wants some painting done, in general you should call Invalidate() . Here's why:
-
Drawing is almost always the most processor- intensive task a GDI+ application will carry out, so doing it in the middle of other work holds up the other work. With our example, if we'd directly called a method to do the drawing from the LoadFile() method, then the LoadFile() method wouldn't return until that drawing task was complete. During that time, our application can't respond to any other events. On the other hand, by calling Invalidate() we are simply getting Windows to raise a Paint event before immediately returning from LoadFile() . Windows is then free to examine the events that are waiting to be handled. How this works internally is that the events sit as what are known as messages in a message queue . Windows periodically examines the queue and if there are events in it, it picks one and calls the corresponding event handler. Although the Paint event may be the only one sitting in the queue (so OnPaint() gets called immediately anyway), in a more complex application there may be other events that ought to get priority over our Paint event. In particular, if the user has decided to quit the application, this will be marked by a message known as WM_QUIT .
-
Related to the first reason, if you have a more complicated, multithreaded, application, you'll probably want just one thread to handle all the drawing. Using Invalidate() to route all drawing through the message queue provides a good way of ensuring that the same thread (whatever thread is responsible for the message queue - this will be the thread that called Application.Run() ) does all the drawing, no matter what other thread requested the drawing operation.
-
There's an additional performance-related reason. Suppose at about the same time a couple of different requests to draw part of the screen come in. Maybe your code has just modified the document and wants to ensure the updated document is displayed, while at the same time the user has just moved another window that was covering part of the client area out of the way. By calling Invalidate() , you are giving windows a chance to notice that this has occurred. Windows can then merge the Paint events if appropriate, combining the invalidated areas, so that the painting is only done once.
-
Finally, the code to do the painting is probably going to be one of the most complex parts of the code in your application, especially if you have a very sophisticated user interface. The guys who have to maintain your code in a couple of years time will thank you for having kept your painting code all in one place and as simple as you reasonably can - something that's easier to do if you don't have too many pathways into it from other parts of the program.
The bottom line from all this is that it is good practice to keep all your painting in the OnPaint() routine, or in other methods called from that method. However, you have to strike a balance; if you want to replace just one character on the screen and you know perfectly well that it won't affect anything else that you've drawn, then you may decide that it's not worth the overhead of going through Invalidate() , and just write a separate drawing routine.
In a very complicated application, you may even write a full class that takes responsibility for drawing to the screen. A few years ago when MFC was the standard technology for GDI-intensive applications, MFC followed this model, with a C++ class, C < ApplicationName > View that was responsible for painting. However, even in this case, this class had one member function, OnDraw() , which was designed to be the entry point for most drawing requests.
Calculating Item Sizes and Document Size
We'll return to the CapsEditor example now and examine the CalculateLineWidths() and CalculateDocumentSize() methods that are called from LoadFile() :
private void CalculateLineWidths() { Graphics dc = this.CreateGraphics(); foreach (TextLineInformation nextLine in documentLines) { nextLine.Width = (uint)dc.MeasureString(nextLine.Text, mainFont).Width; } }
This method simply runs through each line that has been read in and uses the Graphics.MeasureString() method to work out and store how much horizontal screen space the string requires. We store the value, because MeasureString() is computationally intensive. If we hadn't made the CapsEditor sample so simple that we can easily work out the height and location of each item, this method would almost certainly have needed to be implemented in such a way as to compute all those quantities too.
Now we know how big each item on the screen is, and we can calculate where each item goes, we are in a position to work out the actual document size. The height is basically the number of lines multiplied by the height of each line. The width will need to be worked out by iterating through the lines to find the longest. For both height and width, we will also want to make an allowance for a small margin around the displayed document, to make the application look more attractive.
Here's the method that calculates the document size:
private void CalculateDocumentSize() { if (!documentHasData) { documentSize = new Size(100, 200); } else { documentSize.Height = (int)(nLines*lineHeight) + 2*(int)margin; uint maxLineLength = 0; foreach (TextLineInformation nextWord in documentLines) { uint tempLineLength = nextWord.Width + 2*margin; if (tempLineLength > maxLineLength) maxLineLength = tempLineLength; } documentSize.Width = (int)maxLineLength; } this.AutoScrollMinSize = documentSize; }
This method first checks whether there is any data to be displayed. If there isn't we cheat a bit and use a hard-coded document size, which I happen to know is big enough to display the big red < Empty Document > warning. If we'd wanted to really do it properly, we'd have used MeasureString() to check how big that warning actually is.
Once we've worked out the document size, we tell the Form instance what the size is by setting the Form.AutoScrollMinSize property. When we do this, something interesting happens behind the scenes. In the process of setting this property, the client area is invalidated and a Paint event is raised, for the very sensible reason that changing the size of the document means scrollbars will need to be added or modified and the entire client area will almost certainly be repainted. Why do I say that's interesting? It illustrates perfectly what I was saying earlier about using the Form.Invalidate() method. You see, if you look back at the code for LoadFile() you'll realize that our call to Invalidate() in that method is actually redundant. The client area will be invalidated anyway when we set the document size. I left the explicit call to Invalidate() in the LoadFile() implementation to illustrate how in general you should normally do things. In fact in this case, all calling Invalidate() again will do is needlessly request a duplicate Paint event. However, this in turn illustrates what I was saying about how Invalidate() gives Windows the chance to optimize performance. The second Paint event won't in fact get raised: Windows will see that there's a Paint event already sitting in the queue and will compare the requested invalidated regions to see if it needs to do anything to merge them. In this case both Paint events will specify the entire client area, so nothing needs to be done, and Windows will quietly drop the second Paint request. Of course, going through that process will take up a little bit of processor time, but it'll be an negligible amount of time compared to how long it takes to actually do some painting.
OnPaint()
Now we've seen how CapsEditor loads the file, it's time to look at how the painting is done:
protected override void OnPaint(PaintEventArgs e) { base.OnPaint(e); Graphics dc = e.Graphics; int scrollPositionX = this.AutoScrollPosition.X; int scrollPositionY = this.AutoScrollPosition.Y; dc.TranslateTransform(scrollPositionX, scrollPositionY); if (!documentHasData) { dc.DrawString("<Empty document>", emptyDocumentFont, emptyDocumentBrush, new Point(20,20)); base.OnPaint(e); return; } // work out which lines are in clipping rectangle int minLineInClipRegion = WorldYCoordinateToLineIndex(e.ClipRectangle.Top - scrollPositionY); if (minLineInClipRegion == -1) minLineInClipRegion = 0; int maxLineInClipRegion = WorldYCoordinateToLineIndex(e.ClipRectangle.Bottom - scrollPositionY); if (maxLineInClipRegion >= this.documentLines.Count maxLineInClipRegion == -1) maxLineInClipRegion = this.documentLines.Count-1; TextLineInformation nextLine; for (int i=minLineInClipRegion; i<=maxLineInClipRegion ; i++) {
nextLine = (TextLineInformation)documentLines[i]; dc.DrawString(nextLine.Text, mainFont, mainBrush, this.LineIndexToWorldCoordinates(i)); } }
At the heart of this OnPaint() override is a loop that goes through each line of the document, calling Graphics.DrawString() to paint each one. The rest of this code is mostly to do with optimizing the painting - the usual stuff about figuring out what exactly needs painting instead of rushing in and telling the graphics instance to redraw everything.
We start off by checking if there is any data in the document. If there isn't, we draw a quick message saying so, call the base class's OnPaint() implementation, and exit. If there is data, then we start looking at the clipping rectangle. The way we do this is by calling another method that we've written, WorldYCoordinateToLineIndex() . We'll examine this method next, but essentially it takes a given y position relative to the top of the document, and works out what line of the document is being displayed at that point.
The first time we call the WorldYCoordinateToLineIndex() method, we pass it the coordinate value e.ClipRectangle.Top - scrollPositionY . This is just the top of the clipping region, converted to world coordinates. If the return value is -1 , we'll play safe and assume we need to start at the beginning of the document (this is the case if the top of the clipping region is in the top margin).
Once we've done all that, we essentially repeat the same process for the bottom of the clipping rectangle, in order to find the last line of the document that is inside the clipping region. The indices of the first and last lines are respectively stored in minLineInClipRegion and maxLineInClipRegion , so then we can just run a for loop between these values to do our painting. Inside the painting loop, we actually need to do roughly the reverse transformation to the one performed by WorldYCoordinateToLineIndex() . We are given the index of a line of text, and we need to check where it should be drawn. This calculation is actually quite simple, but we've wrapped it up in another method, LineIndexToWorldCoordinates() , which returns the required coordinates of the top left corner of the item. The returned coordinates are world coordinates, but that's fine, because we have already called TranslateTransform() on the Graphics object so that we need to pass it world, rather than page, coordinates when asking it to display items.
Coordinate Transforms
In this section, we'll examine the implementation of the helper methods that we've written in the CapsEditor sample to help us with coordinate transforms. These are the WorldYCoordinateToLineIndex() and LineIndexToWorldCoordinates() methods that we referred to in the last section, as well as a couple of other methods.
First, LineIndexToWorldCoordinates() takes a given line index, and works out the world coordinates of the top left corner of that line, using the known margin and line height:
private Point LineIndexToWorldCoordinates(int index) { Point TopLeftCorner = new Point( (int)margin, (int)(lineHeight*index + margin)); return TopLeftCorner; }
We also used a method that roughly does the reverse transform in OnPaint() . WorldYCoordinateToLineIndex() works out the line index, but it only takes into account a vertical world coordinate. This is because it is used to work out the line index corresponding to the top and bottom of the clip region.
private int WorldYCoordinateToLineIndex(int y) { if (y < margin) return -1; return (int)((y-margin)/lineHeight); }
There are three more methods, which will be called from the handler routine that responds to the user double-clicking the mouse. First, we have a method that works out the index of the line being displayed at given world coordinates. Unlike WorldYCoordinateToLineIndex() , this method takes into account the x and y positions of the coordinates. It returns -1 if there is no line of text covering the coordinates passed in:
private int WorldCoordinatesToLineIndex(Point position) { if (!documentHasData) return -1; if (position.Y < margin position.X < margin) return -1; int index = (int)(position.Y-margin)/(int)this.lineHeight; // check position isn't below document if (index >= documentLines.Count) return -1; // now check that horizontal position is within this line TextLineInformation theLine = (TextLineInformation)documentLines[index]; if (position.X > margin + theLine.Width) return -1; // all is OK. We can return answer return index; }
Finally, on occasions we also need to convert between line index and page, rather than world, coordinates. The following methods achieve this:
private Point LineIndexToPageCoordinates(int index) { return LineIndexToWorldCoordinates(index) + new Size(AutoScrollPosition); } private int PageCoordinatesToLineIndex(Point position) { return WorldCoordinatesToLineIndex(position - new Size(AutoScrollPosition)); }
Note that when converting to page coordinates, we add the AutoScrollPosition , which is negative.
Although these methods by themselves don't look particularly interesting, they do illustrate a general technique that you'll probably often need to use. With GDI+, we'll often find ourselves in a situation where we have been given some coordinates (for example the coordinates of where the user has clicked the mouse) and we'll need to figure out what item is being displayed at that point. Or it could happen the other way round - given a particular display item, whereabouts should it be displayed? Hence, if you are writing a GDI+ application, you'll probably find it useful to write methods that do the equivalent of the coordinate transformation methods illustrated here.
Responding to User Input
So far, with the exception of the File menu in the CapsEditor sample, everything we've done in this chapter has been one way: the application has talked to the user, by displaying information on the screen. Almost all software of course works both ways: the user can talk to the software as well. We're now going to add that facility to CapsEditor .
Getting a GDI+ application to respond to user input is actually a lot simpler than writing the code to draw to the screen, and indeed we've already covered how handle user input in Chapter 7. Essentially, you override methods from the Form class that get called from the relevant event handler - in much the same way that OnPaint() is called when a Paint event is raised.
For the case of detecting when the user clicks or moves the mouse the methods you may wish to override include:
| Method | Called when: |
|---|---|
| OnClick(EventArgs e) | mouse is clicked |
| OnDoubleClick(EventArgs e) | mouse is double-clicked |
| OnMouseDown(MouseEventArgs e) | left mouse button pressed |
| OnMouseHover(MouseEventArgs e) | mouse stays still somewhere after moving |
| OnMouseMove(MouseEventArgs e) | mouse is moved |
| OnMouseUp(MouseEventArgs e) | left mouse button is released |
If you want to detect when the user types in any text, then you'll probably want to override these methods:
| Method | Called when: |
|---|---|
| OnKeyDown(KeyEventArgs e) | a key is depressed |
| OnKeyPress(KeyPressEventArgs e) | a key is pressed and released |
| OnKeyUp(KeyEventArgs e) | a pressed key is released |
Notice that some of these events overlap. For example, if the user presses a mouse button this will raise the MouseDown event. If the button is immediately released again, this will raise the MouseUp event and the Click event. Also, some of these methods take an argument that is derived from EventArgs rather than an instance of EventArgs itself . These instances of derived classes can be used to give more information about a particular event. MouseEventArgs has two properties X and Y , which give the device coordinates of the mouse at the time it was pressed. Both KeyEventArgs and KeyPressEventArgs have properties that indicate which key or keys the event concerns.
That's all there is to it. It's then up to you to think about the logic of precisely what you want to do. The only point to note is that you'll probably find yourself doing a bit more logic work with a GDI+ application than you would have with a Windows.Forms application. That's because in a Windows.Forms application you are typically responding to quite high-level events ( TextChanged for a textbox, for example). By contrast with GDI+, the events tend to be more basic - user clicks the mouse, or hits the key h . The action your application takes is likely to depend on a sequence of events rather than a single event. For example, say your application works like Word for Windows, where in order to select some text the user clicks the left mouse button, then moves the mouse, then releases the left mouse button. Your application will receive the MouseDown event, but there's not much you can do with this event except record that the mouse was clicked with the cursor in a certain position. Then, when the MouseMove event is received, you'll want to check from the record whether the left button is currently down, and if so highlight text as the user selects it. When the user releases the left mouse button, your corresponding action (in the OnMouseUp() method) will need to check whether any dragging took place while the mouse button was down, and act accordingly . Only at this point is the sequence complete.
Another point to consider is that, because certain events overlap, you will often have a choice of which event you want your code to respond to.
The golden rule really is to think carefully about the logic of every combination of mouse movement or click and keyboard event that the user might initiate, and ensure that your application responds in a way that is intuitive and in accordance with the expected behavior of applications in every case. Most of your work here will be in thinking rather than in coding, though the coding you do will be quite fiddly, as you may need to take into account a lot of combinations of user input. For example, what should your application do if the user starts typing in text while one of the mouse buttons is held down? It might sound like an improbable combination, but sooner or later some user is going to try it!
For the CapsEditor example, we are keeping things very simple, so we don't really have any combinations to think about. The only thing we are going to respond to is when the user double-clicks - in which case we capitalize whatever line of text the mouse pointer is hovering over.
This should be a fairly simple task, but there is one snag. We need to trap the DoubleClick event, but the table above shows that this event takes an EventArgs parameter, not a MouseEventArgs parameter. The trouble is that we'll need to know where the mouse is when the user double-clicks, if we are to correctly identify the line of text to be capitalized - and you need a MouseEventArgs parameter to do that. There are two workarounds. One is to use a static method that is implemented by the Form1 object, Control.MousePosition , to find out the mouse position, like so:
protected override void OnDoubleClick(EventArgs e) { Point MouseLocation = Control.MousePosition; // handle double click
In most cases this will work. However, there could be a problem if your application (or even some other application with a high priority) is doing some computationally intensive work at the moment the user double-clicks. It just might happen in that case that the OnDoubleClick() event handler doesn't get called until perhaps half a second or so after the user has double-clicked. You don't really want delays like that, because they usually annoy users intensely, but even so, occasionally it does happen, and sometimes for reasons beyond the control of your app (a slow computer for instance). Trouble is, half a second is easily enough time for the mouse to get moved halfway across the screen - in which case your call to Control.MousePosition will return completely the wrong location!
A better way here is to rely on one of the many overlaps between mouse-event meanings. The first part of double-clicking a mouse involves pressing the left button down. This means that if OnDoubleClick() is called then we know that OnMouseDown() has also just been called, with the mouse at the same location. We can use the OnMouseDown() override to record the position of the mouse, ready for OnDoubleClick() . This is the approach we take in CapsEditor :
protected override void OnMouseDown(MouseEventArgs e) { base.OnMouseDown(e); this.mouseDoubleClickPosition = new Point(e.X, e.Y); }
Now let's look at our OnDoubleClick() override. There's quite a bit more work to do here:
protected override void OnDoubleClick(EventArgs e) { int i = PageCoordinatesToLineIndex(this.mouseDoubleClickPosition); if (i >= 0) { TextLineInformation lineToBeChanged = (TextLineInformation)documentLines[i]; lineToBeChanged.Text = lineToBeChanged.Text.ToUpper(); Graphics dc = this.CreateGraphics(); uint newWidth =(uint)dc.MeasureString(lineToBeChanged.Text, mainFont).Width; if (newWidth > lineToBeChanged.Width) lineToBeChanged.Width = newWidth; if (newWidth+2*margin > this.documentSize.Width) { this.documentSize.Width = (int)newWidth; this.AutoScrollMinSize = this.documentSize; } Rectangle changedRectangle = new Rectangle( LineIndexToPageCoordinates(i), new Size((int)newWidth, (int)this.lineHeight)); this.Invalidate(changedRectangle); } base.OnDoubleClick(e); }
We start off by calling PageCoordinatesToLineIndex() to work out which line of text the mouse pointer was hovering over when the user double-clicked. If this call returns -1 then we weren't over any text, so there's nothing to do; except, of course, call the base class version of OnDoubleClick() to let Windows do any default processing.
Assuming we've identified a line of text, we can use the string.ToUpper() method to convert it to uppercase. That was the easy part. The hard part is figuring out what needs to be redrawn where. Fortunately, because we kept the sample so simplistic, there aren't too many combinations. We can assume for a start, that converting to uppercase will always either leave the width of the line on the screen unchanged, or increase it. Capital letters are bigger than lowercase letters ; therefore, the width will never go down. We also know that since we are not wrapping lines, our line of text won't overflow to the next line and push out other text below. Our action of converting the line to uppercase won't, therefore, actually change the locations of any of the other items being displayed. That's a big simplification!
The next thing the code does is use Graphics.MeasureString() to work out the new width of the text. There are now just two possibilities:
-
The new width might make our line the longest line, and cause the width of the entire document to increase. If that's the case then we'll need to set AutoScrollMinSize to the new size so that the scrollbars are correctly placed.
-
The size of the document might be unchanged.
In either case, we need to get the screen redrawn, by calling Invalidate() . Only one line has changed; therefore, we don't want to have the entire document repainted. Rather, we need to work out the bounds of a rectangle that contains just the modified line, so that we can pass this rectangle to Invalidate() , ensuring that just that line of text will be repainted. That's precisely what the above code does. Our call to Invalidate() will result in OnPaint() being called, when the mouse event handler finally returns. Bearing in mind our comments earlier in the chapter about the difficulty in setting a break point in OnPaint() , if you run the sample and set a break point in OnPaint() to trap the resultant painting action, you'll find that the PaintEventArgs parameter to OnPaint() does indeed contain a clipping region that matches the specified rectangle. And since we've overloaded OnPaint() to take careful account of the clipping region, only the one required line of text will be repainted.
EAN: 2147483647
Pages: 244