Trusting Your Workgroup File to Other Users
![]()
The developer workgroup model of Access security that I described in Chapter 8 involved securing your database so that the anonymous Admin user could use your user interface to view and modify the data. This model is good because it forces users to use the application interface that has been set up for them. The problem is that the data is open to anyone who has access to the database files.
The next progression from that model is to add a new Group account to the workgroup file and give that Group permission to edit or read data in the database. This process uses Access workgroup security in the way that Microsoft planned it.
By deciding to share the workgroup file, you have to decide whether you can trust the other persons who share the workgroup file. I am no psychologist , but because most people like to do the right thing, this model of sharing the workgroup files with other users will protect your data in most cases. In my experience, people first try to find a way around Access security when they start searching for an easier and quicker way to do their job. For a flexible environment like Access, the developer and DBA should certainly understand that point of view.
Anyway, this section of the chapter concentrates on how to use the security menu commands to remove permissions from the anonymous Admin account and the ubiquitous Users group. This setup means that these accounts either do not have permission to do anything with the data or have limited rights to the database, such as read-only permission.
Changing Ownership From the Anonymous Account
In Chapter 8, I explained that object ownership is a critical part of the security process, because any workgroup account that owns an object can reinstate permissions to use that object. This rule applies even if the account has been removed from the Admins (administrator) group. Even though I didn't discuss tables in detail before, exactly the same principle applies to tables. Therefore, we must first change the ownership of tables to the Developer account before embarking on the other steps to protect the database.
So that we can focus our attention throughout the chapter on data, the first thing we need to do is make a database with only tables in it. As a result of this process, the Developer account should own all the tables in the database. You should practice this demonstration on copies of files until you are comfortable with the techniques. Now I will show you how to make the demonstration database.
-
Make a copy of the Northwind database and save it in a temporary directory.
-
Make the Developer workgroup file your security file. For details on this procedure, see the section "Preparing Your Developer Workgroup File" in Chapter 8.
-
Log on as Developer. If you followed the exercises in Chapter 8, your password probably will be "Developer."
-
Use the Database Splitter wizard to create a data-only database (which I will call Northwind_be.mdb ). Alternatively, create a new database through the Developer account and import all the tables into that database.
When this process is complete, the Developer account should own all the tables. To verify, choose Tools ˜ Security ˜ User and Group Permissions, and then select the Change Owner tab (shown in Figure 10-1). Tables are the default object type for this tab, so verifying ownership is easy. What you should be concerned with is that the Admin account doesn't own any tables. While you are on this tab, select Database on the Owner Type dropdown form and make sure that the anonymous Admin account doesn't own the database.
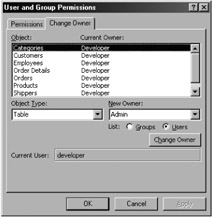
Figure 10-1: Making sure that the Developer account owns all the tables.
Now that the Developer account owns all the tables, you can protect those tables from the anonymous Admin account by removing all database permissions.
Stopping Anyone Else From Opening the Database
In Chapter 8, I said, "Clearing the Open/Run permission for the Users group (and Admin user) results in a very secure database. No one who uses the anonymous Admin user account will be able to open the database, link to the tables in the database, or import any objects from the database, which means that you will need a workgroup file with an account that has Open/Run permission for the database."
Therefore, protecting your data and database requires that you do no more than choose Tools ˜ Security ˜ User and Group Permissions, select Database from the Object Type field (as shown in Figure 10-2), and clear the Open/Run permission check box for the Admins account and the Users group account.
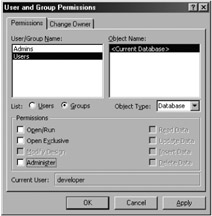
Figure 10-2: Removing all the permissions for the Database object type.
When the anonymous Admin account or any other account without permission attempts to open the database, the account will be locked out with the message shown in Figure 10-3. This lockout applies equally to anyone who tries to link to or import to this database.

Figure 10-3: The message that results from completely removing the database object permissions.
Removing these permissions is a terrific and easy way to stop any other users from opening the database, and if you are only interested in using the database yourself or with one or two other users, then this approach will secure your data. If you like simplicity, you can even use the Developer account in the workgroup file to log on, modify data, and produce reports . Later on in the chapter, I will show you how you can use shortcut files to open this database. You can use this method of protection for both combined and split (front-end and back-end) databases. To guarantee security, though, you must ensure that you keep the developer workgroup file in a secure folder.
| Note | Whenever you add a user account to a workgroup file, Access ( specifically , the Jet engine) automatically adds the account to the ubiquitous Users group. Because the Users group has the same SID for all versions of Access and because you can never remove a user account from the Users group, you have to be very careful with the permissions assigned to the ubiquitous Users group. |
Protecting Individual Tables
If you want the anonymous Admin user to have some authority to change data in your database, you need to review the permissions on the tables in your database. This section describes how you can vary the permissions on individual tables. Before starting this process, you first have to verify that the Admin account doesn't have any permissions for any of the tables. To do this, choose Tools ˜ Security ˜ User and Group Permissions, and see whether the Admin account has permissions on any tables (as shown in Figure 10-4). If it does, clear all the permissions check boxes for all the tables in the database. If you have imported your tables (and other objects) correctly into another database by using the Developer account, Admin should not actually have any individual permissions for any objects. If you cleared the Open/Run permission check box from the Users group as described in the last section of this chapter, you will need to select the Open/Run check box again, otherwise removing or adding these table permissions will not have any effect.
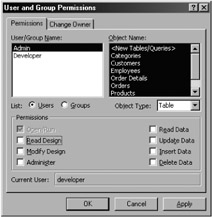
Figure 10-4: Checking whether all permissions have been removed for the Admin account.
Because the default permission structure grants permissions to the ubiquitous Users group for all new objects, it is very likely that the User group will have full permissions for all objects in the database. Obviously, you may want to review these permissions if you are going to protect your database. In Figure 10-5, I have removed all permissions for some of the tables for the Users group. Because the Admin account is always a member of this group, this step is very important for securing your tables. You should also remove permissions from the <New Tables/Queries> object if you want to protect any tables that you may create in this database in the future.
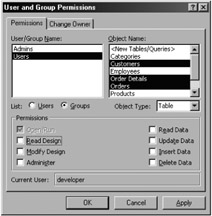
Figure 10-5: Removing permissions from some tables for the Users group.
| Tip | To change the permission on more than one object, you can select more than one object by pressing CTRL as you select each object in the object list. To select a continuous range of objects, select the first object, press SHIFT, and then select the last object. |
Now, if you want to test your security, join your default workgroup by using the workgroup administrator or, in Access 2002 or later, by choosing Tools ˜ Security ˜ Workgroup Administrator. Now you will find that the Admin account will not be able to open any secured table and will receive an error, as shown in Figure 10-6. Naturally, you may want to test all secured tables with the Admin account.
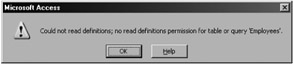
Figure 10-6: Error message that indicates that the Admin account can no longer open the table.
Allowing Ubiquitous Users Read-Only Rights to Data
My favored data security setup, especially in the early stage of projects, is to allow users with the anonymous Admin account to have read-only access to the tables in a database. I like this arrangement for a number of reasons, including:
-
Users who want to run reports or view data can do so without logging on to a workgroup.
-
There is less administration of workgroup accounts.
-
The casual user will not be able to change data.
-
Some users and managers feel more comfortable with read-only access so that they cannot do any damage!
-
I personally lose less sleep worrying about whether critical data can be recovered when I know that I can always get read-only access to the tables in a database.
The steps to configure permissions on the tables as read-only are very similar to the instructions for removing permissions described in the previous section. The only difference is that you need to select the Read Data check box. In Figure 10-7, I have given read-only permission to the Users group for all the tables. Note that when you select the Read Data check box, Access automatically selects the Read Design check box for you.
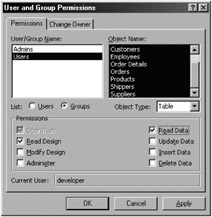
Figure 10-7: Setting read-only permission for all tables for the Users group.
Now we find that whenever someone's software connects anonymously to the database, be it as a front-end database or any other product, that person will not be able to change any data in the database.
| Tip | If you want to identify whether a table is read-only, look at the record selector control at the bottom of the table's datasheet. When a table is read-only, the new record selector (identified by a triangle and an asterisk [*]) appears unavailable, as shown in Figure 10-8.  Figure 10-8: A table, query, or form in read-only mode. |
Form-Based Read-Only Mode
If you decide that you would like to grant read-only access (for anonymous Admin users) to your data but do not want to change permissions on the tables, you can use a basic alternative, as follows . When you open an Access form by using VBA code, you can use the read-only argument for certain users. In the following example, I have used the CurrentUser method to test whether the workgroup user is Admin. If it is, I open the form in read-only mode. This approach is suited to some homegrown security systems and works nicely in a function such as the user logging functions described in Chapter 6.
If Application.CurrentUser = "admin" Then DoCmd.OpenForm "frmMyForm", , , , acFormReadOnly Else DoCmd.OpenForm "frmMyForm" End If
In the next section, I explain how you can adapt your workgroup for trusted users by allowing a special Group account that can modify data but not objects in the database.
EAN: 2147483647
Pages: 176