Installing Certificate Services
|
Installing Windows 2000 Certificate Services takes only a couple of minutes and requires just a few configuration settings. Unfortunately, the impact of these decisions is critical, and some settings cannot be changed without removing the entire CA infrastructure. For these reasons, you should always pilot your CA deployment in a lab environment prior to the actual production deployment. Moreover, because the settings you configure have enterprise policy implications, you should spend time working with other department leaders and IT management to define the policies and procedures for PKI.
Microsoft recommends that you define your certificate policies and CA practices on paper before you configure the test server in the lab. These definitions and requirements determine how the PKI environment is configured. We have already covered the basic information such as placement, performance, and overall administrative strategy. Now we have to consider the procedural aspects. Here is a checklist of things that should be considered and documented before you begin testing.
First, you must settle on global setting and standards for your PKI; these standards govern the naming, trust, and maintenance requirements for your infrastructure. You should do the following:
-
Set naming standards for the CA naming components: the CA name itself, the organization and organizational unit (OU) names, and the administrator e-mail address for each CA. Usually, these names mirror the names you’re already using in Active Directory.
-
Choose the key length, cryptographic algorithms, and CSPs that you’ll use for your CAs.
-
Determine trust requirements, then design a hierarchy to implement them. In addition, decide who will have the ability to issue, revoke, and manage certificates and who can manipulate the contents of the CTL.
-
Identify which external CAs you’re going to trust, then ensure that you understand what their policies and procedures are so you can see if they’re trustworthy enough to put on your CTL.
-
Explore your CA maintenance and recovery requirements. Make sure that you have an adequate backup and recovery plan for your CA data. Build a procedure for mass recoveries, re-enrollments, and rekeyings—in other words, if your CA certificate is ever compromised, you should already have a plan in place to deal with it.
Next, identify the CAs (including their physical locations—see Chapter 5, “Physical and Operational Security”) and their roles. This process requires you to do the following:
-
Decide how many CAs you’ll have; where they will be physically located; whether they will be enterprise or standalone; whether they’ll act as issuing, intermediate, or root CAs; and who will own and manage them.
-
For each CA, determine its issuance policy (automatic or manual) and what types of certificates it can issue.
-
Define the security procedures required for each CA. This should include physical security, administrative access control, and any specific procedures for individual CAs.
Third, define the enrollment and renewal requirements for each of your CAs by doing the following:
-
Decide whether your CAs will issue certificates automatically or only after manual approval.
-
For each CA, set a default lifetime for the certificates it issues.
-
For all CAs, decide ahead of time when you will renew certificates and when you’ll rekey them.
Finally, design revocation procedures and policies that make sense for your environment. Ask yourself the following questions:
-
Under what conditions will you revoke a certificate? Make a list, and make sure that all of your CA and security administrators know what’s on it. The most common revocation reasons are key compromise, loss of key material (for example, “I lost my smart card” or “My hard disk died”), and change of employment status.
-
What procedures will be used for revocation?: Who can notify the CA administrator that a particular certificate needs to be revoked? Who is actually authorized to do the revocation?
-
How often will you publish CRLs, and where will they be distributed from?
Now that you know everything about our planned environment, you can begin the installation procedures. If you are planning to install a standalone root, it is usually a better idea to install Certificate Services on Windows 2000 Server in a workgroup for two reasons: you can leave the machine offline for long periods because there are no Active Directory machine accounts to synchronize, and the machine cannot be compromised by attacks against your Active Directory domains’ administrator accounts.
| Caution | Once you install Certificate Services on a computer, you cannot change its computer name or domain and workgroup membership. |
Because Certificate Services is a Windows 2000 Server component, installation begins by selecting Add/Remove Windows Components from the Add/Remove Programs control panel tool. The first page you see during the Certificate Services installation prompts you to choose the type of CA you wish to install: enterprise or stand-alone, subordinate or root. Select the Advanced Options check box to configure the additional settings for the CA, such as the key length and CSP. Based on your requirements, you might need to change the default CSP to an alternative provider. For most cases, the Microsoft Enhanced Cryptographic Provider 1.0 is appropriate, although you might have a specific requirement for a different CSP. The CSPs that ship with Windows 2000 are as follows:
-
The Gemplus GemSAFE and Schlumberger CSPs support smart cards from their respective vendors; you’ll only need them if you’re using that particular type of smart card.
-
The Microsoft Base Cryptographic Provider implements RSA with up to 512- bit keys and 40-bit RC2/RC4.
-
The Microsoft Base DSS Cryptographic Provider implements support for the DSA (see Chapter 2) and Digital Signal Standard (DSS) algorithms.
-
The Microsoft Enhanced Cryptographic Provider implements the same algorithms as the Base CSP, but it lengthens the available keys to RSA-1024 and 128-bit RC2/RC4. It also adds support for single and triple Data Encryption Standard (DES).
-
The Microsoft Strong Cryptographic Provider combines the base provider’s key lengths with the expanded set of algorithms from the enhanced provider.
The next choice you make in the installation is the hash algorithm you wish to use. The choices will be different based on the CSP that is selected. The default and recommended hash algorithm is SHA-1, but you might need to modify this based on your identified requirements.
The next page you see during the installation process is the CA Identifying Information page for the CA, shown in Figure 12-4. It is important that you follow your naming standards document to clearly identify your company and the name and purpose of the CA. If you specified a longer key length for your root CA certificate, you can change the information in the Valid For text box to assign a longer lifetime. I would recommend against choosing a lifetime of more than 5 years.
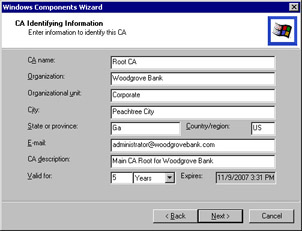
Figure 12-4: The information you provide here will be signed into the CA certificate, so don’t misspell anything.
Next, you need to choose locations for the database and log files. After the installation, you should modify the access control lists (ACLs) for these folders to better protect the certificate stores. After you have made these choices, the program installs the appropriate software and establishes the CA.
| Note | If you need to install multiple CAs, install the root first, then before taking it offline, install the subordinate CAs. Just be sure to choose the appropriate CA type for the subordinate CAs. |
Using Web Enrollment
By default, your new CA supports Web enrollment. A new Internet Information Services (IIS) virtual directory named CertSrv is added to the server. Users can then connect to http://caServer/certsrv to perform common certificate management tasks such as requesting a certificate, as shown in Figure 12-5, checking on the status of a request, or downloading the CA’s certificate or a copy of the most recent CRL.
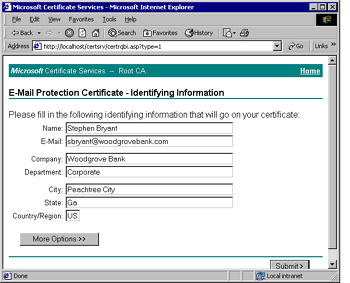
Figure 12-5: Users can request certificates themselves by using the Web enrollment application.
If the CA is configured as an enterprise CA, you can choose to allow the CA to automatically process these requests by using one of the predefined certificate template types. Otherwise, the administrator for the CA needs to specifically approve the request using the MMC Certification Authority console. To do this, the administrator can open the console (it’s in Start | Programs | Administrative Tools | Certification Authority), view pending requests, and approve or deny them, as shown in Figure 12-6.
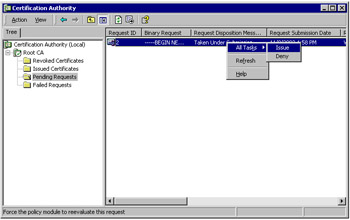
Figure 12-6: Using the Certification Authority console, the administrator can select the Pending Requests option from the right pane, and right-click a specific request to issue or deny.
An enrollment station does not necessarily have to be the certificate server. In many cases, it is better to configure a separate station for this purpose. Moreover, if you are planning to use smart cards or other hardware devices that need programming, the certificate and enrollment tools should be installed on a machine that has the appropriate smart card readers or writers or other required hardware to enroll, manage, and configure the PKI environment. This station is used by the administrators to perform various PKI tasks; it is not intended to be directly accessed by the user community.
Using the Exchange KMS
KMS was once required if you wanted to encrypt Outlook mail, but that is no longer the case. At this point, you have already configured all that is necessary to provide certificates and PKI functionality to your user population. Having said that, environments that intend to use Certificate Services only for messaging and want to reduce the administrative overhead to a bare minimum will probably want to take advantage of the Exchange KMS, which provides a fairly straightforward set of tools for issuing and using Exchange certificates.
Setting Up KMS
Assuming that Exchange 2000 is already installed and working, installing KMS is easy. First, you’ll need to add a couple of Certificate Services policies, then run the Exchange 2000 Setup media to install KMS.
First comes the template installation:
-
Launch the Certification Authority MMC.
-
Expand the branches underneath your root server, and right-click the Policy Settings object in the left pane. You’ll only see this object on enterprise CAs, so if you don’t see it, that’s a good sign that you need to install an enterprise CA before attempting to use the KMS. From the object shortcut menu, select New | Certificate To Issue.
-
In the Select Certificate Template dialog box, select the Exchange Signature Only template and click OK.
-
Repeat steps 2 and 3 for the Exchange User and Enrollment Agent (Computer) templates. Depending on your other PKI requirements, you might need to enable more templates.
Once these templates are in place, you can install the Exchange KMS from the Exchange 2000 Server CD. Run Exchange Setup, then use the Change and Install options to add KMS to an Exchange server. Exchange’s setup utility is smart enough to check for the existence of an enterprise CA with the correct templates. After you install the KMS, you’ll be ready to start using it.
| Note | The account you use to install the KMS is granted KMS administrator privileges. You’ll need to use Exchange System Manager to assign additional administrators once KMS is up and running. |
KMS requires a separate password to start. This is less of a hassle than it would seem, because the KMS only has to be running when you want to issue certificates. When you install the KMS, you’ll get to specify whether you want to save the KMS password on a disk (removable or fixed) or write it down for manual entry. Keeping it on a removable disk allows you to lock it up to restrict KMS access; just remember that floppy disks are notoriously unreliable, so make sure you keep a backup, or perhaps use a more reliable storage medium.
Each account given KMS administrator privileges has a separate KMS password that must be entered for every KMS function. This password is completely separate from, and should differ from, the Active Directory account password. The account you used to install KMS will be assigned the default password of “password”. Obviously, this should be immediately changed (as described later).
| Note | Remember that you have to manually start the KMS each time a KMS server reboots—it’s not set to automatically restart, and you shouldn’t set it to do so. Use the Exchange System Manager to start and stop the KMS when needed. |
Managing KMS
After you install KMS, you’ll see a new object in the administrative group you installed KMS in: Advanced Security. Selecting this object reveals that it has two subordinate nodes, Encryption Configuration and Key Manager.
Let’s deal with the simpler one first: the Encryption Configuration. This object allows you to see that the KMS is installed (no kidding—see the General tab) and to set the algorithms available to users of this KMS, as shown in Figure 12-7. In normal operation, you won’t need to change these settings.
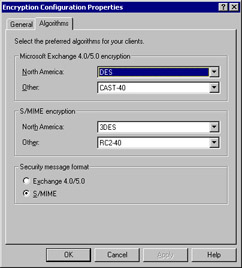
Figure 12-7: The KMS lets you set preferred algorithms for downlevel and S/MIME clients.
The Key Manager object is more complicated, because it’s where you actually configure the KMS. To open it, you’ll have to enter your KMS administrator password. The resulting Key Manager Properties dialog box has four tabs in it, each one of which allows you to do something useful:
-
The General tab The General tab allows you to view the CA certificate used by the KMS; click View Details to open the certificate’s Properties dialog box, from which you can see its certification path or attributes. See Figure 12-8.
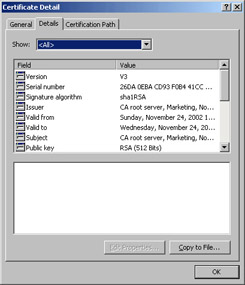
Figure 12-8: If your KMS certificate is invalid, you wont be able to use KMS. -
The Enrollment tab The Enrollment tab allows you to choose whether or not you want tokens for enrolled or recovered users to be sent over e-mail, and, if you do, what you want the enrollment message to say.
-
The Administrators tab The Administrators tab shows you who has administrative permissions on the KMS; it allows you to add or remove administrator accounts or change passwords on existing accounts.
-
The Passwords tab The Passwords tab, shown in Figure 12-9, has a misleading name. It should be called the “two-man rule” tab, because its intent duplicates the long-standing U.S. policy that any operation involving arming or firing a nuclear weapon must involve at least two people. Likewise, the Passwords tab lets you specify how many administrators must concur before some kinds of changes can be made. The top field controls how many administrators must agree on adding or removing administrator accounts or editing any of the other policies on the Passwords tab; the others (whose values cannot be greater than the Add/Delete Administrators, Edit Multiple Password Policies value) apply to the specific actions listed.
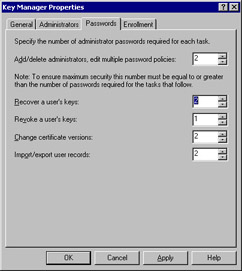
Figure 12-9: Use the Passwords tab to specify how many people must concur before revoking or recovering users’ certificates.
| Tip | You’re probably familiar with the common recommendation to use groups to assign permissions on objects in Windows. That would be a bad idea for the KMS, so you can only add domain user accounts using the Administrators tab. |
Enrolling Users with KMS
Enrollment consists of creating a temporary secret key for the user and providing it to him or her; the user then generates a key pair and uses the temporary key to encrypt it and return it to the KMS. The temporary key can be sent in an e-mail (convenient, but not terribly secure), or you can deliver it to the user manually. In either case, once the user has his or her token, he or she can enroll using Outlook (as described in Chapter 13).
Enrolling Individual Users Enrolling individual users is simple; you do it from the Active Directory Users And Computers snap-in. Just do the following:
-
Verify that the Microsoft Exchange Key Management service is started.
-
Launch the Exchange-aware version of Active Directory Users And Computers and open the user’s properties dialog box.
-
Click the Exchange Features tab, then select E-Mail Security and click Properties. After you enter your KMS password, you are given the list of available options based on the current enrollment status of the user: Enroll, Recover, and Revoke, as shown in Figure 12-10.
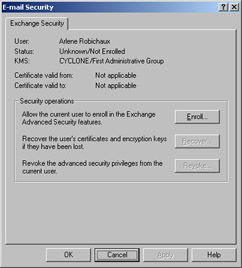
Figure 12-10: You can enroll, recover, or revoke users from their Properties dialog boxes in Active Directory Users and Computers. -
Click Enroll in this screen to begin the enrollment process; the KMS generates a temporary token and (depending on the option you set in the KMS Enrollment tab) either e-mails it to the user or displays it in a dialog box so that you can send it on.
Enrolling Users en Masse You can enroll multiple users at once using the KMS Key Manager object in ESM. The trick is to right-click Key Manager; when you do, you’ll see that the All Tasks command in the shortcut menu has commands to enroll, revoke, recover, import, or export users in batches. To enroll multiple users, right-click Key Manager, choose All Tasks | Enroll Users, and enter your KMS password. The Enroll Users Selection dialog box opens, so you can choose your preferred method of enrollment. You can one of the following:
-
Choose users from the global address list. This gives you fine-grained control, but the filter that KMS uses is not smart enough to filter out contacts. However, it is smart enough not to let you select them for enrollment. If you have numerous contacts, this might cause some extra scrolling hassle when enrolling.
-
Choose a mailbox database from the administrative group that the KMS is in. This allows you to quickly enroll all users in that mailbox store.
Note that there’s no middle ground—for example, it would really be nice to have a way to enroll an OU or domain of users, but at present KMS can’t use anything other than mailbox database membership as a selection criteria. Once you select the users to be enrolled, enrollment proceeds as it does with individual users.
Recovering and Revoking User Certificates
Recovering users’ certificates is what you do when they’ve lost access to the private key (usually because they forgot the associated password); in essence, recovery rekeys the certificate. When you recover a certificate, the user gets a new enrollment token and proceeds as though it were the initial enrollment; KMS is smart enough to update the keys and reissue the certificate. Revocation, of course, is a different matter altogether; when you revoke a certificate through KMS, it goes on the CRL and can no longer be used.
In either case, you can recover or revoke users one at a time or en masse: individual actions happen through the Active Directory Users And Computers snap-in, and group operations require you to right-click the Key Manager node and choose the appropriate shortcut menu command, as described earlier in the chapter.
|
EAN: N/A
Pages: 169