The InfoPath Security Model
Every application is responsible for providing some level of security control. The approach used within InfoPath is to protect both the running application and the local machine from any security breaches that can harm or cause misuse of application data. InfoPath provides two fundamental levels of security. First, as a client-based application, it s responsible for adhering to locally defined security policies and privileges. Under no circumstances should it provide any type of security threat for the local machine. Second, as a data-focused application, InfoPath provides additional levels of security to ensure that any data it may be responsible for is protected.
Form-Based Security
InfoPath forms can be deployed with varying levels of security. The level of security is dictated by the level of access to external resource that a form needs. By default, forms are restricted from accessing local system resources and are not allowed to use any software components not marked safe for scripting.
For a form to be used, InfoPath must access the template the form is based on. When a solution is created, InfoPath initially defines an entry in the form definition file (xsf) file. As shown within the bolded section in Listing 9.1, this entry contained in the XDocumentClass node contains a URL that points to the current form template location.
| |
<xsf:xDocumentClass dataFormSolution="yes" solutionVersion="1.0.0.4" productVersion="11.0.5329" solutionFormatVersion="1.0.0.0" publishUrl="D:\CompanyCatalog.xsn" xmlns:xsf="http://schemas.microsoft.com/office/infopath/2003/solutionDe finition" xmlns:msxsl="urn:schemas-microsoft-com:xslt" xmlns:xd="http://schemas.microsoft.com/office/infopath/2003" xmlns:xsi="http://www.w3.org/2001/XMLSchema-instance" xmlns:ns1="Http://localhost/Catalog" xmlns:s0="http://tempuri.org/wsCatalog/CatalogInfo" xmlns:dfs="http://schemas.microsoft.com/office/infopath/2003/dataFormSo lution" xmlns:ns2="http://schemas.microsoft.com/office/infopath/2003/myXSD/2003- 09-14T18:00:49">
| |
Forms based on an URL are considered sandboxed. When the form is opened, it is placed in the local system cache and denied access to local system resources. This type of form inherits its default permissions from Internet Explorer (IE) security settings that are applied to the original location of the form template. Security zones within IE are used to determine specific access rights. These zones are defined by the URL and can control cross-domain permissions based on the default location where the form template is hosted. When you re running the InfoPath IDE, these types of forms contain an URL template location that is displayed on the bottom left of the InfoPath IDE, as shown in Figure 9.1.
Figure 9.1: An URL-based form that contains sandboxed permissions.
Typically, form templates stored on a Web server or running in a WSS site on the local network run in the Intranet zone. Unlike with IE, in which the security for HTML generated by XML/XSLT is based on the URL of the XML, InfoPath security is based on the URL of the form template and not the individual XML files. You can use an InfoPath form template from any URL with XML files from the same or different domains.
Fully Trusted Forms
It is possible to modify a form so that it is based on a Universal Resource Name (URN). When based on a URN, the form is considered a trusted solution. This means it is installed locally and given access to local system resources. Within the InfoPath IDE, fully trusted forms are located on the Custom Installed Forms in the Forms dialog box, as shown in Figure 9.2.
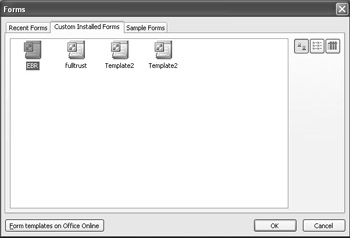
Figure 9.2: List of fully trusted forms available within InfoPath.
Fully trusted forms have a higher set of privileges than sandboxed forms. As trusted solutions, they are given the following additional access:
-
Ability to access external objects
-
Microsoft Active X controls not marked safe for scripting
-
Custom business logic contained in the Component Object Model (COM) component
-
Additional object model access
The InfoPath object model associates every property and method with a security level. This level determines whether the property or method is callable from a form template. All form templates are defined into three possible security levels. The higher the trust factor of a solution, the more resources it is able to access. These levels are defined in Table 9.1.
| Security Level | Description |
|---|---|
| 1 | Callable by any form template. |
| 2 | Called only from templates running in the same domain that is granted cross-domain permissions. |
| 3 | Cannot be called by InfoPath 2003 form templates unless they are fully trusted. This level is the highest security restriction that can be placed on a property or object. |
Any member of the InfoPath object model set to a security level three means that it can be used only from a fully trusted from. For example, the HTML Window property is used to return a reference to an HTML Window object running in a custom task pane. This property is an inherited property of the TaskPane objects that is available only when you re using a custom task pane. The following code example is available only within a fully trusted form:
var objHTMLWindow; objHTMLWindow = XDocument.View.Window.TaskPanes(0).HTMLWindow; objHTMLWindow.parentWindow.TaskPaneSwitchView();
| Note | If you use any property or object model member with a security level of three in a form that is not fully trusted, this will result in a permission denied error. |
Creating a Fully Trusted Form
In order to enable level three access to trusted forms on your computer, you must first define the security options for fully trusted locally installed forms. This system-wide option is available from the Tools Options menu, as shown in Figure 9.3.

Figure 9.3: InfoPath enabled to use trusted forms.
Once the system option is enabled to use trusted forms, there are two ways to create and then register the specific form on the local machine. Although slightly different, they generally following the following steps:
-
Modify the form so that it is URN based rather than URL based.
-
Add the requireFullTrust attribute to the .xsf file and set its value to yes.
-
Register the fully trusted solution on the target computer using the RegisterSolution method of the InfoPath ExternalApplication object.
| Note | It is possible, and in many situations desirable, to create an URN-based form that is not fully trusted. The difference between an URN-based form that is not fully trusted and a fully trusted form is that in these types of forms, the requireFullTrust attribute is set to no. These InfoPath solutions can access system and cross-domain resources, but the users are prompted to allow it. |
Manually Creating a Trusted Form
Depending on the needs of your application, you may find it easier to manually register the form as a trusted solution than to manually change the attributes. Although not always the preferred way, manually creating a trusted form certainly does provide developers with the most control and flexibility in how they register their solutions.
CD-ROM Let s, for example, take the Sales Follow Up example from Chapter 6 and manually register this form as a trusted form (see \Code\Chapter 6\Sales Follow Up\ebr.xsn on the companion CD-ROM). To do so, follow these steps:
-
Make a backup copy of the form template file. This is a simple precaution that should be done in case you need to revert back to a previous version for any reason.
-
Open the form template using InfoPath. Then, using the Extract Form Files on the File menu, extract the contents of the solution into a directory.
-
Using Notepad, open the
 manifest.xsf and add the following attributes to the XDocument element. name="urn:myForm:myCompany" requireFullTrust="yes" . When you re done, the new element will look like Listing 9.2 (the modified section is in bold).
 Listing 9.2: Modified manifest.xsd for a fully trusted form.

<xsf:xDocumentClass solutionVersion="1.0.0.64" productVersion="11.0.5329" solutionFormatVersion="1.0.0.0" publishUrl="c:\ebr\ebr.xsn" name="urn:sales:followup" requireFullTrust="yes" xmlns:xsf="http://schemas.microsoft.com/office/infopath/2003/solutionDe finition" xmlns:msxsl="urn:schemas-microsoft-com:xslt" xmlns:xd="http://schemas.microsoft.com/office/infopath/2003" xmlns:xsi="http://www.w3.org/2001/XMLSchema-instance" xmlns:my="http://schemas.microsoft.com/office/infopath/2003/myXSD/2003- 08-24T03:18:24" xmlns:q="http://schemas.microsoft.com/office/infopath/2003/ado/queryFie lds" xmlns:d="http://schemas.microsoft.com/office/infopath/2003/ado/dataFiel ds" xmlns:dfs="http://schemas.microsoft.com/office/infopath/2003/dataFormSol ution" xmlns:xhtml="http://www.w3.org/1999/xhtml">
Note The URN value can be any type of string value as long as this value is unique and contains at least two values after the urn: prefix. These values must be separated by a colon , and the entire string can be no longer than 255 characters .
-
Open the
template.xml file and remove the href attribute from the mso- infoPathSolution processing instruction; replace it with the same URN-based attribute used above. When you re done, the new attribute will look like the following (with the changed sections in bold): <?mso-infoPathSolution name=" urn:sales:followup " solutionVersion="1.0.0.64" productVersion="11.0.5329" PIVersion="1.0.0.0" ?>
Note The URN attribute is a way of uniquely identifying the form and must be same the same in both the
template.xml and manifest.xsf . files. Any difference may cause your form to not load or run. -
Repackage the files into the .xsn CAB format using a tool such as makecab.exe or one of the other freeware utilities available on the Internet.
Note Even though the InfoPath design environment does support the repackaging of form files into an .xsn, do not use this method when creating fully trusted forms. During the repackaging process, InfoPath automatically reverts the form files back to their original URL-based extensions. In order to successfully create a fully trusted form, you must package these files with an external program like makecab.exe to prevent overwriting your changes.
-
Create a custom installation script using the RegisterSolution method of the InfoPath ExternalApplication object to install the fully trusted form. A sample function to register the Sales Call Follow up is shown here:
objInfoForm = new ActiveXObject("InfoPath.ExternalApplication"); objInfoForm.RegisterSolution("C:\MyForms\ebr.xsn"); objInfoForm.Quit(); objInfoForm = null;If you need to uninstall the application, you can use the UnregisterSolution method of the ExternalApplication object, as shown here:
objInfoForm = new ActiveXObject("InfoPath.ExternalApplication"); objInfoForm.UnregisterSolution("C:\MyForms\ebr.xsn"); objInfoForm.Quit(); objInfoForm = null;
Using the SDK Regform Utility
Although you can manually create a fully trusted form, often because of the needs of the application, this conversion may be a better solution. One of the tools available within the InfoPath SDK is a command line utility called regform.exe. This utility simplifies the creation of a fully trusted form by automatically completing the following tasks :
-
It automatically makes a backup copy of the form template.
-
It automatically makes the necessary changes to the .xsf file and the XML template files to make the form fully trusted.
-
It automatically updates the version number of the form template.
-
It automatically repackages the files into an .xsn CAB file format.
-
It automatically creates a custom installation program.
Using the ![]() regform.exe tool from the command prompt supports a variety of parameters, as shown in Table 9.2.
regform.exe tool from the command prompt supports a variety of parameters, as shown in Table 9.2.
| Usage: | |
| Regform | [/V urn] [/FT formtemplatename] [/C companyname] [/V [0-9999. 0-9999. 0-9999. 0-9999]] [/T YesNo] [/O outputfile] [/MSI] [/?/h/help] formtemplatefile |
| Parameter | Description |
| /U | The URN to use for the form template. Must be in the form of urn:<string>:<string>. If the URN is not specified, it is built using the form template and company name. If either of these are not specified, then a GUID is used. |
| /FT | The form template name. |
| /C | The company name. |
| /V | The version number [0-9, 9999. 0-9, 9999. 0-9, 9999. 0-9, 9999] of the form template. If this is not specified, the version number of the form template is used. If no version number is present in the form template file, the default number of 1.0.0.1 is used. |
| /T | Specifies that the form template is fully trusted. This sets the requireFullTrust attribute in the form definition file to yes . |
| /O | The path and name of the output file that is to be created. If the path and name are not specified, the name of the form template file is used. |
| /MSI | Specifies that the output installation file is a Microsoft System Installer (.msi) file. The default is a Microsoft JScript file. |
| /?/h/help | Displays the information about using the Regform tool. |
| formtemplatefile | The full path to the InfoPath form template to process. |
If we wanted to create a fully trusted form using this utility, we could enter the following from the command line:
RegForm /U urn:FormName:CompanyName /T Yes C:\FormDirectory\FormName.xsn
In this example, the /T option indicates that the form should be marked as a fully trusted form. The last parameter is the path and name of the form template that should be converted. When the ![]() regform.exe utility is completed, this utility creates a .bak file and a .js file in the same folder that contains the name of the form template that was converted. The .bak file is a backup copy of the original un-trusted form, and the .js file contains the installation script that is run on machines where the form is going to be installed.
regform.exe utility is completed, this utility creates a .bak file and a .js file in the same folder that contains the name of the form template that was converted. The .bak file is a backup copy of the original un-trusted form, and the .js file contains the installation script that is run on machines where the form is going to be installed.
CD-ROM The ![]() regform.exe utility (see \Code\Chapter 6\Sales Follow Up\regform.exe) also supports creating an .msi file if you have Visual Studio.NET installed on the local machine. This is done through the /MSI switch. If we wanted to create a fully trusted form using a Resource Request form, we could enter the following from the command line:
regform.exe utility (see \Code\Chapter 6\Sales Follow Up\regform.exe) also supports creating an .msi file if you have Visual Studio.NET installed on the local machine. This is done through the /MSI switch. If we wanted to create a fully trusted form using a Resource Request form, we could enter the following from the command line:
RegForm /U urn:resourcerequest:verylargecompanyinc /T Yes /MSI C:\resourcerequest.xsn
The /MSI switch uses Visual Studio.NET to create the installation file, as you can see in the processing message in Figure 9.4.
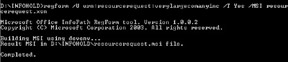
Figure 9.4: Building the trusted form using Visual Studio.NET.
Once the ![]() regform.exe utility is completed, the directory contains an .msi file in the same folder as the form template being converted, as shown in Figure 9.5.
regform.exe utility is completed, the directory contains an .msi file in the same folder as the form template being converted, as shown in Figure 9.5.
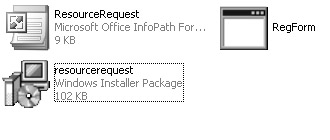
Figure 9.5: A completed trusted form that uses the /MSI solution.
If you use the /MSI switch and do not have Visual Studio.NET installed, the Regform utility will create the default .js file. The ![]() regform.exe tool also creates a Visual Studio.NET setup project in the %temp%\RegForm directory. This is a standard setup project, as shown in Figure 9.6, that can be modified and then recompiled based on your solutions needs.
regform.exe tool also creates a Visual Studio.NET setup project in the %temp%\RegForm directory. This is a standard setup project, as shown in Figure 9.6, that can be modified and then recompiled based on your solutions needs.
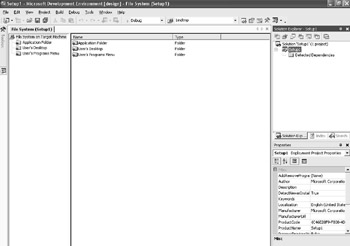
Figure 9.6: Viewing the installation program in Visual Studio.NET.
InfoPath is only one piece of the actual security required to adequately secure an application and meet the definition of a secure solution. It is important to understand the other part of the application and security that is required within the service components.
EAN: 2147483647
Pages: 111