Designing Administrative Workflow
The most important feature of an administrative type of workflow system is the defining of the processes. Typically, a variety of definitions are running concurrently and they tend to involve a large number of independent processes. Process definitions are usually created using forms; if the definition is too complex for the defined form, then a new one is designed for a new instance of the form solution. Flexibility is more important than productivity, and these systems tend to handle a lower number of transactions than production workflow. Administrative workflow is characterized by a low volume of transactions with a high repetition factor.
The Web Service Advantage
Within administrative workflow, Web Services play an important part in their definition and function. Typically, Web Services are coupled with an InfoPath form as a way of defining the form and then enforcing the specific process. For example, let s create a Help Desk system (shown in \Code\Chapter 6\Help Desk\Setup.exe on the companion CD-ROM) that shows how this works. Users are responsible for entering their requests through an InfoPath form that is designed based on a Web Service that controls the process, as shown in Listing 6.5.
| |
<WebMethod()> Public Function InfoPathSubmitRequest(ByVal RequestName As String, ByVal RequestPhone As String, ByVal RequestEmail As String, ByVal RequestType As String, ByVal RequestComment As String) As Integer 'create the DB connection Dim sqlConn As SqlConnection Dim sqlCmd As SqlCommand Dim strConstring As String strConstring = ConfigurationSettings.AppSettings("constring") sqlConn = New SqlConnection(strConstring) sqlConn.Open() sqlCmd = New SqlCommand With sqlCmd .Connection = sqlConn .CommandTimeout = 30 .CommandType = CommandType.StoredProcedure .CommandText = "spInsertRequests" .Parameters.Add("@RequestName", RequestName) .Parameters.Add("@RequestPhone", RequestPhone) .Parameters.Add("@RequestEmail", RequestEmail) .Parameters.Add("@RequestType", RequestType) .Parameters.Add("@RequestComment", RequestComment) Return .ExecuteNonQuery() End With sqlConn.Close() End Function | |
The process is further enforced through the creation of a Web Service that supplies the list of available request types. The benefit of this is that as new request types are added, they can automatically be pushed down to the form through a secondary data source. Listing 6.6 shows a Web Service for connecting a secondary datasource.
| |
<WebMethod()> Public Function GetRequestTypes() As System.xml.XmlDataDocument 'db connection Dim sqlConn As SqlConnection Dim sqlCmd As SqlCommand Dim strConstring As String Dim intUserID As Integer strConstring = ConfigurationSettings.AppSettings("constring") sqlConn = New SqlConnection(strConstring) sqlConn.Open() sqlCmd = New SqlCommand With sqlCmd .Connection = sqlConn .CommandTimeout = 30 .CommandType = CommandType.StoredProcedure .CommandText = "spGetRequestType" End With Dim RequestDA As SqlDataAdapter = New SqlDataAdapter RequestDA.SelectCommand = sqlCmd Dim RequestDS As DataSet = New DataSet RequestDA.Fill(RequestDS, "RequestType") RequestDS.Namespace = "Http://localhost/RequestType" Dim Info As System.Xml.XmlDataDocument = New System.Xml.XmlDataDocument(RequestDS) Return Info sqlConn.Close() End Function | |
Designing the InfoPath Form
The InfoPath form shown in Figure 6.21 is created using the Web Services as we have done in previous chapters. The important thing is that a secondary data source is created to tie the request types to the form. This allows you to add new types and update the workflow without having to update the form.
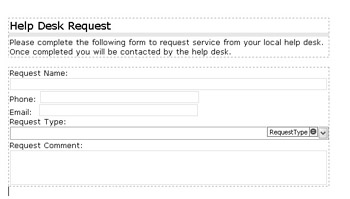
Figure 6.21: Displaying the Help Desk form.
| Note | If you are running this form in design mode, it is important to make sure that you have a copy of the Web Service running. This is a common mistake when you re designing InfoPath forms that use Web Services. |
Designing the Status Screen
Once the Web Service is completed, you can easily design and publish the form to allow users to enter their requests. Once requests are entered and submitted, they are shown on the Help Desk Scorecard Web page, shown in Figure 6.22. This page allows the help desk personnel to view current status, respond to open requests, and close completed ones.
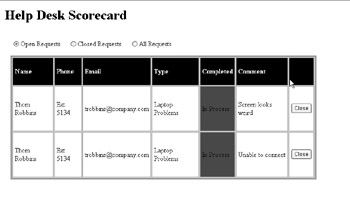
Figure 6.22: Displaying the Help Desk Scorecard.
The main part of the scorecard is calling the Web Service through an ASP.NET page. Once the Web Service is called, all data is shown through an ASP data grid using the code shown in Listing 6.7.
| |
Public Function LoadRequests(ByVal TypeOfRequest As RequestType) Dim ws As New localhost.wsSubmit Dim xmlStatus As DataSet Select Case TypeOfRequest Case RequestType.AllRequests xmlStatus = ws.GetAllRequests Case RequestType.ClosedRequest xmlStatus = ws.GetRequests(RequestedStatus:=False) Case RequestType.OpenRequest xmlStatus = ws.GetRequests(RequestedStatus:=True) End Select With DgRequests DataSource = xmlStatus DataBind() ' format the grid Select Case TypeOfRequest Case RequestType.AllRequests .Columns(GridColum.RCloseButton).Visible = False Case RequestType.ClosedRequest With DgRequests .Columns(GridColum.RCloseButton).Visible = False .Columns(GridColum.RCompletedBy).Visible = True .Columns(GridColum.RCompletedDate).Visible = True End With Case RequestType.OpenRequest With DgRequests .Columns(GridColum.RCloseButton).Visible = True .Columns(GridColum.RCompletedBy).Visible = False .Columns(GridColum.RCompletedDate).Visible = False End With End Select End With End Function
| |
It is important to remember that during the actual process, all control is maintained within the Web Services. This ensures that any maintenance is always done on the Web Services and that only until the actual process has to change will the forms need to be updated.
EAN: 2147483647
Pages: 111