Defining a Workflow Automation Solution
Before the invention of computers ( otherwise known as the Dark Ages), workflow was a manual process. Each person involved in the process would receive a document, perform an action, and then pass it to the next participant. The line manager was responsible for keeping the process moving forward and maintaining quality control. Within these processes, change was slow and error prone. With the introduction of technology, these types of paper-based processing became automated. The biggest benefit was that specific work items could be processed and changed at any number of processing points within the same application. Each of these steps or activities could easily be checked and reassigned based on any number of criteria.
Workflows are composed of a number of logical steps. Each of these individual steps is known as an activity . Actions that execute within an activity may either involve human interaction (manual intervention) or be completely automated, executed using only system-based resources. Computing-based resources within a workflow help both the participants and the enterprise to deliver better worker productivity and efficiency while reducing overall processing errors. Figure 6.1 shows the similarity in the model between human- and computer-based workflow.
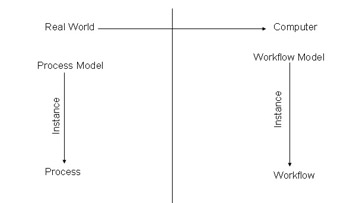
Figure 6.1: A similar model exists between human- and computer-based workflow.
Workflows are, by definition, a sequence of events that result in the completion of an action. When they are automated, the workflow process enables documents, information, or tasks to be passed from one participant to another based on a procedural set of rules. The process-oriented nature of workflow applications is designed to coordinate smaller sets of work to accomplish a larger task.
The design of these types of systems follows a different approach than traditional transaction-oriented systems. Within a traditional application design, everything is done around the idea of a transaction. Transactions are defined as the completed execution of a program that certifies a set of pre-determined criteria. Transactions are always considered atomic, consistent, durable, and isolated. The main benefits of transactions are that they guarantee concurrency control and provide a consistent recovery point.
Here are some important considerations to keep in mind when you re designing a transaction-based application:
Atomic: This guarantees that the entire transaction is committed or ensures that none of it is committed.
Consistent: When applied, transactions don t violate any of the constraints defined by the database.
Durable: Once a transaction is committed, another transaction is required to undo the first.
Isolated: Each transaction is an independent and separate entity from any other. This guarantees that one transaction will not have an effect on another.
Workflow applications are designed very differently than transactional-based applications. In these types of applications, the logic is designed to enable multiple sessions to remain both active and incomplete for long periods of time without incurring either significant system overhead or requiring human intervention. It is important to understand that even though the overall workflow process doesn t adhere to the basic transactional model, it is possible that certain activities may result in a transaction.
Defining a Workflow Repository
The design of a workflow application is based on the process definition that defines the control flow for the application. These definitions are used to define resources, constraints, and the anticipated application flow. For non-technical business users, these definitions represent what actions are expected to occur during the execution of the workflow. Within the process definition, each process is composed of sub-processes that define a specific executable task. The physical design process of splitting the process into a series of tasks ensures that each step of the workflow is completely auditable. Each of the defined logical steps within a sub-process is known as an activity and, based on the specific business requirements, can be defined as either manual or automated.
One of the most important benefits of any workflow application is to increase efficiency and productivity within the workflow. This doesn t mean that the entire sub-processes and workflow have to be automated. It s important to define the process definition so that you can determine the steps that are candidates for automation. Process definitions also ensure that documents within a process don t get lost.
The auditable nature of workflow applications ensures that documents can be tracked and are easy to find. The most common design pattern within these types of applications is the creation of a centralized repository to store documents or forms.
Collaborative workflow focuses on teams working together toward common goals. Groups can vary from small project-oriented teams to widely dispersed people with common interests. This type of workflow has become one of the most important in any type of organization. Collaborative workflow is characterized by high business value but infrequent execution. Typically, the underlying process is rather complex and is created specifically for the task, often by customizing an existing project.
Collaborative workflow is a business process with a set of linked tasks. It is important to share knowledge during a workflow to document business objectives or policy goals. When a document is shared as part of the workflow process, a set of appropriate access controls is necessary. The access control on documents involves setting security at both the document and data levels.
The increased importance of the knowledge worker has elevated the importance of collaborative processes within organizations. These types of workflow processes are intended to enhance the communications and effectiveness of these types of workers and to enable them to function faster and easier within an enterprise. The one major characteristic of this type of workflow that is different from many others is its semi-structured nature.
The nature of these types of workflow processes generally follows no fixed process map or well-defined roles. Depending on the process and the needs of the business requirements, people may fit into different roles at different points within the process. The main drivers are the reduced cycle time and centralized repository of reusable information. Throughput is not an important consideration, and process definitions are not considered rigid and can be amended frequently.
WSS
InfoPath is integrated into WSS through a new type of document library called a Form Library . A Form Library is a Document Library where all of the documents are based on a specific InfoPath Form template. This provides three specific benefits. First, a WSS Form Library can serve as the deployment point for an InfoPath form. Users can open a new document based on the form in InfoPath by clicking on the Fill Out This Form button in the Form Library. When the user saves the completed form, it will automatically be saved back to the Form Library. If the user saves the form offline to work on later, he can still upload the completed form using the Upload Form command in the Form Library.
Second, a WSS Form Library provides access to InfoPath s Merge Forms functionality through the Merge Forms view. The user uses checkboxes to select the documents he wants and then selects Merge Forms. Assuming the user has InfoPath installed, WSS will open a blank template in InfoPath and then merge each of the selected documents into that template. This operation does not change the original documents, but it allows you to easily view aggregate data from multiple documents.
Third, WSS allows you to promote individual fields in an InfoPath document to columns in a WSS view. The contents of the promoted fields are displayed in a custom column. For example, say you were creating an FAQ-style Form Library where each document in the library contained one question, answer, and status field. Instead of depending on the filename to accurately reflect the contents of the document, you could promote the Question field to a WSS column. Users of the Form Library would be able to see the question covered by each document and pick the ones that meet their needs.
Using Forms-Based Libraries
The centralized repository allows you to formally document the workflow; in addition, adding technologies like SQL Server enables developers to enforce business rules and include row-level security. The simplest repository for applications that leverage document-based solutions like InfoPath is WSS. WSS provides a centralized distribution mechanism for form-based applications and a portal technology for locating and maintaining forms.
WSS enables users to go to a specific portal page and submit documents where workflow can be implemented. WSS manages not only documents but InfoPath forms as well. This provides the place that you can publish forms. WSS also enables you to store forms within the central location and share the fields within the form as part of the column. Use the following steps when creating a new Form Library:
-
Open the WSS site and select Documents and Lists, as shown in Figure 6.2.

Figure 6.2: Select Documents and Lists to start creating a Form Library. -
From within Documents and Lists, select the Create option, as shown in Figure 6.3.
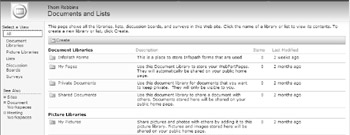
Figure 6.3: Select the Create option. -
This Web page allows you to create all new document libraries. Select the Form Library option, which brings up the WSS Create Page, shown in Figure 6.4.
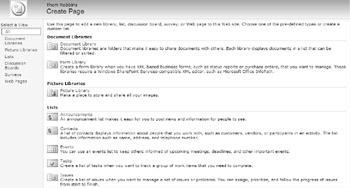
Figure 6.4: The WSS Create Page. -
Enter the information to create the Sales Contact Page, which brings up the page creation properties, shown in Figure 6.5.
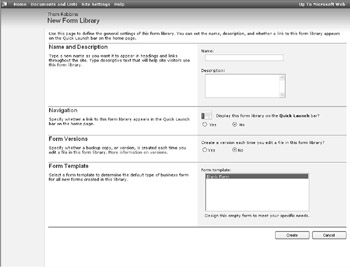
Figure 6.5: Page creation properties. -
Once the page is created, you are redirected the default page, shown in Figure 6.6, where you can then save the forms to these pages.
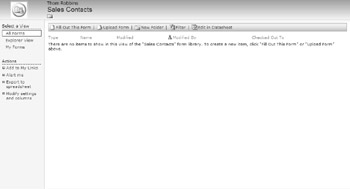
Figure 6.6: The new Form Library.
WSS enables documents to become more than just a procedural step within a managed process. Documents involved within the processes can easily be managed and validated against the required business process. Individual documents may be based on a single workflow process or part of a much larger core business process that spans the entire organization.
Often, workflow solutions provide a key competitive advantage in increasing customer satisfaction and retention, and enable organizations to better respond to changing market conditions. Due to the many benefits of workflow-based solutions, enterprises look to both optimize and protect them as critical assets. This includes not only basic security requirements but also enhanced visibility across all business sectors. Workflow applications don t create business processes; however, applying workflow to a business process often helps to define the details of the process as the process definition and business requirements are defined.
Exposing InfoPath Data
CD-ROM Once the Form Library is created, developers can store forms directly on the library and then expose key fields in the document as part of this. For example, we can create a Sales Contact form that can be stored in the WSS library (this can be found on the companion CD-ROM in \Code\Chapter 6\Sales Contacts\SalesContact.xsn). This provides an ideal location for people to be able to store and retrieve contact information. We can create the form using the XSD shown in Listing 6.1.
| |
<?xml version="1.0"?> <xsd:schema targetNamespace="http://schemas.mycompany.com/ns/sales/info" xmlns:sales="http://schemas.mycompany.com/ns/sales/info" xmlns:xsd="http://www.w3.org/2001/XMLSchema"> <xsd:simpleType name="roletypes"> <xsd:restriction base="xsd:string"> <xsd:enumeration value="Decision Maker"/> <xsd:enumeration value="Gatekeeper"/> <xsd:enumeration value="Influencer"/> <xsd:enumeration value="Champion"/> <xsd:enumeration value="User"/> <xsd:enumeration value="Other"/> </xsd:restriction> </xsd:simpleType> <xsd:element name="CompanyName" type="xsd:string"/> <xsd:element name="ContactName" type="xsd:string"/> <xsd:element name="ContactAddress1" type="xsd:string"/> <xsd:element name="ContactAddress2" type="xsd:string"/> <xsd:element name="ContactCity" type="xsd:string"/> <xsd:element name="ContactState" type="xsd:string"/> <xsd:element name="ContactZipCode" type="xsd:string"/> <xsd:element name="ContactEmail" type="xsd:string"/> <xsd:element name="ContactCellPhone" type="xsd:string"/> <xsd:element name="ContactAssistName" type="xsd:string"/> <xsd:element name="ContactAssistPhone" type="xsd:string"/> <xsd:element name="ContactRole" type="sales:roletypes"/> <xsd:element name="Comments" type="xsd:string"/> <xsd:element name="salescontact"> <xsd:complexType> <xsd:sequence> <xsd:element ref="sales:CompanyName"/> <xsd:element ref="sales:ContactName"/> <xsd:element ref="sales:ContactAddress1"/> <xsd:element ref="sales:ContactAddress2"/> <xsd:element ref="sales:ContactCity"/> <xsd:element ref="sales:ContactState"/> <xsd:element ref="sales:ContactZipCode"/> <xsd:element ref="sales:ContactEmail"/> <xsd:element ref="sales:ContactCellPhone"/> <xsd:element ref="sales:ContactAssistName"/> <xsd:element ref="sales:ContactAssistPhone"/> <xsd:element ref="sales:ContactRole"/> <xsd:element ref="sales:Comments"/> </xsd:sequence> </xsd:complexType> </xsd:element> </xsd:schema>
| |
The form shown in Figure 6.7 is based on the XSD defined above. This form is designed to store the Sales Contact information based on the data structure defined within the XSD.
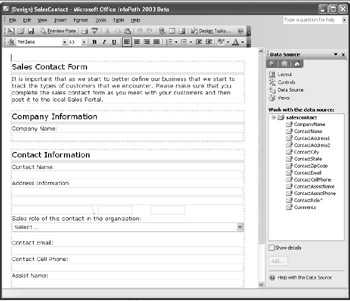
Figure 6.7: The Sales Contact form that we created based on an XSD.
Forms can promote their fields to the WSS site and show this as part of the actual design of the site. This provides a quick tickler for those users who are viewing the site and want to quickly review the information that has already been posted.
Fields are exposed through the Forms Options dialog box and by selecting the fields from a drop-down list, as shown in Figure 6.8.
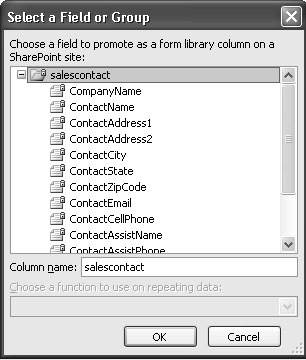
Figure 6.8: Selecting fields for display in a WSS Form Library.
Once saved, the solution file is modified to include a listProperties node that contains the promoted fields and is displayed when saved back to the portal site, as shown in Listing 6.2.
| |
<xsf:listProperties> <xsf:fields> <xsf:field name="CompanyName" columnName="{2FA32E08-4766-49B5- BF85-205BC6AC728C}" node="/sales:salescontact/sales:CompanyName" type="xsd:string"></xsf:field> <xsf:field name="ContactName" columnName="{1E9FBA22-2D60-4CE3- 8D87-8F1CF7788C57}" node="/sales:salescontact/sales:ContactName" type="xsd:string"></xsf:field> <xsf:field name="ContactAssistName" columnName="{A8B29C59-86AC- 4803-A47D-998E171A3486}" node="/sales:salescontact/sales:ContactAssistName" type="xsd:string"></xsf:field> </xsf:fields> </xsf:listProperties> | |
Once the fields are selected, you can then publish the form to the WSS site. Use the following steps to define the default form published to the site using the InfoPath Publishing Wizard:
-
Within the form designer, select File Publish, as shown in Figure 6.9.
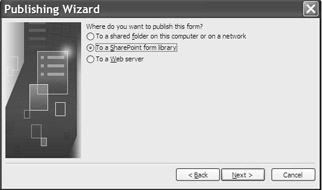
Figure 6.9: The InfoPath Publishing Wizard. -
We have already created the Form Library, so we will need to modify the existing library, as shown in Figure 6.10.
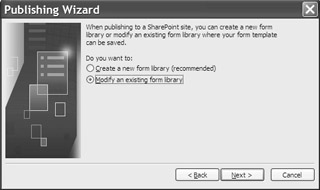
Figure 6.10: Selecting the Form Library to modify. -
Enter the URL of the Form Library and then select it from the available list, as shown in Figure 6.11.
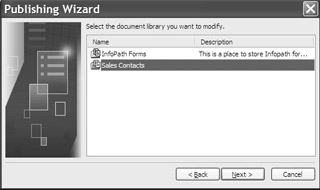
Figure 6.11: Selecting the available Form Libraries. -
InfoPath form properties that are selected for promotion are automatically selected for WSS columns, as shown in Figure 6.12.
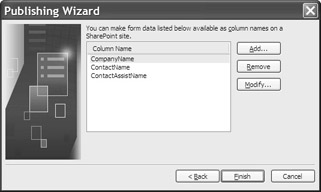
Figure 6.12: Selecting the properties to expose in the column list. -
Once the form is published, you can notify users of the new form and location, as shown in Figure 6.13.
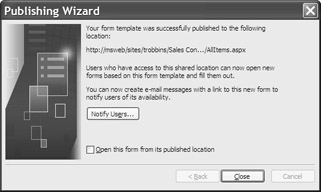
Figure 6.13: Completing the Publishing Wizard and notifying users. -
Users can receive an e-mail that outlines and shows the form and its location.
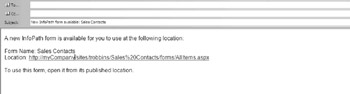
Figure 6.14: The notification e-mail that invites users to use the Form Library.
Once the form is published to the WSS library, the form becomes the default template for the site. You can modify the basic menu to allow users to directly fill out the form from this site. Once the form is filled out, it can be directly saved back to the default site, as shown in Figure 6.15.
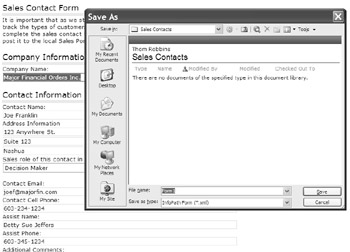
Figure 6.15: Saving an InfoPath form to the library.
Once the form is saved, both the form and the promoted fields are viewable, as shown in Figure 6.16.
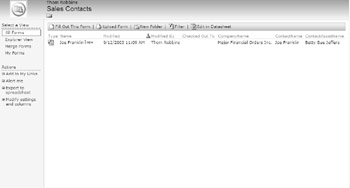
Figure 6.16: Reviewing the saved items.
One of the most important advantages of this type of workflow is that users can set up notifications that allow them to see when new items have been added. WSS allows portal users to set up alerts that will notify them when a new document has been added, as shown in Figure 6.17.
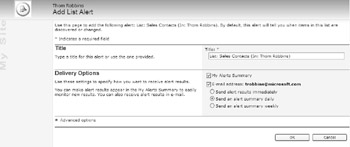
Figure 6.17: Defining a WSS alert.
| Note | Alerts are not only limited to Form Libraries; they can be defined for anything within the repository. |
The Need for Real Time
Activities within workflows can be executed either synchronously or asynchronously. In the real world, the majority of business processes are executed instantaneously. Most commonly, this is due to a lack of either human- or machine-based resources. Typically, applications tend to require human intervention, so the cycle time for completion tends to get longer. As these cycle times get longer, many times these processes are disconnected from the main application and run asynchronously. The asynchronous application model allows systems or users to start a process and not wait for the actual request to complete.
This is also the opposite design pattern of traditional transaction-based applications, in which all participants wait for the request to complete once a process is started. Such disconnected applications are often referred to as asynchronous processing because they are disconnected from the main process, and this allows each individual process to run at different speeds. Within a workflow application, this type of processing allows more flexibility in distribution and scaling workflow processes.
The benefits of asynchronous processing are:
-
Faster response from front-end systems like Web pages or InfoPath forms, which the customer perceives as a faster system
-
Makes load balancing of applications and requests easier
-
Provides built-in fault tolerance
-
Enables intermittently connected sub-systems
Within the asynchronous application model, the real benefit is the result of decoupling the application section. In order for the model to be effective, there must be some form of queue to hold pending requests, and each step of the process is responsible for communicating with these queues instead of directly with the previous or next step of the defined processes. This allows these types of applications a sense of isolation within the workflow processes.
One of the most common examples of asynchronous-based workflow is e-mail. In today s world, this is the common way of completing various tasks and activities. Often, this is because people need information from other information workers in different departments, cities, and even time zones, or simply because they want the freedom to decide when they will complete a task. E-mail-based workflow is ideally suited for approval- and task-based routing.
In this scenario, an e-mail-enabled form is submitted to users, who can review and complete the requested action. E-mail is used to notify them when they need to complete the task, and when the action is complete, they can notify the requestor that it s complete. Based on these types of scenarios, InfoPath provides a variety of built-in features.
InfoPath and Mail Enablement
The InfoPath object model allows you to send an InfoPath form as either an embedded message or as an attachment to an e-mail message. Additionally, InfoPath is client based, so it can interact with local applications like Outlook 2003 as a way of generating and sending custom e-mail messages.
The MailEnvelope Object
The MailEnvelope object enables you to send a custom e-mail message within an InfoPath form. This object provides a number of custom properties that you can use programmatically to create a custom e-mail message by using the system default mail editor and then attaching the current open InfoPath form to the message, as shown in Figure 6.18.
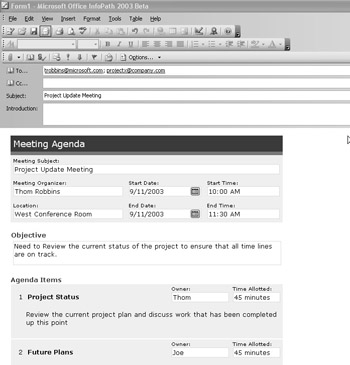
Figure 6.18: Using the MailEnvelope object to route a form.
| Note | It is important to remember that because of security concerns InfoPath cannot directly send an e-mail message. It can generate the envelope or message, but the user is required to actually send the message. |
CD-ROM The MailEnvelope object is accessed through the MailEnvelope property of the Window object. The following example from the Meeting Agenda sample uses this property to set a reference to the MailEnvelope objects that are associated with the current window and to create the custom e-mail message using the script shown in Listing 6.3. (This example is found in \Code\Chapter6\Meeting\Agenda.xsn on the companion CD-ROM.)
| |
function SendMeetingAgendaBtn::OnClick(oEvent) { var rgRecipients = new Array(); var xmlRecipients = getNodeList("/mtg:meetingAgenda/mtg:attendees/mtg:attendee/mtg:emailAdd ressPrimary"); var xmlRecipient; while (xmlRecipient = xmlRecipients.nextNode()) rgRecipients.push(xmlRecipient.text); try { var oEnvelope = Application.ActiveWindow.MailEnvelope; oEnvelope.Subject = getNode("/mtg:meetingAgenda/mtg:subject").text; oEnvelope.To = rgRecipients.join("; "); oEnvelope.Visible = true; } catch(ex) { XDocument.UI.Alert(ex.description); } } | |
The ShowMailItem Method
The ShowMailItem method enables you to programmatically create an e-mail message using the default e-mail editor and attaches the current InfoPath form as an attachment to the message. The main difference between this method and the MailEnvelope object is that the InfoPath form is created as an XML attachment to the message, as shown in Figure 6.19.
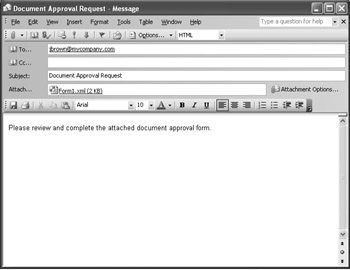
Figure 6.19: Sending an approval request form using the ShowMailItem method.
| Note | For those enterprises that block certain types of attachments, this method attaches the file to the generated e-mail message with an XML extension. If this type of attachment is blocked, this method may not be an ideal solution . |
CD-ROM Listing 6.4 uses the Document Approval form, generates the e-mail message, and attaches the InfoPath form to it. (The Document Approval sample is found in \Code\Chapter 6\Document Approval\DocApproval.xsn on the companion CD-ROM.)
| |
var sendTos = ""; for(var i =0;i<=(XDocument.DOM.selectNodes("/approver:documentinformation/approve r:Approvals/approver:ApproverEmail").length -1); i++) { sendTos = sendTos + XDocument.DOM.selectNodes("/approver:documentinformation/approver:Appro vals/approver:ApproverEmail").item(i).text + ";" ; } try { XDocument.UI.ShowMailItem(sendTos, "", "", "Document Approval Request", "Please review and complete the attached document approval form."); } catch(ex) { XDocument.UI.Alert(ex.description); } | |
EAN: 2147483647
Pages: 111