The Basics of Form Design
It is important to understand that InfoPath makes extensive use of a variety of XML standards. Table 2.1 provides an overview of these and how they are used in InfoPath.
| Name | Description |
|---|---|
| XML | This is the output format produced by InfoPath. XML is also used to contain default data that is used to pre-load form fields. |
| XSLT | This is the format of the view files produced when a form is designed. |
| XML Schema | This is the primary means of data validation within a form and defines the underlying structure of XML within a form. Also, XML Schemas are used to define the structure of the form definition file. This is the file that provides the entry point and definition for an InfoPath solution and is generated when a form is designed or edited. |
| XHTML | This data format is well- formed HTML and is used primarily when you are developing rich text areas. |
| XPATH | XPATH is an XML expression language that is used to bind controls to a form and store conditional formatting expressions. |
| Document Object Model (DOM) | Within InfoPath the DOM is used to programmatically access the contents of a form as well as the various portions of the form definition file. |
| XML Signature | This is used to digitally sign InfoPath forms. InfoPath supports the digital signing of the entire form and does not allow you to sign individual data sections. |
| XML Processor | This is used to load the source XML of a document into memory, validate the XML schema, and produce XSLT document views. The InfoPath base processor relies on the Microsoft XML Core Server 5.0. |
| Note | InfoPath 2003 does not provide support for XML Formatting Object (XSL-FO), arbitrary or dynamic XSL files used for presentation within the InfoPath client, XML Data Reduce (XDR), or Document Type Definitions (DTDs). |
Each of the files types shown in Table 2.1 are combined together to form a single solution file. When you re looking around for your first InfoPath application, the easiest place to start is with the paper forms that are being used today. These are generally pretty easy to convert into an InfoPath solution, and the resulting XML makes them highly portable.
CD-ROM Included on the companion CD-ROM (\Code\Chapter 2\Contact Form\ ![]() EmployeeContact.xsn ) is an example of an employee contact form. We have included the original form as a separate Word document. Based on the feedback that was received, the administration department was looking to add additional emergency contacts, add doctors names , and include a current picture of the employee. During the rest of the chapter, we will cover how this form is built.
EmployeeContact.xsn ) is an example of an employee contact form. We have included the original form as a separate Word document. Based on the feedback that was received, the administration department was looking to add additional emergency contacts, add doctors names , and include a current picture of the employee. During the rest of the chapter, we will cover how this form is built.
Use the following steps to create a blank design form:
-
Start the InfoPath client.
-
From the task pane, select Design a Form.
-
From the Design a Form task pane, select New Blank Form.
Creating Data Sources
The data source, which stores all data entered into a form, is made up of field groups. Similar to the way folders on a hard drive contain and organize files, form fields contain data, and groups contain and organize the fields. For example, the first, middle, and last name fields can be contained in a name group . Here is what we mean by field and group :
Field: An element or attribute in the data source that contains data. If the field is an element, it can contain attribute fields. Fields store the data that is entered into controls.
Group: An element in the data source that can contain fields and other groups. Controls that contain other controls, such as a repeating table and sections, are bound to groups.
You work with fields and groups through the task pane, as shown in Figure 2.7. Controls that are placed on the form are bound to the fields and groups in the data source. This binding allows you to save the data entered into a control. As information is entered into a bound control, the data is saved to the field associated with it.
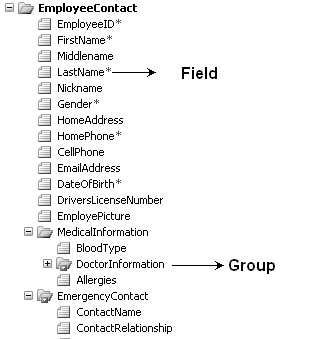
Figure 2.7: The task pane showing fields and groups.
Often, the structure of the data source doesn t exactly match the layout of the form, but there are similarities, particularly for groups and fields that are associated with repeating tables, sections, and optional sections. In these cases, a table or section is bound to a group in the data sources, and all the controls in the table or section are bound to fields that are part of the group.
XML Schema
The form that a user fills out is stored as an XML document. Initially creating the data source for a form template defines an XML schema structure. Each group in the data source is an XML element that can contain other elements and attributes, but not data, and each field in the data source is an XML element that can contain data. When designing a data source, you can view additional schema details by using the Details tab of the field s or group s properties, as shown in Figure 2.8.
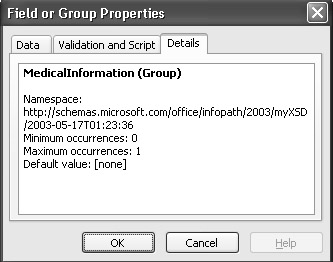
Figure 2.8: Viewing details for the current data source object.
When you design a form based on an existing XML schema, InfoPath creates a data source based entirely on that structure. Existing XML schemas can be more restrictive than new blank forms, so you cannot modify existing fields or groups in that data source. In addition, depending on the design of the schema, you may be restricted from adding additional fields or groups to all or part of the data source. On the other hand, when you design a form based on an existing XML document, InfoPath creates the data source based on the information contained in that XML document. The more detailed your XML document is, the more detailed the resulting data source will be.
When you re designing a new form that is connected to a database or Web Service, InfoPath builds the data source for your form based on the database or the operations of the Web Service or the database table structure. You can use the resulting form to submit data to the database or Web Service and then query it. The data source must match the database or Web Service, so you cannot modify existing fields or groups in the data source. In addition, you can add fields or groups only to the root group in the data source.
Creating Schema Objects
The data source task pane allows you to add, move, reference, and delete fields or groups. Using this task pane, you can add new elements to the schema structure, as shown in Figure 2.9. This dialog box enables you to add a field or group to the document structure using the required parameters given in Table 2.2.
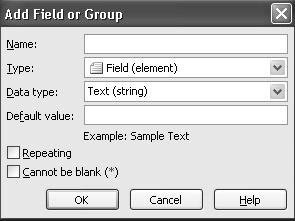
Figure 2.9: Adding a new schema object to the data source.
| Parameter | Description |
|---|---|
| Name | The unique name of the field or group. Names cannot contain spaces and must begin with an alphabetic character or an underscore . The only allowable characters within a name are alphanumeric characters, underscores, hyphens, and periods. |
| Type | The type of specific data element. These are element fields (default), attribute fields, and group. Fields are used to store data entered into controls, and groups contain fields and are unable to store data. |
| Data Type | Defines the type of data that a field can store. Data types include text, rich text, whole number, decimal, true/false, hyperlink, date, time, time and date, and picture. Fields are the only element types that can have data types. |
| Default Value | The initial value that a field will use when the user first opens the form. Fields are the only element types that can contain default values. |
| Repeating | Determines if a field or group can occur more than once in a form. List controls, repeating sections, repeating tables, and controls that are part of a repeating section or table can be added to repeating field and groups. |
| Cannot Be Blank | Requires a value entered for a field. Once the checkbox is selected, any control bound to this field will cause a validation error if it is left blank. |
As you start to create and change schemas, it is important to keep in mind that under the following conditions, the versioning of an InfoPath document can cause data loss:
-
If you move, delete, or rename a field or group
-
If you change a rich text field to a different data type
As you design schema, you can create matching fields and groups when you need to store the same type of data in more than one form location. An example is if you needed to create a home and work address for an employee. Referencing a field within InfoPath creates a new field whose name and data type are linked and matched to the properties of the original. Both fields are then considered reference fields, and a change to one field updates the other automatically. Reference groups, like reference fields, share the same properties; in addition, they contain the same fields and groups.
For example, Figure 2.10 shows the schema when you use the paper employee contact form and add the additional user requirements.
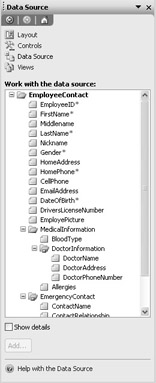
Figure 2.10: Viewing the Employee Contact schema.
As shown in Table 2.3, InfoPath supports a wide variety of XML data types.
| InfoPath Type | Description |
|---|---|
| Text | String |
| Rich Text | XHTML that can include formatting |
| Decimal | Double |
| True/False | Boolean |
| Hyperlink | Any Uniform Resource Indicator (URI) |
| Date | Date |
| Time | Time |
| Date/Time | Date/Time |
| Picture | Base 64 Binary |
Laying out a Form
As with Web page design, InfoPath is based around the idea of layout tables as a way of organizing and designing forms. Layout tables define the boundaries of your page grid and help line things up on the page. These are used like normal tables within a Web page, except for two main differences. First, a layout table is designed to support a document layout; it s not for data presentation. Second, by default a layout table doesn t have a visible border. When we are in design mode, the borders are seen as a set of dashed lines that provide a visual border. When a user is filling in a form, these borders become invisible.
Once the visual structure or layout is created, the designer can add text, fields, controls, sections, and tables that the end user uses to fill in the form. In addition to layout tables, both repeating and optional sections can be added and can act as containers for controls and text.
The layout task pane, shown in Figure 2.11, provides a collection of drag and drop layout tables and sections that can be placed on a blank form. If none of the predefined tables and sections meet the designer s needs, a custom table can be used. This allows the designer to format the exact rows and columns that are needed. Layout tables are editable like any other Office application, either through the table menu or a right click of the table properties.
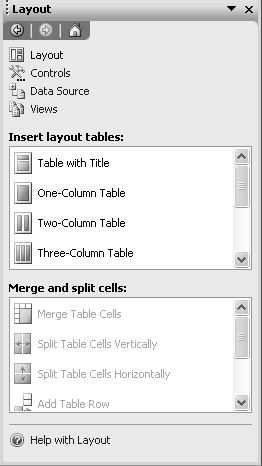
Figure 2.11: The layout task pane within InfoPath.
To keep your formatting simple, it s typically a good idea to break your form into sections with a separate layout table for each of the main sections. This allows the designer to reposition the individual layout tables more easily and will automatically align them to the desired layout. This method allows designers to create complex forms, while remaining free from the restrictions of cell resizing, splitting, and merging adjacent table rows and columns.
Placing Controls
Once the table layout is completed, the designer can start to build the data entry portion of the form. This is done by dragging the schema fields or groups onto the InfoPath workspace. During this process, InfoPath attempts to match the specific data type to a control type that makes sense for the data entry needs. Once the field is dropped on the form, the control and the form are bound together. For example, dropping a string field will result in a text box field. You can verify that your schema is properly bound by hovering over the control and seeing the green light, as shown in Figure 2.12.
Figure 2.12: Validating that a field is bound correctly.
Many times, the default rendered field will provide the appropriate control for the specific schema type. However, you can change the specific type of control if the rendered control is not appropriate. For example, you might have a text box that needs to contain a list of choices, so it will make better sense to make it a drop-down list.
Creating Views
Within InfoPath a view is defined as a form-specific display setting that is saved with the form template and applied to the form data when the form is being filled out. A view is derived from XSLT, which allows InfoPath to transform and present structured form data. Each InfoPath form has a default view called View 1 that is displayed when a user opens and completes a form.
Form designers can create custom views for their forms. Creating a custom view provides several benefits. For example, if a form is too long or complex for everyone in the company, you can move various parts of the form into different custom views. Also, you can present important sections of information within certain views.
To create custom views, use the Views task pane during design mode, as shown in Figure 2.13. Users completing a form can access the form s View menu. When a user switches views, the form s data is not changed in any way; only the presentation of the form and the amount of data displayed changes.
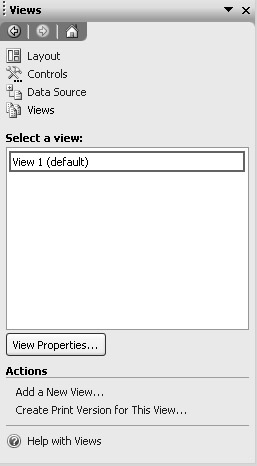
Figure 2.13: The Views task pane.
In addition to custom views, you can create print views for forms. By default, when a user selects the Print command when filling out a form, the current view is printed. Form designers can also designate any existing view as a print view and specify custom printing options that include headers, footers, and page orientation using the dialog box shown in Figure 2.14. When users fill out and print out a form that contains a designated print view, InfoPath will use the print view instead of the current view to print the form.
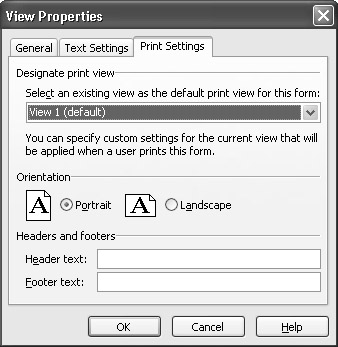
Figure 2.14: Defining a print view.
Publishing Forms
After finalizing the form design and data entry views, you can then deploy forms. We will cover the various deployment aspects in more depth during Chapter 10, but for now we ll introduce InfoPath s Publishing Wizard, shown in Figure 2.15. This wizard allows you to either save or publish the completed form to a shared location.
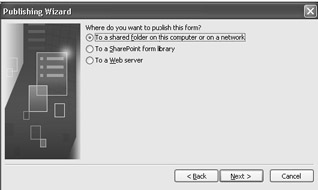
Figure 2.15: The Publishing Wizard for distributing InfoPath forms.
The Publishing Wizard allows form distribution to:
-
A form template library based on WSS. A form library is a common location where designers can store a group of business forms. When the user selects Fill Out This Form in the form library, a blank InfoPath form opens. This form is based on the template from the associated form library.
-
Save the form template to a Web server or network file share.
Testing the Employee Contact Form
Once the form is completed and deployed, InfoPath provides some additional capabilities to allow you to work with forms.
Export to Excel
When users are filling out a form, the Export to Excel feature on the file menu allows them to save either their current InfoPath view or several related form views into an Excel spreadsheet. This export allows users to analyze and work with the collected data using the aggregation and analysis features of Excel.
InfoPath fully supports digital signatures at the document level. If any of the documents that you want to export to Excel contain a digital signature, you must remove the signature before you can complete the export. Digital signatures are considered an authentication that the document or data has not been altered from its original state. The minute that you export the document, this invalidates the signature on the specific documents. However, once the export is complete, you can guarantee authenticity by reapplying the InfoPath signatures in addition to signing the Excel document.
| Note | InfoPath uses XML signatures to enable a form to be digitally signed. The certificate used to create the signature confirms that the form originated from the signer, and that the signature has not been altered. |
Export to Web Page
When users are filling out a form, the Export to Web feature on the file menu allows them to save their current form view as a single file Web page in Mail Enabled HTML (MHTML) format. This is an HTML document formatted for Multipurpose Internet Mail Extensions (MIME). This content type allows the message to contain an HTML page and other resources like documents, pictures, and applets directly in the MIME hierarchy of the message. The data is referenced through links from the HTML content and used to complete the document rendering. The main benefit of MHTML is that all links within the document are rendered locally, and this means that there is no network traffic and that documents can be used offline.
CD-ROM If you review the sample file found in the Chapter 2 sample directory (\Code\ Chapter 2\Contact Form\EmployeeContact_View 1.MHTML), you can see that MHTML defines the naming of objects that are normally referred to by URLs as a means of aggregating these resources together. Two MIME headers, Content-Base and Content-Location, are defined in order to resolve the references to the additional content stored locally or in related body parts. Content-Base provides the absolute URLs that appear in other MIME headers and in HTML documents that don t contain any base HTML elements. Content-Location specifies the URL that corresponds to the content of the body part that contains the header. This format easily compresses the data into a single file structure that is viewable from a Web browser. It is important to remember that this is a read-only version of the form and that this type of form editing requires the InfoPath client.
Send to Mail Recipient
Many times, users who are completing an InfoPath form need to send a copy of the form to another user. One way of doing this is to use the Send to Mail Recipient option on the file menu. This allows end users to share forms with other users by sending forms in a body of an e-mail message or an attachment. If users don t have the InfoPath client application, they will receive the form in a read-only mode.
File ’ Save
When you save a form that you have filled out, you are saving it in an .xml file. This file contains the data saved into the schema structure designed for the data source and a pointer to the form template to view and edit the file. The XML file contains only the data representations and defined structure. For example, when the Employee Contact form is completed and saved, the XML file contains the data shown in Listing 2.1.
| |
<?xml version="1.0" encoding="utf-8"?> <?mso-infoPathSolution solutionVersion="1.0.0.3" productVersion="11.0.4920" PIVersion="0.9.0.0" href="file:///D:\Programming%20Microsoft%20InfoPath%20A%20Developers%20 Guide\Chapter%202\Samples\Contact%20Form\EmployeeContact.xsn" ?> <?mso-application progid="InfoPath.Document"?><my:EmployeeContact xmlns:my="http://schemas.microsoft.com/office/infopath/2003/myXSD/2003- 05-17T01:23:36" xml:lang="en-us"> <my:EmployeeID>1234</my:EmployeeID> <my:FirstName>Thomas</my:FirstName> <my:Middlename>Jared</my:Middlename> <my:LastName>Robbins</my:LastName> <my:Nickname>Tommy</my:Nickname> <my:Gender>Male</my:Gender> <my:HomeAddress><div xmlns="http://www.w3.org/1999/xhtml">123 Anywhere Street</div> <div xmlns="http://www.w3.org/1999/xhtml">Bedford NH 03110</div></my:HomeAddress> <my:HomePhone>603-456-7891</my:HomePhone> <my:CellPhone>603-478-9612</my:CellPhone> <my:EmailAddress>trobbins@microsoft.com</my:EmailAddress> <my:DateOfBirth>1965-01-31</my:DateOfBirth> <my:DriversLicenseNumber>123-98-6541-985</my:DriversLicenseNumber> <my:EmployeePicture xsi:nil="true" xmlns:xsi="http://www.w3.org/2001/XMLSchema- instance"></my:EmployeePicture> <my:MedicalInformation> <my:BloodType>O+</my:BloodType> <my:DoctorInformation> <my:DoctorName>Sally Sue</my:DoctorName> <my:DoctorAddress>NE Medical Bldg</my:DoctorAddress> <my:DoctorPhoneNumber>603-421-8465</my:DoctorPhoneNumber> </my:DoctorInformation><my:DoctorInformation> <my:DoctorName>Joe Franklin</my:DoctorName> <my:DoctorAddress>123 MedicalCenter</my:DoctorAddress> <my:DoctorPhoneNumber>603-412-7123</my:DoctorPhoneNumber> </my:DoctorInformation> <my:Allergies></my:Allergies> </my:MedicalInformation> <my:EmergencyContact> <my:ContactName>Denise Robbins</my:ContactName> <my:ContactRelationship>Spouse</my:ContactRelationship> <my:ContactAddress>123 Anywhere St</my:ContactAddress> <my:ContactPhone>603-456-7891</my:ContactPhone> </my:EmergencyContact><my:EmergencyContact> <my:ContactName>Marvin Robbins</my:ContactName> <my:ContactRelationship>Parent</my:ContactRelationship> <my:ContactAddress>2910 Huntingdon Ave</my:ContactAddress> <my:ContactPhone>410-987-4561</my:ContactPhone> </my:EmergencyContact> </my:employeecontact>
| |
Form Submission
One of the things we will cover in Chapter 4 and 5 is how InfoPath can submit directly to a Web Services, SQL, or Access database. This can be done through a direct connection or through a scripted execution model that provides additional validation and enhancement scenarios around an XML structure.
EAN: 2147483647
Pages: 111
- Enterprise Application Integration: New Solutions for a Solved Problem or a Challenging Research Field?
- Context Management of ERP Processes in Virtual Communities
- Distributed Data Warehouse for Geo-spatial Services
- Intrinsic and Contextual Data Quality: The Effect of Media and Personal Involvement
- Healthcare Information: From Administrative to Practice Databases