Enhancing Forms
You can enhance your forms and applications by taking advantage of additional features available in Outlook such as custom actions and voting buttons. If you have any Office products installed, you can tie into some of their capabilities. You can also add actions to your forms by customizing Reply and Forward forms and by using voting buttons . We'll take a look at these features next .
Extending Functionality with Office Documents
Outlook is part of Office, so you can tie together Outlook and the other Office programs. The main way you do this is by creating custom properties of Office documents that you can use in your Outlook views. For example, an Excel expense reporting form can use its cell values as properties in an Outlook view. You implement this sharing of properties by creating custom properties in the Office application. Following is a description of how to create custom properties in Excel. (You create custom properties in Word and PowerPoint in the same way, except that in Word, the custom properties link to custom bookmarks, and in PowerPoint, the custom properties link to objects in the presentation.)
-
Start Excel, type a value (such as 100 ) in a cell, and select that cell.
-
From the Insert menu, choose Name and then Define.
-
In the Names In Workbook box, type the custom name you want for the cell, such as Total , and click Add. Click Close.
-
From the File menu, choose Properties.
-
Click on the Custom tab. In the Name box, type the name for your custom property. This can be the same name you selected for the cell.
-
In the Type drop-down list, select the type that corresponds to the values contained in the cell. For example, for a Total field, you should select Number.
-
Select the Link To Content check box. In the Source drop-down list, select the custom cell name you created in step 3.
-
Click Add. In the Properties box, you should see the name, value, and type of the property you just added.
-
Click OK.
After you create a custom property to hold the value from the Office document, you can add it to your Outlook view. To do this, save the Office document and drag and drop it into an Outlook folder. Right-click on the column headings for the view, and choose Field Chooser. In the Field Chooser, in the drop-down list, select User -Defined Fields In Folder. The Total field should be listed. You can use this property to group , sort , and filter your view. The only restriction on using this property is that you cannot edit it using in-cell editing in Outlook. The properties are read-only within Outlook, and you must use the Office document form to edit the properties. Figure 4-24 shows a view of expense reports inside an Outlook folder. The properties in the view are actually values from the Excel documents.
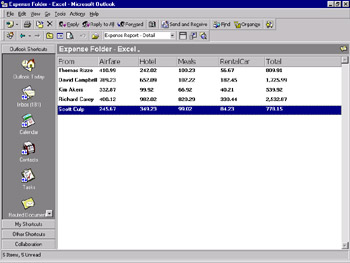
Figure 4-24: A view of expense reports inside an Outlook folder
Creating Actions
Actions are built-in or custom responses to a particular item on a form. They add dynamic functionality to your application without requiring you to do any coding. For example, in the Account Tracking application we'll look at in Chapter 8, individual contacts for the company can be created off the master company contact information. In a threaded discussion application, new items can be created as responses to posted items. We'll look at how to create actions for Outlook items and associate those actions with custom forms, and we'll examine some strategies for using actions in your applications.
By default, Outlook provides you with four built-in actions for items: Reply, Reply To All, Forward, and Reply To Folder. In many cases, you'll want to customize these actions or create your own. Figure 4-25 shows the Actions page, in which you create actions.
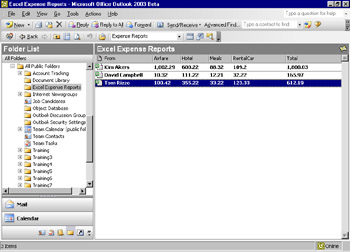
Figure 4-25: The Actions page of a form
To create a new action, follow these steps:
-
In design mode, click on the Actions tab.
-
Click the New button at the bottom of the form.
-
In the Action Name text box, type the name of your custom action. Outlook uses this name to display your custom action on the form or menu.
-
In the Form Name drop-down list, select a custom form. By default, Outlook displays the custom forms in the active folder. If the form you want is not in the active folder, you can locate it in one of two ways:
-
From the Forms menu, choose the Choose Form command. You can then select any forms in the forms libraries.
-
Type the name of a form in the drop-down list. Outlook will automatically enter its message class in the Message Class box.
-
-
In the When Responding drop-down list, select a method for copying the contents of the original item to the new form:
-
Do Not Include Original Message Outlook will not include the original item in the action.
-
Attach Original Message Outlook will attach the original message as an icon in the message body or in a separate window at the bottom of the message. The mail format of the attached message will be based on the user's settings.
-
Include Original Message Text Outlook will include the original message text and some carriage returns before the text in the message body of the form.
-
Include And Indent Original Message Text Outlook will include the original message text, indented in the message body of the form.
-
Prefix Each Line Of The Original Message Outlook will prefix each line of the message with the default prefix character that the user selected from the Options/E-mail Options dialog box. By default, the character is a greater-than sign (>).
-
Attach Link To Original Message Outlook will attach a shortcut to the original message. This functionality is useful when the reply item is a message form that is sent to the user and the original item is posted in a public folder. It allows the user to double-click on the reply item and quickly find the original item without having to search the public folder tree for the folder.
-
Respect User's Default Outlook will use the settings for replying and forwarding messages that the user selected from the Options/E-mail Options dialog box.
-
-
In the Address Form Like A drop-down list, select how you want to address the form:
-
Reply Outlook will copy the contents of the original From field to the To field in the reply form. No Cc and Bcc information will be copied . The Subject field contains the text from the original item.
-
Reply To All Outlook will copy the contents of the original From field to the To field in the reply form as well as Cc information. The Subject field contains the text from the original item.
-
Forward Outlook will clear the address information in the reply form so the To, Cc, and Bcc fields will be empty. However, Outlook will copy the subject of the message to the reply form.
-
Reply To Folder Outlook will place in the Post To field the active folder so the reply automatically posts to the folder. Outlook will also copy the subject of the message to the Conversation field and clear the Subject field. This will allow you to create threaded views of your items.
-
Response This option is used only with voting buttons.
-
-
Select the Show Action On check box to make your custom action appear on both the Actions menu and the toolbar or on just the Actions menu.
Note Sometimes you will want only the action to appear on the menu. For example, if you create a CommandButton control on your form and program the control to execute the action when clicked, you might not want the action to also appear in the toolbar. In other cases, you might not want the action to appear on either the toolbar or the menu ”for example, when the action is used in an event such as the close event for an Outlook form. In this situation, you do not want users to be able to launch this action ”only your application.
-
Select an option in the This Action Will area. The default option, Open The Form, is the one you'll probably use most often. You can also select options to send the form immediately or to prompt the user about whether to send the form or open it for modification.
-
In the Subject Prefix text box, type the characters that should precede the Subject in the reply form. Outlook will automatically place a colon after the characters.
-
Click OK.
That's it. Now you have custom functionality on your form without writing a single line of code.
Modifying and Disabling Actions
Outlook allows you to modify and disable built-in and custom actions so you can control which actions are available to the user. When you disable a built-in action such as Reply All, you can replace it with your own. Disabling doesn't actually delete the action, so you can reenable it. You can also modify a built-in action so that its functionality is consistent with the functionality of your application.
You modify, disable, and delete built-in actions on the Actions page. To modify or disable the action, select the action on the Actions page and click the Properties button to open the Form Action Properties dialog box. To delete an action, select the action and click the Delete button. Once you delete an action, you must re-create it to get it back. If there is any chance you will need the action in the future, you're better off disabling it.
| |
Actions can take advantage of hidden forms in your applications. Remember that selecting the Use Form Only For Responses check box on the form's Properties page hides the form from the user when the user selects a form to compose. Suppose you are writing a helpdesk application and on your form you want to include an action called Resolved. This action launches a new form, which the technician fills out to mark a ticket as resolved. Suppose also that you do not want users creating their own resolved forms. You can hide the resolved form from users by marking it as a response form and then setting permissions on the folder that holds the resolved forms that will prevent users from reading the items posted there. Technicians can open the items and click the resolved action to resolve the ticket, but users will not see the resolved form in the Choose Forms dialog box.
| |
EAN: 2147483647
Pages: 227