Helpdesk Application
Now that we know how to successfully log on to the Exchange Server, let's take a look at our first sample application, the Helpdesk application. The Helpdesk application is a Web-based application that allows users to submit new help requests. Help technicians can, in turn, use their Web browser to view and answer help requests as well as schedule meetings with the users to go on site to solve their problems. This application allows the technicians to use different views for the help tickets stored in the system so that they can quickly see who the ticket is from, when it was sent, and its status. (A help ticket for the Helpdesk application is shown in Figure 12-2.) When browsing help tickets, the technicians are presented with machine-configuration information from a Microsoft Access database, making it easier for them to track down whether the issue is related to hardware, software, or a user error.

Figure 12-2. A help ticket in the Helpdesk application. This is the Dynamic HTML version of the application.
This application is the most complex of all the sample applications in this book, but the code for it is easy to follow and shows you how to use many of the objects in the CDO library. There are actually two versions of the application on the companion CD. The version you use depends on the Web browser you want to target. One version implements a user interface for the help tickets by using Dynamic HTML (DHTML). The other version uses HTML tables. A screen from the non-DHTML version is shown in Figure 12-3.
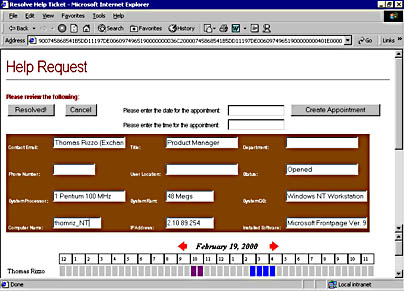
Figure 12-3. The non-DHTML version of a help ticket.
Setting Up the Helpdesk Application
Before you can install the application, you must have a Windows NT 4.0 Server or Windows 2000 server and a client with certain software installed. Table 12-1 outlines the installation requirements.
To use the Helpdesk application, you will need to have some e-mail users. You can either select currently set up e-mail users or add new ones using the Exchange Administrator program. Be sure to fill in the directory information for your users; this information should include their office locations, phone numbers, titles, and departments. The Helpdesk application dynamically retrieves this information using the CDO library. If the information is not available in the directory, the application will display the text "None specified" for these fields.
To install the application, copy the Helpdesk folder from the companion CD to your Web server where you want to run the application. If you are going to use a browser that does not support DHTML, such as Microsoft Internet Explorer 3.0, copy the three .asp files from the Nondhtml subfolder to the Helpdesk folder, overwriting the current files. These files will replace the DHTML versions of the Helpdesk with the HTML versions.
Table 12-1. Installation requirements for the Helpdesk application.
| Required Software | Installation Notes |
|---|---|
| Exchange Server 5.5 with Service Pack 1 or later installed with Outlook Web Access | Service Pack 3 is recommended. |
| IIS 3.0 or higher with Active Server Pages | IIS 4.0 is recommended. |
| CDO library (cdo.dll) and CDO Rendering library (cdohtml.dll) | Exchange Server 5.5 Service Pack 1 installs CDO library 1.21 and CDO Rendering library 1.21. Outlook installs CDO library 1.21. |
| ActiveX Data Objects | IIS 4.0 installs ADO 1.5. Visual Basic 6.0 installs ADO 2.0. For more information on ADO, consult http://www.microsoft.com/data/. |
| Access 97 (optional) | Install Access if you want to utilize the database access feature. Access 2000 is recommended. |
| For the client: A Web browser or Outlook | For the Web browser, Internet Explorer 5.0 is recommended. You can run the client software on the same machine or on a separate machine. |
Start the IIS administration program. The user interface you see depends on what version of IIS you have. Create a virtual directory that points to the location where you copied the helpdesk files, and name the virtual directory helpdesk. Make sure you enable the Execute Permission for the virtual directory or you will receive an http error when attempting to access the application. You will be able to use the following URL to access your helpdesk: http://yourservername/helpdesk.
Included with the helpdesk files on the companion CD is a sample Access 2000 database (smsdata.mdb) that allows the application to query for system information about the current user. To use this database, you must set up a system DSN for it on the server machine by using the ODBC Data Source Administrator in the Control Panel. Point the system DSN at the smsdata.mdb file, and name the DSN Helpdesk. Make sure that the read-only flag is unchecked for the smsdata.mdb file. Open smsdata.mdb in Access, and edit the UserID fields for all three tables to reflect the display names of the users you have in Exchange.
NOTE
Files copied from CDs have their read-only flags set. When setting up the applications included with this book, be aware that you may need to clear this read-only flag after copying files from the companion CD.
Launch Microsoft Outlook. (You can launch it on any machine because you are going to create a public folder that will contain the help tickets for the application. The only requirement is that the Exchange server with which the IIS server is communicating can access the public folder you create.) Create a new public folder under All Public Folders. Name the folder Helpdesk, and select Task Items as the default item type for the folder.
NOTE
You must install the Helpdesk folder under All Public Folders or the application will not work. If you cannot install the application there, you can modify the code contained in the Helpdesk application so that it looks for the folder in another location, or you can retrieve the folder by using its EntryID.
Among the helpdesk files, you will find a file named helpdesk.fdm. This file is a form definition file that will be used to import the correct fields needed by the Helpdesk application. In this case, the form is a Help Request task form with multiple custom fields.
To install the Help Request form, you need to import this file into the Helpdesk public folder. To do this, right-click on the Helpdesk public folder and select Properties. Click on the Forms tab, and click Manage to display the Forms Manager, as shown in Figure 12-4.
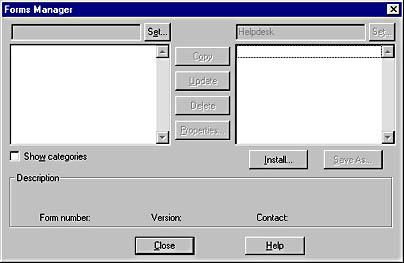
Figure 12-4. The Forms Manager dialog box.
In the Forms Manager dialog box, click Install to display the Open dialog box. Select the All Files option from the Files Of Type drop-down list so that Outlook does not search only for files with a .cfg extension. Locate and double-click on the helpdesk.fdm file to display the Form Properties dialog box. Click Cancel, and then click Close and OK. When you have the Helpdesk public folder selected, you should see a new option on the Actions menu named New Helpdesk Request.
You will need to create some views in the Outlook client so that these views are available to the Web browser client. This is one of the powerful features of CDO. These views will include some of the custom fields from the Help Request form just installed. Using the Define Views dialog box and the information in Table 12-2, create the helpdesk, from, and status views for the Helpdesk public folder. (For information about creating views, see the section titled "Views" in Chapter 3.)
Table 12-2 Information for creating helpdesk, from, and status views.
| View Name | Type | Fields | Group By |
|---|---|---|---|
| Helpdesk | Table | Flag, From User (select from Help Request form), Received, Subject (select from All Mail Fields) | None |
| From | Table | Flag (select from Help Request form), Received, Subject (select from All Mail Fields) | From User, in ascending order |
| Status | Table | From User (select from Help Request form), Received, Subject (select from All Mail Fields) | Flag, in ascending order |
Using the Properties dialog box in Outlook for the Helpdesk public folder, set the permissions for your users. Give regular users who will submit help tickets Create Items permission. Give technicians who can submit, view, and resolve help tickets Create Items and Read Items permissions. Figure 12-5 shows a sample permissions setup for the Helpdesk folder. As you will see, the application checks the permissions of the current user for the Helpdesk folder to determine whether the user is a technician or just a regular user. If you do not give yourself at least Read Items permissions, you will not be able to see the menu option View Current Help Tickets in the Helpdesk application.

Figure 12-5. The Permissions tab of the Properties dialog box for the Helpdesk public folder. Regular users have Create Items permissions, and technicians have Create Items and Read Items permissions.
You're finished setting up the application. Try connecting your browser to http://yourservername/helpdesk to access the application.
Helpdesk CDO Session Considerations
You need to be aware of certain issues when building ASP-based applications with CDO, like the Helpdesk application. Recall from Chapter 7 that the ASP Session object, which is created when a new user connects to your Web application, maintains the user state for Web applications. ASP, in turn, runs the Session_OnStart subroutine in the Global.asa file. When a user's session times out or the user abandons the session, ASP runs the Session_OnEnd subroutine in the Global.asa file. This might seem simple enough, but the most common problem developers run into with CDO applications is not putting the correct code in the Session_OnStart and Session_OnEnd subroutines in the Global.asa. If you do not put the correct code in these subroutines, you could get an ASP 0115 error, which indicates that a trappable error has occurred in an external object. Your ASP application will cease working until you restart the Web server. To help you better understand what you need to do as a CDO developer, and to help you avoid this error in your application, let me explain in more detail exactly what happens when a user logs on and off an Exchange server in a CDO ASP application. I'll do this by showing you the Global.asa file from the Helpdesk application:
<SCRIPT LANGUAGE=VBScript RUNAT=Server> Sub Application_OnStart On Error Resume Next Set objRenderApp = Server.CreateObject("AMHTML.Application") If Err = 0 Then Set Application("RenderApplication") = objRenderApp Else Application("startupFatal") = Err.Number Application("startupFatalDescription") = _ "Failed to create application object<br>" & _ Err.Description End If Application("hImp") = 0 'Load the configuration information from the registry objRenderApp.LoadConfiguration 1, _ "HKEY_LOCAL_MACHINE\System\CurrentControlSet\" & _ "Services\MSExchangeWeb\Parameters" Application("ServerName") = objRenderApp.ConfigParameter("Server") Err.Clear End Sub Sub Application_OnEnd Set Application("RenderApplication") = Nothing End Sub Sub Session_OnStart On Error Resume Next 'This is a handle to the security context. 'It will be set to the correct value when a 'CDO session is created. Session("hImp") = 0 Set Session("AMSession") = Nothing End Sub 'While calling the Session_OnEnd event, IIS doesn't call us in 'the right security context. 'Workaround: current security context is stored in Session 'object and then gets restored in Session_OnEnd event handler. ' 'All CDO and CDO Rendering library objects stored in the 'Session object need to be explicitly set to Nothing between 'the two objRenderApp.Impersonate calls below. Sub Session_OnEnd On Error Resume Next set objRenderApp = Application("RenderApplication") fRevert = FALSE hImp = Session("hImp") If Not IsEmpty(hImp) Then fRevert = objRenderApp.Impersonate(hImp) End If 'Do our cleanup. Set all CDO and CDOHTML objects inside 'the session to Nothing. 'The CDO session is a little special because we need to do 'the Logoff on it. Set objOMSession = Session("AMSession") If Not objOMSession Is Nothing Then Set Session("AMSession") = Nothing objOMSession.Logoff Set objOMSession = Nothing End If If (fRevert) Then objRenderApp.Impersonate(0) End If End Sub </SCRIPT> |
The Application_OnStart subroutine is run only once, when the first user connects to the application. As you can see in the code, the first step is to create a new CDO rendering application from the CDO Rendering library. The ProgID for the CDO rendering application is AMHTML.Application. The rendering application is stored in an application-level variable so that you avoid creating multiple AMHTML objects. Your application will perform better if you create the AMHTML object once and then use it throughout all user sessions.
NOTE
CDO was formerly named Active Messaging, so you will see both CDO and AM used throughout the CDO library. Consider any objects that are prefixed with AM to be CDO objects.
The Application_OnStart subroutine initializes some variables and then uses a method on the CDO rendering application object to retrieve the name of the Exchange server from the Web server's registry. This method allows portability of the code. You don't have to hard-code the name of the Exchange server; the Helpdesk application pulls the information from the registry.
After the first user connects and Application_OnStart is finished running, ASP runs the Session_OnStart subroutine for all users. Session_OnStart clears a session variable named hImp. This hImp variable is a handle to the security context for the current user. Remember that when a user first browses a Web page in IIS, she is running in the security context of the IUSR_servername account. While this account is useful for browsing Web pages anonymously, it is not useful for accessing Exchange Server objects and information because it has no implicit permissions on Exchange Server objects. So when building an authenticated CDO application, you need to force IIS to challenge the current user for the user's Microsoft Windows NT credentials. IIS and CDO can use the Windows NT security context for that user to attempt a logon to the Exchange server. The following code, taken from the Logon.inc file of the Helpdesk application, checks the http variables to make sure that the current user is authenticated by the Web server using the user's Windows NT credentials. In the Helpdesk application, this section of code is called by every ASP page, just in case the ASP session of the user has timed out.
Public Function BAuthenticateUser On Error Resume Next 'Response.Write( "In BAuthenticateUser<br>") BAuthenticateUser = False bstrAT = Request.ServerVariables("AUTH_TYPE") If InStr(1, "_BasicNTLM", bstrAT, vbTextCompare) < 2 Then Response.Buffer = TRUE Response.Status = ("401 Unauthorized") Response.AddHeader "WWW.Authenticate", "Basic" Response.End Else BAuthenticateUser = True End If End Function |
This function searches the AUTH_TYPE server variable to see whether either "Basic" or "NTLM" is contained anywhere in the string. If neither is, the user is unauthenticated and the script sends back a "401 Unauthorized" response and a header that will force the browser to challenge the user for credentials.
Once authenticated, the security context of the user must be saved as a Session variable. You must save this security context because IIS uses multiple threads of execution and you cannot be guaranteed that the thread that tries to destroy the session when the user logs off will be the same thread used to create the session. In the Session_OnEnd subroutine, the script checks to see whether hImp is not empty, implying it is a valid handle. If hImp is not empty, hImp is used to specify the Windows NT security context to impersonate. Once the CDO and CDO Rendering objects are set to Nothing and the session is logged off, the CDO Rendering application object reverts from the authenticated thread to the unauthenticated thread by calling the Impersonate method, with 0 as the parameter.
As we step through the Helpdesk application, you will see that every page in the application checks to see whether the ASP session, and therefore the CDO session, has been abandoned or has timed out. If the session has been abandoned or has timed out, the application redirects the user to the logon page so that he can restart his ASP and CDO sessions. Figure 12-6 shows the logon page.
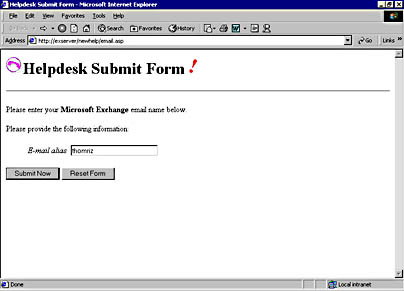
Figure 12-6. The logon page for the Helpdesk application.
Logging On to the Helpdesk
You've seen that both the Global.asa and the Logon.inc files help to authenticate users and maintain sessions. We have not yet discussed, however, how you actually use the Logon method of the CDO Session object in the Helpdesk application to create a valid session with the Exchange server. The Logon method must be called before you attempt to access any other CDO objects. The script that implements user logons is contained in the Logon.inc file, shown here:
<% 'logon.inc. VBScript methods to create and check an 'ActiveMessaging session '============================ 'ReportError ' '============================ Function ReportError( bstrContext) ReportError= False If Err.Number <> 0 Then Response.Write( "Error: " & bstrContext & " : " & _ Err.Number & ": " & Err.Description & "<br>") Err.Clear ReportError= True End If End Function '============================ 'BAuthenticateUser 'Ensures user is authenticated. Note that this implies that 'Basic authentication is enabled on the IIS server. '============================ Public Function BAuthenticateUser On Error Resume Next 'Response.Write( "In BAuthenticateUser<br>") BAuthenticateUser = False bstrAT = Request.ServerVariables("AUTH_TYPE") If InStr(1, "_BasicNTLM", bstrAT, vbTextCompare) < 2 Then Response.Buffer = TRUE Response.Status = ("401 Unauthorized") Response.AddHeader "WWW.Authenticate", "Basic" Response.End Else BAuthenticateUser = True End If End Function '============================ 'CheckAMSession ' 'Checks for and returns the AM session in the Session object. 'If not found, calls NoSession. 'Call this before emitting any HTML or any redirects, 'authentication, and so on. 'Returns True if session exists or can be created. '============================ Public Function CheckAMSession() On Error Resume Next 'Response.Write( "In GetSession<br>") Dim amSession CheckAMSession= False Set amSession= Session( "AMSession") If amSession Is Nothing Then NoSession amSession= Session( "AMSession") End If If Not amSession Is Nothing Then CheckAMSession= true End If End Function '============================ 'NoSession ' 'Called when the AM session cannot be found. 'Either creates a session or gets more info from the user. 'Returns only if the session was created. ' '============================ Sub NoSession() On Error Resume Next Dim bstrMailbox Dim bstrServer Dim bstrProfileInfo Dim objAMSession1 Dim objRenderApp Dim objInbox bstrServer = Application("ServerName") if Session("mailbox") is Nothing then bstrMailbox = Request.QueryString("Contact_Email") else bstrMailbox = Session("mailbox") end if 'Must be authenticated to successfully log on BAuthenticateUser Err.Clear Set objAMSession1 = Server.CreateObject("MAPI.Session") If Not ReportError( "create MAPI.Session") Then set objRenderApp = Application( "RenderApplication" ) 'Construct the ActiveMessaging profile from server 'and mailbox name bstrProfileInfo = bstrServer + vbLF + bstrMailbox Err.Clear objAMSession1.Logon "", "", False, True, 0, True, _ bstrProfileInfo If Not ReportError( "CDO Logon") Then 'To ensure that we are really logged on, we need to 'try retrieving some data Err.Clear Set objInbox = objAMSession1.Inbox 'If ReportError( "Get Inbox"), then 'the logon is no good. We'll do a little 'cleanup here. If err.number <> 0 then objAMSession1.Logoff Set objAMSession1 = Nothing %> <META HTTP-EQUIV="REFRESH" CONTENT="0; URL=email.asp"; TARGET="_top"> <% 'response.redirect "default.htm" End If 'This will be retrieved in CheckSession. 'Note that if the logon failed, this is set to 'Nothing'. Set Session("AMSession") = objAMSession1 'Need this to re-create the proper security context 'in Session_OnEnd. Session("hImp") = objRenderApp.ImpID End If 'objAMSession1.Logon End If 'Server.CreateObject() End Sub |
The first function called on every ASP page in the Helpdesk application is the CheckAMSession function, which checks to see whether the user already has a valid CDO Session object with the Exchange server. If this function does not find a valid object, it calls the NoSession subroutine to log the user on to CDO.
In the NoSession subroutine, the variable bstrServer is set to the Exchange Server name, which is pulled from the registry in the Global.asa file. (Again, retrieving the Exchange Server name from the registry allows the portability of the code to any Web server and any Exchange server.) The script then checks to see whether the ASP Session variable named mailbox contains a valid mailbox alias name. If this variable is empty, the script attempts to grab the mailbox name from the URL that was passed to the Web server by the logon screen of the application.
The BAuthenticateUser function is called to ensure that the user is logged on to Windows NT correctly before the code attempts the CDO Session Logon method. After the CDO object is created, its Logon method is called. The variable bstrProfileInfo is set so that CDO can dynamically create a profile for the user. The script calls the Logon method, and if that method returns no errors, the script tries to retrieve the Inbox for the user. You should follow similar steps in your applications because the Logon method can return successfully when called with dynamic profiles, even when the server or mailbox name is not valid. If you do not try to retrieve information from the server directly and assume the Session object is valid because the method returned successfully, you will run into many problems.
If the code cannot retrieve the user's Inbox successfully, the code logs off and redirects the user to the logon page. If the code can retrieve the Inbox, it stores the handle to the security context for this user in the hImp session variable.
Accessing Folders in the Helpdesk
You don't have much of a Helpdesk application if your users can't enter information and your technicians can't retrieve information. This Helpdesk application uses a public folder to store and retrieve information about ticket status. CDO provides access to public folders through its InfoStores collection, which contains all the different stores or databases that CDO can access. For example, with the InfoStores collection, you can access not only public folders and server-based mailboxes, but also personal folders stored in .pst files or offline replicated folders stored in .ost files. Of course, to enable CDO to access some of these infostores, you must run your CDO application on the client machine. Figure 12-7 shows the InfoStores collection with some of its child objects.
In the Helpdesk application, the InfoStores collection is used to find the public folder store. The following code from default.asp uses a For Each…Next statement to loop through the InfoStores collection and retrieve each store in the collection. Each store is checked to see whether the store name corresponds to the public folder store. If a corresponding store name is found, the For…Each statement is exited.
Set objInfoStoresColl = objOMSession.InfoStores For Each objInfoStore In objInfoStoresColl If objInfoStore.Name = "Public Folders" Then Exit For End If Next |
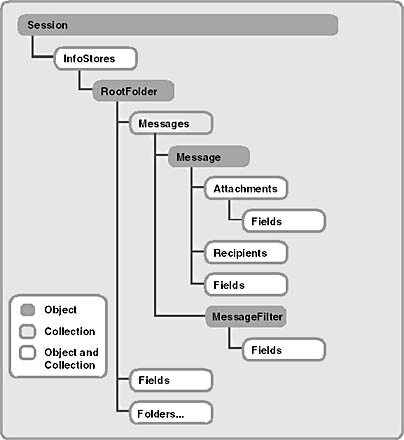
Figure 12-7. The InfoStores collection in CDO. This collection is used to access data stored in Exchange Server.
Now that the application has the correct infostore, the correct set of folders needs to be accessed in that infostore. The InfoStore object in CDO has a RootFolder property that returns a Folder object representing the root of all the folders. For your mailbox and public folder stores, the RootFolder property returns a Folder object named IPM_Subtree. By using that Folder object, you can traverse all folders in your mailbox or top-level public folders. However, there's one caveat with this property: you cannot use the RootFolder property to access public folders if your application is running as a Windows NT service. Instead, you need to use the Fields collection on the InfoStores object with the specific property tag PR_IPM_PUBLIC_FOLDERS_ENTRYID (&H66310102). Once you retrieve the EntryID for the root public folder from the Fields collection, you can use the GetFolder method to actually retrieve the root Public Folder. (An EntryID is like a globally unique identifier, or GUID, in that it uniquely identifies the folder in the Exchange Server database.) After retrieving the root folder, you can then use the Folders collection of the root public folder to retrieve the root folder's subfolders. The following code, taken from default.asp, shows the GetFolder method in action. It retrieves the folders in the public folder tree, and then recurses the top-level folders as it searches for the Helpdesk folder.
'This is the EntryID for the root public folder bstrPublicRootID = objInfoStore.Fields.Item( &H66310102 ).Value Set myrootfolder = objOMSession.GetFolder(bstrPublicRootID, _ objInfoStore.ID) 'Now get the Folders collection below the root Set myfoldercollect = myrootfolder.Folders Set recursefolder = myfoldercollect.GetFirst() 'Recurse it until we get the folder we are looking for While recursefolder.Name <> "Helpdesk" Set recursefolder = myfoldercollect.GetNext() Wend set objFolder = recursefolder set Session("HelpdeskFolder") = recursefolder Session("InfoStoreID") = objInfoStore.ID |
Once the code finds the Helpdesk folder, it stores the CDO Folder object that corresponds to the Helpdesk folder as well as the unique identifier for the public folder InfoStore object because, from a performance standpoint, recursing the InfoStores and Folders collection in every ASP page in the Helpdesk application to find this information is expensive. Since we now have this information available across the entire session, the other pages use the Session object for the folder whenever access to the Helpdesk folder is required.
Implementing Helpdesk Folder Security
When a user logs on to the Helpdesk application, the options displayed depend on the user's folder permissions. For example, if a user accesses the application and she has only Create Items permission for the Helpdesk folder, the ASP will display only the Submit A Help Ticket and Logoff options, as shown in Figure 12-8. However, if a technician who has Read Items and Create Items permissions for the Helpdesk folder logs on to the application, the ASP will display an additional menu option—View Current Help Tickets, as shown in Figure 12-9.
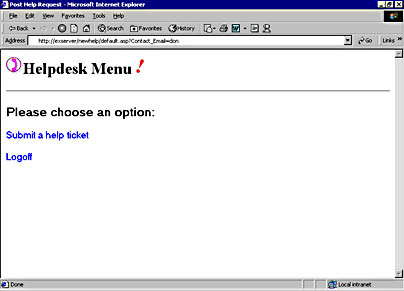
Figure 12-8. The Helpdesk Menu page, where the user who has logged on has Create Items permissions for the Helpdesk folder.
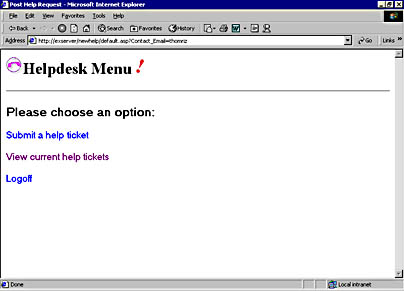
Figure 12-9. The Helpdesk Menu page, where the user logged on is a technician and has Create Items and Read Items permissions for the Helpdesk folder.
This functionality is implemented in CDO by using the Fields collection on the Folder object. The Fields collection, a common collection across many of the objects in CDO, allows you to access specific properties stored for an object that CDO does not have an explicit object or property for. With the Fields collection, you can pass a unique identifier that corresponds to the properties you want to retrieve. In the next section of Helpdesk code, which is from the default.asp file, we pass in the unique identifier for the MAPI property ActMsgPR_ACCESS (&H0FF4003), which contains a bitmask of flags corresponding to the user's permissions level for the current Folder object. The code then performs a logical AND on the returned value from the Fields collection by using the known bitmask of the MAPI_ACCESS_READ permission. If the result does not equal zero, the user can read items in the folder, and the ASP displays the View Current Help Tickets link in the helpdesk menu.
<h2>Please choose an option:</h2> <a href="default1.asp">Submit a help ticket</a><P> <% 'Check permissions on the folder to see whether the user has 'Read access. If the user does, the user must be a technician, 'so display the ability to view help tickets. nAccess = objFolder.Fields.Item(ActMsgPR_ACCESS) bCanPost = nAccess And MAPI_ACCESS_READ If bCanPost <> 0 then %> <a href="render.asp">View current help tickets</a> <% end if %> <P> <a href="logoff.asp">Logoff</a> |
You can pass many types of identifiers to the Fields collection. The Helpdesk application does not use the CdoPR_CONTAINER_CLASS (&H3613001E) property, but I point it out to you because it demonstrates the type of information you can access through the Fields collection on CDO objects. It contains the message class of the default type of item contained in the folder. For example, if in Outlook you set the default item type for a Public Folder as contacts, the CdoPR_CONTAINER_CLASS property will contain IPF.Contact. How do you change the default item type in a folder programmatically through CDO? By using the Fields collection on a folder and this property, as shown in the next bit of sample code, the code changes the default item type of a folder to tasks. The code uses the InfoStores collection to retrieve the mailbox of the user. It then retrieves the root folder of the mailbox by using the RootFolder property. From that root folder, it retrieves the contacts folder in the mailbox. The next line of code uses the Fields collection on the folder to set a property that corresponds to the default item type for the folder. Finally, to make the default item-type change permanent, the Update method of the Folder object is called, committing the changes to the disk memory.
Set oStore = oSession.InfoStores("Mailbox - Thomas Rizzo (Exchange)") Set oFolder = oStore.RootFolder.Folders("Contacts") MsgBox "Before Update: " & oFolder.Fields(&H3613001E) oFolder.Fields(&H3613001E) = "IPF.Tasks" oFolder.Update MsgBox "After Update: " & oFolder.Fields(&H3613001E) |
NOTE
For the complete list of the identifiers you can use with the Fields collection in your applications, refer to the cdo.chm on the companion CD. On the Contents tab, look under the Appendixes section for the MAPI Property Tags document.
Retrieving User Directory Information
If the user clicks on the Submit A Help Ticket option on the helpdesk menu, the file default1.asp is called. This ASP file displays a Help Request form, which is shown in Figure 12-10.
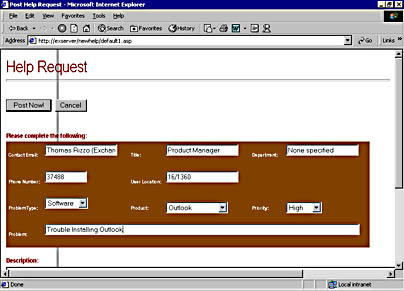
Figure 12-10. The Help Request form allows users to post information to the Helpdesk application.
As you can see in Figure 12-10, some information about the user is already entered in the Help Request form. This information is dynamically pulled from the Exchange Server directory to help users save time when filling out requests. The enabling technology for this dynamic lookup involves primarily two CDO objects, the Recipient object and the AddressEntry object. A diagram illustrating the hierarchy of these two objects is shown in Figure 12-11.
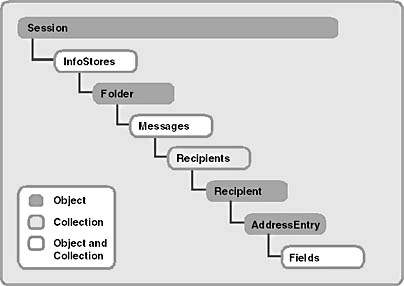
Figure 12-11. The Recipients collection and Recipient object in CDO.
The Recipient object represents a recipient of a message. You might be wondering why a Recipient object is used to retrieve directory information from Exchange Server. There are two primary reasons for this. The first is that CDO does not explicitly support querying for directory information without first retrieving the AddressEntry object for the desired user. The second is that adding the name of the user to a message as a Recipient, and then using the Resolve method of the Recipient object, is probably the easiest way to retrieve the AddressEntry object for a particular user. After resolving the name, you can call the AddressEntry property on the resolved Recipient object to retrieve the corresponding AddressEntry object. Just make sure you destroy the temporary objects you created for the Message and Recipient objects. The AddressEntries collection and AddressEntry object in CDO are shown in Figure 12-12.
The AddressEntry object contains the directory and address information for a user in the Exchange Server system. You can use the built-in properties of this object to access the e-mail address information for a particular user, but to access directory information (department, office location, and phone number), you must use the Fields collection of the AddressEntry object with MAPI property tags. The following code sample, which is taken from default1.asp, shows you how the Helpdesk application implements directory lookup for users:
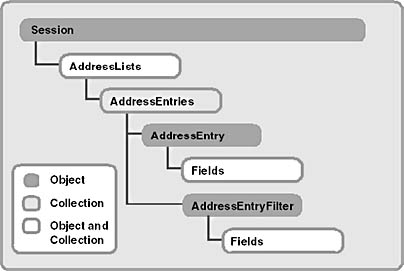
Figure 12-12. The AddressEntries collection and AddressEntry object in CDO.
Set objmessage = objOMSession.Outbox.Messages.Add 'Create the recipient Set objonerecip = objmessage.Recipients.Add 'Retrieve the e-mail address from the previous HTML form objonerecip.Name = Session("mailbox") 'Resolve the name against the Exchange Server directory objonerecip.Resolve 'Get the address entry so that we can pull out template information Set myaddentry = objonerecip.AddressEntry Set myfields = myaddentry.Fields 'The numbers in parentheses are the hard-coded IDs for department, 'title, and so on Set mydept = myfields.Item(974651422).value set mytitle = myfields.Item(974585886).value set myworkphone = myfields.Item(973602846).value set myoffice = myfields.Item(974716958).value if mydept = "" then mydept = "None specified" end if if mytitle = "" then mytitle = "None specified" end if if myworkphone = "" then myworkphone = "None specified" end if if myoffice = "" then myoffice = "None specified" end if set objmessage = Nothing set objonerecip = Nothing |
First this code adds a new message to the Outbox of the user by calling the Add method on the Outbox folder. Then the code adds a new Recipient object to the message. Since the ASP session contains the display name of the current user, this value is passed in as the Name property for the recipient. The code then calls the Resolve method on the Recipient object to make CDO check for ambiguous names in the directory. Once the user is resolved, the AddressEntry object for the user is retrieved using the AddressEntry property of the Recipient object.
From there, the Fields collection of the AddressEntry object is retrieved. The code then uses some MAPI property identifiers to retrieve specific information from the directory. If the information is unavailable in the directory, the code specifies that the value for the variables be "None specified". To make sure that the temporary Message and Recipient objects are released from memory, the code sets both objects to Nothing.
Posting Information in the Helpdesk
Once the user fills in the help ticket information, such as a problem description, the user clicks the Post Now! button on the HTML form. The action of this HTML form sends the user information to another ASP file named posthelp.asp. The posthelp.asp file uses the CDO library to post this information to the Helpdesk public folder by creating a new Message object in the folder. The hierarchy for the Message object and its parent collection, Messages, is shown in Figure 12-13.
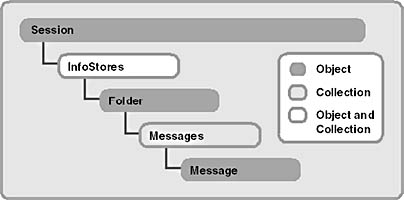
Figure 12-13. The Messages collection and Message object in CDO.
The Messages collection is accessed by calling the Messages property on a Folder object. The Messages collection consists of Message objects, which you can manipulate to change items in folders or to create new items. To add a new message to a folder, you use the Add method of the Messages collection—essentially, it adds a new item to the collection. The type of message created depends on which folder you are calling the Add method in. For example, if you call the Add method in your Inbox, CDO will return a new Message object. If you call the Add method in your Calendar folder, CDO will return a new AppointmentItem object.
After adding a new item to the collection, you can set the properties for the item and then call the Send or Update method, depending on the type of item you created. If you used the Add method in your Outbox, you would call the Send method, because e-mail messages are created in the Outbox. In the Helpdesk application, the script calls the Update method because the application does not e-mail new help tickets into the folder but rather posts them into the folder. The following script from posthelp.asp posts the information from the HTML form into the public folder:
set objFolder = Session("HelpdeskFolder") set recursefolder = objFolder 'Add a new message to the public folder Set oMessage = recursefolder.Messages.Add 'Set the message properties oMessage.Subject = Request("Subject") oMessage.Sent = True oMessage.Unread = True oMessage.TimeSent = Now oMessage.TimeReceived = Now oMessage.Type = "IPM.Task.Help Request" oMessage.Importance = Request("Priority") oMessage.Fields.Add "From User", 8, Request.Form("Contact_Email") oMessage.Fields.Add "Description", 8, Request("Description") oMessage.Fields.Add "Problem Type", 8, Request("Type") oMessage.Fields.Add "Product", 8, Request("Product") oMessage.Fields.Add "Phone", 8, Request("Phone") oMessage.Fields.Add "User Location", 8, Request("Location") oMessage.Fields.Add "Flag", 8, "Opened" 'Set the conversation properties oMessage.ConversationTopic = oMessage.Subject oMessage.ConversationIndex = objOMSession.CreateConversationIndex 'Post the message oMessage.Submitted = FALSE oMessage.Update Set oMessage = Nothing |
As you can see in the code, some properties on the new Message object, such as the Sent, Unread, TimeSent, TimeReceived, and Submitted properties, are explicitly set. These properties need to be set because when you post an item into a public folder as the Helpdesk does, the underlying messaging system does not set these properties for you. They must be set before calling the Update method on the Message object for posted items.
The Sent property is a Boolean that determines whether the message has been sent through the system. Since we are posting information directly into the folder, we need to set this property explicitly to True before calling the Update method. The Submitted property is also a Boolean that needs to be set to True before we call the Update method. The Submitted property determines whether the item has been submitted into the messaging subsystem.
The TimeReceived and TimeSent properties contain dates that tell the user when the message was received by the folder and when the user sent the messages. You should set both of these properties to the current date and time before posting the item into the folder. The easiest way to do this is assign them to the value returned by the Now function.
The Unread property is a Boolean that represents whether the current user has read the item. This property is not set for you automatically by CDO when posting an item to a public folder. For this reason, you must set this property to False before posting your item into the public folder.
Now that we have set the required properties to successfully post a message into a public folder, we can use some of the other properties on the Message object to implement the functionality of our application. Notice in the script that the Type property is set to IPM.Task.Help Request. The Type property corresponds to the message class of the item. By setting this property to a custom message class, Outlook and OWA users can use a custom form that handles that message class to open up the item in the folder.
The Importance property in the script is set to the importance established by the user in the Priority drop-down list in the HTML form. This property has three possible values: CdoLow (0), CdoNormal (1), and CdoHigh (2). Setting Importance in CDO has the same effect as adding the exclamation point icon or the down arrow icon to an e-mail message in Outlook.
The Subject property is set to whatever the user types in the Problem text box of the Helpdesk form. It is rendered as a hyperlink later in the application so that from their Web browser, technicians can click on a specific problem and drill down to the specifics about the help ticket and the user who submitted it.
The Fields collection on the Message object is used in the script to add custom fields to the item programmatically—a powerful technique, because any items you create in CDO can use it. These custom properties, or fields, are then accessible from Outlook. Since the Exchange Server database is a semistructured database, you can even change or add new properties to the items in a folder without worrying about breaking a schema. This means that in your application, every item and its properties can hold different data. Your application can dynamically add new properties to items depending on the input of the user.
The way you add new custom properties to an item is by using the Add method of the Fields collection. This is the syntax for the Add method:
Set objField = objFieldsColl.Add (Name, Class [, Value] [, PropsetID]) |
Semistructured DatabasesExchange Server is a semistructured database, as compared to Microsoft SQL Server, which is completely structured. With SQL Server, you need to define your schema before you can start adding data, and the schema is usually fixed. With Exchange Server, every message can be different. For example, one message might have 0 attachments and another might have 15 attachments. Exchange Server is designed to efficiently handle this varying data.
Passing the last two parameters to this method and setting the value returned by this method are optional. You can see in the preceding script that the code does not set an object variable to the return value of this function.
The first parameter the Add method takes is the name of the custom property. This name is limited to 120 characters, and if you attempt to exceed this limit, CDO will return an error. The second parameter is the class, or data type, that you want to store in the property. The class parameter should pass one of the following values: vbArray (8192), vbBlob (65), vbBoolean (11), vbCurrency (6), vbDataObject (13), vbDate (7), vbDouble (5), vbEmpty (0), vbInteger (2), vbLong (3), vbNull (1), vbSingle (4), vbString (8), or vbVariant (12). The most common data type you will use in your applications is vbString (8). As you can see in the Helpdesk script, all custom properties on the posted item use the string data type.
The third parameter, which is optional, is the value for the property. Usually you want to pass this parameter to the method so that you do not have to write extra code to initialize the custom property with the value.
The fourth and final parameter is the PropsetID. The PropsetID parameter is a GUID that uniquely identifies the MAPI property set to which the custom field should belong. In your applications, you will almost always use the default property set, which is assumed if you omit the PropsetID parameter. Only if you are developing a custom MAPI application that uses its own property sets will you ever need to set PropsetID.
In addition to adding new custom properties, the script sets the ConversationTopic and ConversationIndex properties for the help ticket before posting it into the folder. These properties are used by both CDO and Outlook to allow you to create threaded views of information in your folders. Since your users might want to create these types of views in your applications, you should set these properties in your code.
The ConversationTopic property is a string that describes the subject of the conversation. All the items in the same conversation have the same property value, and since ConversationTopic corresponds to the overall subject of the conversation, the most logical value for it is the Subject property of your message.
The ConversationIndex property is a hexadecimal string that represents the relationship between items in the same conversation. This property is used by CDO and Outlook to determine which items are replies to other items and how to thread these items in a view. Since you do not want multiple messages with the same index, CDO provides a method for you to generate unique conversation index values—the CreateConversationIndex method on the CDO Session object. As you can see in the Helpdesk code, all you need to do is call CreateConversationIndex and assign its value to the ConversationIndex property for your item.
After setting all these properties, the script calls the Update method on the Message object, and a new help ticket is created in the folder. If you do not call the Update method, CDO will not commit your changes to the public folder.
Rendering the List of Helpdesk Tickets
When creating a Web application, one of the hardest aspects to design is the user interface. You have to worry about using HTML tables to line up content, and you have to make sure that these tables have the correct format and spacing to appear properly in a browser. The beauty of CDO is that you do not have to worry about the user interface. The CDO library has a companion library, named the CDO Rendering library, that provides objects that automatically convert Exchange Server information to an HTML format in a preset layout. Figure 12-14 shows the relationships among the objects and collections of the CDO Rendering library.
The CDO Rendering library can not only render simple types of information such as your Inbox, but it can also leverage any custom table views you create in Outlook. For example, you could use the CDO Rendering library to render your Inbox as HTML, grouped by who sent you the message. The CDO Rendering library provides this functionality with a minimal amount of coding, as you will see. Plus, the formats that the library uses to render information to HTML are customizable, so if you want to change the color or the font of items that meet particular criteria or contain particular properties, you can easily do this by using the Rendering objects. Figure 12-15 shows an HTML view of help tickets in a folder, created using the CDO Rendering library.
Similar to the Session object in the CDO library, the RenderingApplication object of the CDO Rendering library is the parent object from which all other objects in the library are derived. To create a RenderingApplication object, you need to use the CreateObject method and pass the ProgID of the CDO Rendering library, which is AMHTML.Application. In the Helpdesk application, the RenderingApplication object is created in the Global.asa file and given application scope in ASP so that all sessions in the Helpdesk application can create individual objects from the global RenderingApplication object. This is a good practice to use in your CDO ASP applications.
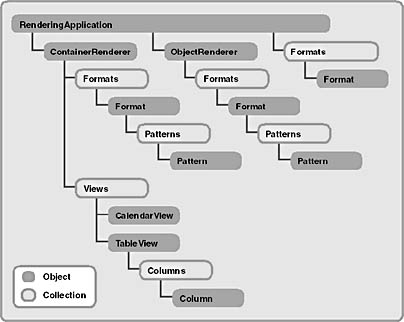
Figure 12-14. CDO Rendering library.
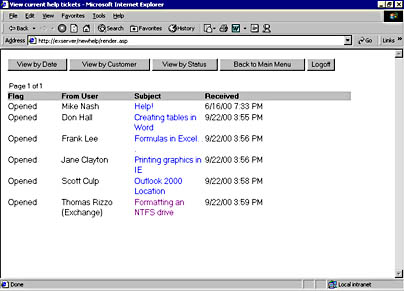
Figure 12-15. An HTML view of the current help tickets in the folder. This was created using the CDO Rendering library.
The RenderingApplication object contains a number of properties that you can set, such as the code page or virtual root, that can be used throughout all the rendering objects created from RenderingApplication. When you first create your RenderingApplication object, most of the properties on the object will be filled in with default values. Most of these default values do not need to be changed unless you are developing completely customized applications that cannot use the defaults.
The most important property and the two most important methods of the RenderingApplication object to learn about are the ConfigParameter property, the CreateRenderer method, and the LoadConfiguration method. This property and these methods will be used in almost all of your ASP CDO applications. The LoadConfiguration method and the ConfigParameter property work together to tell the CDO Rendering library where to pull configuration information from—such as the registry or the Exchange Server directory. This location information is used to retrieve specific configuration data from the selected data source. In the Global.asa file for the Helpdesk application, the name of the Exchange server that CDO communicates with is retrieved by using the LoadConfiguration method and the ConfigParameter property. The ConfigParameter property can retrieve other types of configuration parameters, such as whether anonymous access is enabled on the Exchange server, the organization and site names for the Exchange Server directory, and whether the http protocol is even enabled on the Exchange server.
The CreateRenderer method creates a new rendering object, which is attached to the current RenderingApplication object. This method takes an integer argument that specifies the type of rendering object to create. The values for this integer parameter can be either CdoClassContainerRenderer (3) or CdoClassObjectRenderer (2). In your applications, use the object renderer to render only specific properties on items, such as the subject or the text of the item. You should use the container renderer to render rows of information, such as all the messages in a folder.
In the render.asp file for the Helpdesk application, the following script first gets the global RenderingApplication object and then calls the CreateRenderer method to create a container renderer. The application uses a container renderer to display all the items in the Helpdesk folder rather than specific properties on a specific item.
'Create Rendering Application set objRenderApp = Application("RenderApplication") 'Create Container Renderer id=3 Set objrenderer = objRenderApp.CreateRenderer(3) |
The application then sets the DataSource property for the container renderer to the Messages collection in the Helpdesk folder. With any type of rendering object, you need to set the DataSource property because it tells the rendering object what data to actually convert to HTML. The container renderer can accept an AddressEntries, a Folders, a Messages, or a Recipients collection as its data source.
Set oMsgCol = objFolder.Messages 'Set the data source for the Rendering object to the 'helpdesk public folder objrenderer.DataSource = oMsgCol |
The next step in the code figures out whether the application passed along a custom Outlook view name with the query string. If it did, the script uses that custom view name as the default view for the Rendering object. This is an important point. You can use custom Outlook views as views in your Rendering objects. This means that you do not have to create views on the fly in your CDO applications, but can instead create views in Outlook and then leverage those views in your application. The Rendering object will support views that contain sorting, grouping, and filtering—support that will save you many hours of coding custom views.
If the application did not pass a view name with the query string, the default view named Helpdesk is used to render the tickets in the folder, as shown in the following code:
'Get the requested view from the query string requestedview = Request.QueryString("view") 'Get the Folder Views collection set objviews = objrenderer.views 'If there is no selected view, set it to Helpdesk view 'created in Outlook if requestedview = "" then requestedview = "Helpdesk" end if 'Search the Views collection until you find the view i=1 While objviews.item(i).Name <> requestedview i=i+1 Wend set objview = objviews.Item(i) |
The next step in setting up the container renderer is to enable a hyperlink on a field in the view so that technicians can click on the hyperlink to retrieve the information contained in the ticket. If you do not include this step in your CDO applications, the rendering objects will return HTML without any clickable links. To create hyperlinks, we must first select the column in the view for which we want to create the hyperlink. In the Helpdesk application, the third column in the view is always used to create the hyperlink. The way you access the third column is by using the Columns collection and the Column object of the TableView object that is represented by the custom Outlook view. The Column object has a property called RenderUsing that allows you to specify the HTML code to use when rendering that specific column. You specify not only the HTML but also substitution tokens within percent signs in the RenderUsing property, which CDO will replace with actual values when rendering the information to the Web browser. The two most common substitution tokens you will use are %obj% and %value%.
Use the %obj% token when you want to place the unique identifier for the item as a string in your HTML. This token is used in the Helpdesk application so that the hyperlink on the third column passes the unique identifier for the ticket to the next ASP file, framemsg.asp. Use the %value% token when you want to place the actual value of the property into the HTML returned by the rendering object. The Helpdesk application uses this token to display the actual third-column property value in the view. For the Helpdesk view, this property value is the subject of the message. The following code shows you how to use both these substitution tokens as well as the RenderUsing property and Column object:
set objcolumns = objview.Columns set objcolumn = objcolumns.Item(3) 'Change the column renderer so that it renders the subject field 'as an ahref with the entry ID of the message objcolumn.RenderUsing = _ "<a href='framemsg.asp?entryid=%obj%'>%value%</a>" |
The final step in enabling the container renderer is to set the CurrentView property as the custom view just modified by the application. To do this, the application sets the CurrentView property equal to the TableView object we just modified, as shown in the following code:
'Set the current view equal to the view just selected objrenderer.CurrentView = objview |
To actually render the information to HTML and return it to the browser, you must call the Render method on your ContainerRenderer object. The Render method takes four parameters. The first parameter is a Long data type that determines the style that the data should be rendered in. This parameter has two possible values—CdoFolderContents (1) and CdoFolderHierarchy (2):
- CdoFolderContents is used to render the actual contents of the data source and not the child objects.
- CdoFolderHierarchy is used to render child folders for a Folders collection. If you wanted to build an HTML page that displays a folder hierarchy for users to scroll through, you would use the CdoFolderHierarchy style.
The second parameter, which is optional, also is a Long data type and specifies the page number at which rendering should begin. In the CDO Rendering library, you can have CDO automatically break up the content of a data source into data pages so that when the HTML is rendered by the library, the length of the resulting HTML table is not massive. By default, CDO will break the content at every 25 rows in the HTML table. CDO does this to enhance the performance of your application as well as make it easier for your users to read the information. You can change the default number of rows rendered by setting the RowsPerPage property on the ContainerRenderer object.
The third parameter is for internal use only by the CDO Rendering library. You should always pass 0 as the value to it. The final parameter is the Active Server Response object to which you want to send the HTML output from the Render method. This parameter should always be Response if you want to render the information to the browser.
When you have large amounts of information to render, you should be aware that CDO does not automatically generate a way to navigate rows on multiple pages nor will it tell you that there are multiple pages of information you need to render. Therefore, in your application, you must provide navigation elements if the number of rows in the table is larger than the value of the RowsPerPage property. You also must remember which page the user is currently rendering as well as the total number of pages. If the number of help tickets exceeds the RowsPerPage property, the render.asp file for the Helpdesk application will display graphical navigation arrows as well as text indicating the current page of information. When a user clicks on the Next Page or the Previous Page arrows, the current page variable is either incremented or decremented, and this value is sent with the query string. The ASP script retrieves the value and renders the correct content on the page. If there are no previous or next pages, the graphical navigation elements are not displayed. The following code from render.asp handles viewing help tickets on multiple pages:
'Calculate total number of pages intMessageCount = oMsgCol.Count numrows = objrenderer.RowsPerPage intPages = (intMessageCount - 1) \ numrows intPages = intPages + 1 intCurPage = CInt(Request.QueryString("curpage")) if intCurPage > intPages or intCurPage < 1 then 'Initialize it intCurPage = 1 elseif intMessageCount < 1 then intCurPage = 1 end if <% if intCurPage <> 1 then %> <a href= "render.asp?view=<%=requestedview%>&curpage=<%=intCurPage-1%>"> <img src = "left.gif" Align="Middle" border=0 Alt="Previous Page"></a> <% end if %>   Page <%=intCurPage%> of <%=intPages%>  <% if intCurPage <> intPages then %> <a href="render.asp?view=<% response.write requestedview %> &curpage=<%=intCurPage+1%>"> <img src = "right.gif" Align="Middle" border=0 Alt="Next Page"></a> <% end if %> <table border="0" width="65%"> <tr> <td><% objRenderer.Render 1,intCurPage,0,Response %></td> </tr> </table> |
Notice how you can easily calculate the total number of pages you need to render to completely show all the information in your application. Take the number of messages minus 1, integer divide that number by the number of rows per page set for the ContainerRenderer object, and then add 1 to that value. Therefore, if the number of messages is less than or equal to the number of rows per page, the integer division will return 0. This value will be incremented by 1, indicating there is one page of information.
Rendering the Actual Help Ticket
When the technician clicks on one of the hyperlinks in the rendered list of help tickets, the application calls another ASP file, message.asp, to render the actual ticket for the technician, as shown in Figure 12-16. The technician can then view a number of different items for the ticket, resolve the ticket, or schedule a meeting with the customer who submitted the ticket.
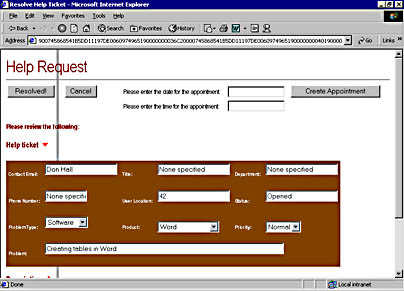
Figure 12-16. The DHTML version of a help ticket rendered when a technician clicks on a hyperlink from a list of tickets.
The Helpdesk application uses DHTML to simplify navigating information contained in a ticket. It also uses ADO and queries an Access database to pull out the relevant information about the user's machine. This portion of the application shows you how you can combine CDO and ADO to make rich Web applications that access information from two types of data sources: Exchange Server and an ODBC database.
In the code for the help ticket page, the EntryID of the help ticket link that the user clicked on is retrieved from the Request.QueryString collection. The script then calls the GetMessage method of the CDO Session object to retrieve the message from the Exchange Server database. The GetMessage method is an easy and fast way to retrieve information from Exchange Server if you know the unique EntryID for the desired message. If you do not know the EntryID, you will need to search the folder where the message is stored or use a MessageFilter object to filter out only your message. The MessageFilter object is discussed in the Calendar of Events application later in this chapter.
The script then sets the Unread property of the message to False and calls the Update method of the Message object to save that property back to the database. Since CDO does not automatically update the Unread property for you, you must set it in code. After the code sets Unread, when the technician goes back to the table of tickets in the folder, the code displays all messages read by the technician as nonbold tickets. This functionality of not bolding read messages is automatically provided to you by the Rendering objects and ultimately makes your application easier to use. Also, the Exchange Server database maintains a per-user Unread property so that each technician will receive different read and unread messages in the folder according to what each has actually read. The VBScript code for this functionality is shown here:
'Get the EntryID for the message from the query string set objMessageID = Request.QueryString("entryid") 'Get the message by its ID set oMessage = objOMSession.GetMessage(objMessageID, _ Session("InfoStoreID")) 'Set the message as read oMessage.Unread = FALSE 'Update the message in the folder oMessage.Update |
The application then pulls out the status of the ticket, either Opened or Done, and also the name of the user who submitted the ticket. An ADO Connection object is created, and a connection to the Access database is established by the application. In ADO, you can specify values for the Open method on the Connection object to determine which OLE DB data source you want to open. In this case, the DSN name Helpdesk, which we created earlier on the machine, is passed as the parameter for the Open method. After establishing a connection, three queries are executed against three database tables to figure out the machine configuration for the current user. This is accomplished by using the name of the user retrieved from the help ticket. These queries use the Execute method of the ADO Connection object. This information is then used later in the form. The following code shows the ADO connection and queries. (For more information about ADO and its object library, you should visit the Microsoft Web site at http://www.microsoft.com/data.)
'Start the ADO connection on error resume next Set Conn = Server.CreateObject("ADODB.Connection") Conn.Open "Helpdesk" Set RS = Conn.Execute( _ "Select SystemChipType, SystemChipSpeed, SystemChipCount, " & _ "SystemOS, SystemRAM FROM tblMachine " & _ "WHERE Userid like '" & objuser & "';") Set RSIP = Conn.Execute( _ "Select CompName, IPAddress FROM tblNetwork " & _ "WHERE Userid like '" & objuser & "';") Set RSSoft = Conn.Execute( _ "Select SoftwareName, SoftwareVersion FROM tblSoftware " & _ "WHERE Userid like '" & objuser &"';") |
The script retrieves the user information from the Exchange Server directory and stores it in variables. (You saw this code earlier when submitting a help ticket.) Then the body of the actual ticket is displayed using DHTML. The DHTML code includes some JavaScript to allow the user to dynamically expand or collapse the different sections of the help ticket, such as system information or the description of the problem.
Creating the Calendar Information
The one interesting section in the body of the HTML is the drop-down section of calendaring information, shown in Figure 12-17. This drop-down section allows technicians to view the free/busy information for the user and for themselves. By providing the free/busy information at the bottom of the help ticket page, a technician can quickly find time slots that are open for both the technician and the user.
NOTE
To obtain up-to-the-minute calendar information for a user on the Help Request page, it might be necessary to adjust the calendar settings in Outlook. By default, Outlook updates the calendar free/busy information on the server every 15 minutes. You can decrease this time in Outlook by choosing Options from the Tools menu, clicking Calendar Options, and then clicking Free/Busy Options.
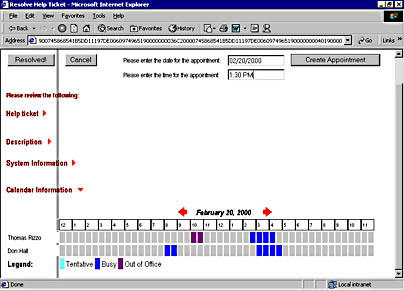
Figure 12-17. The help ticket showing the calendar information.
This calendar information is created by using the calendaring functionality of the CDO library. The code for the drop-down section is shown here:
<% bcGrayM = "#c0c0c0" 'gray bcGrayD = "#909090" buildmonth = Request.QueryString("m") buildday = Request.QueryString("d") buildyear = Request.QueryString("y") builddate = buildmonth & "/" & buildday & "/" & buildyear dtCurrentDay = DateValue(builddate) arrBGColors= _ Array(bcGrayM, "#99ccff", "#0000ff", "#940080", "#ff0000") Dim MeetingPlanner(2) %> <B><FONT STYLE="ARIAL NARROW" SIZE=3><SPAN style="cursor:hand" CLASS=ex TITLE="Calendar Information" ID="CalInfo" onclick="checkExpand()" myArrow=4>Calendar Information </SPAN></FONT></B> <IMG WIDTH=15 HEIGHT=13 SRC="addarrow.gif" ID="imgArrow4"><P> <TABLE ID = "CalInfoChild" style="display:none" BORDER = 0> <TR> <td nowrap=nowrap width="355" align="right"> <A href="message.asp?entryid=<%response.write objMessageID%> &m=<%=Month(dtCurrentDay-1)%>&d=<%=Day(dtCurrentDay-1)%> &y=<%=Year(dtCurrentDay-1)%>" target="main"> <img src="left.gif" border=0 alt="Previous Day"></a></td> <td nowrap=nowrap width="10"></TD> <td nowrap=nowrap border=0><i><b> <%=MonthName(Month(dtCurrentDay)) & " " & Day(dtCurrentDay) & _ ", " & Year(dtCurrentDay)%></b></i></TD> <td nowrap=nowrap border=0 width="10"></td> <td nowrap=nowrap width="20" align="right"> <A href="message.asp?entryid=<%response.write objMessageID%> &m=<%=Month(dtCurrentDay+1)%>&d=<%=Day(dtCurrentDay+1)%> &y=<%=Year(dtCurrentDay+1)%>" target="main"> <img src="right.gif" border=0 alt="Next Day"></a></td> </Table> <table ID = "CalInfoChild2" style="display:none" cols=50 bordercolor=#FFFFFF border=1 cellspacing=0 cellpadding=0> <tr> <td nowrap=nowrap width="102"> <td colspan=2> </td> <% For idx = 0 to 23 %> <td bordercolor=#000000 colspan=2 align=left width="24"> <font size=-2%> <%= CStr((((idx + 11) Mod 12) + 1))%> </font></td> <% Next %> </tr> </TABLE> <% 'Loop from 3 to 4 for x = 3 to 4 if x = 3 then set objRecip = objOMSession.CurrentUser else set objRecip = objonerecip end if 'Initialize the string aFB = "" aFB = objRecip.GetFreeBusy( dtCurrentDay, dtCurrentDay+1, _ 30, true) szFreeBusy = aFB %> <table ID = "CalInfoChild<%=x%>" style="display:none" Border=0> <tr bordercolor=#000000> <td nowrap=nowrap bgcolor="#ffffff" width="100"><font size=-1> <%= objRecip.Name %><br></font></td> <% if Len(szFreeBusy) = 0 then %> <TD><font size=2>Free/Busy Information is not available </font></TD> <% else For idy = 1 to 48 sCell= Mid( szFreeBusy, idy, 1) %> <td bgcolor=<%= arrBGColors(CInt(sCell)) %> width="9"> </td> <% Next end if Next %> </table> <TABLE ID="CalInfoChild5" style="display:none" border=0> <TR> <td nowrap=nowrap width="100"><b>Legend:</b></TD> <TD bgcolor=<%= arrBGColors(1) %>> </TD> <TD> Tentative </TD> <TD bgcolor=<%= arrBGColors(2) %>> </TD> <TD> Busy </TD> <TD bgcolor=<%= arrBGColors(3) %>> </TD> <TD> Out of Office </TD> </TABLE> |
First the code tries to retrieve, from the query string, the day, the month, and the year values passed by the application. When the user first clicks on a hyperlink from the list of help tickets, these date values are filled with the current day, month, and year from the Web server machine. The code then builds a date from the values, such as 10/12/2000. This is done so that the string containing the date value can be used as a parameter to the DateValue function in VBScript. This function will return a Variant of the subtype Date so that we can use it in the rest of the code.
The application then builds an array of information. This array, named arrBGColors, comprises background colors used to render the free/busy information to the Web browser. These colors correspond to the Outlook colors for rendering calendar information, such as blue for busy slots, light blue for tentative slots, and purple for out-of-office slots in the calendar. You'll understand why we place these colors into an array when we look at the GetFreeBusy method in CDO, and see how the values are returned from this method and parsed by the application.
The next step in the code is to render the navigation elements to move to the previous or next day in the calendar and also to print out the current day the technician is viewing. The navigation elements to move to the next and previous days are implemented using hyperlinks, which pass the next or previous date, broken up into day, month, and year, across the query string to message.asp. To retrieve the day, month, and year from the dtCurrentDay variable, which has the form 12/31/2000, the VBScript functions Day, Month, and Year are used.
The code then uses a For…Next loop from 0 through 23 to draw a table that creates the time values across the top of the free/busy information. Starting at 12 am, this code draws table elements until 11:30 pm the same day. Adding 11 to the current index of the loop, using the Mod operator to return the remainder when divided by 12, and then adding 1 to that value produces the correct identifiers for the time slots. The code uses the CStr function to convert the number returned by the formula to a string value.
The next portion of the code uses the calendaring features of CDO. Figure 12-18 shows some of the calendar-related objects in the CDO library. The CDO library provides extensive support for building calendaring applications: the Helpdesk application shows how to use the GetFreeBusy method and the meeting request functionality of CDO, and the Calendar of Events application, which we'll examine later in this chapter, shows appointment filtering and rendering of calendars using the Rendering library.
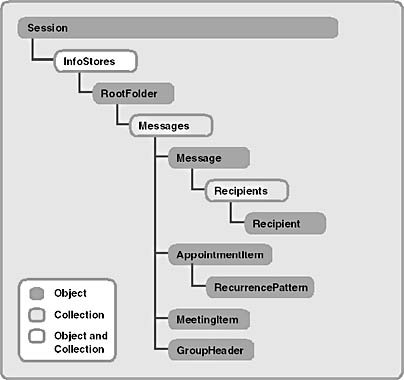
Figure 12-18. The calendar-related objects of the CDO library.
A For…Next loop is used to loop through the code twice. The loop starts at the number 3 and continues through the number 4. The loop does not start at the number 1 because the index of the loop is used to create unique <DIV> elements in the HTML code so that the JavaScript checkExpand function can find the tables using them. Since this code is fairly generic, you can use it in other applications that render tens or hundreds of blocks of free/busy information for users rather than blocks for only two users. All you need to do is change the ending point of the loop and pass in the targeted users' free/busy information as an array of names.
The code uses the GetFreeBusy method of the CDO Recipient object to return the free/busy calendaring information for the current user, which is retrieved using the CurrentUser property on the CDO Session object, and the name of the person who submitted the help ticket, which is stored in the Recipient object named objonerecip. The GetFreeBusy method in CDO is exactly the same as the GetFreeBusy method in the Outlook object library. You need to pass these four parameters to this method:
- The start time of the first slot you want to retrieve.
- The end time of the last slot you want to retrieve.
- The interval, in minutes, of each of the slots.
- A Boolean specifying whether you want to have CDO return full formatting for the slots. Full formatting will inform you of the exact nature of busy slots: CdoFree (0), CdoTentative (1), CdoBusy (2), or CdoOutOfOffice (3). If you do not enable full formatting, CDO will return 0 for free and 1 for busy.
For GetFreeBusy, CDO will return the most committed value in the time slots. This means that if a user has overlapping appointments in the slot and one is tentative and the other is out-of-office, CDO will return the out-of-office value. CDO will not return "free" for time slots unless the entire time slot is free. Be careful when working with free/busy information far beyond the current date. By default, free/busy information is published only two months past the current date. If you query beyond the published information for free/busy, CDO will return free slots even though the user might have appointments during those slots. You can ask your Outlook users to change the number of months to a maximum of 12 months past the current date for free/busy information if you need longer term information. They can change this number of months in Outlook by selecting Options from the Tools menu, clicking Calendar Options, and clicking Free/Busy Options.
The return value for this method returns a string of numbers that correspond to the free/busy status of the user for all the time slots you specified. Your code must then parse the string and make a graphical representation of this information in your application.
The Helpdesk application parses this string by first looking at the length to make sure it's not zero, which would mean there is no free/busy information for the user. It then uses a For…Next loop and the VBScript Mid function to retrieve each character from the string and display the free/busy status for the user in an HTML table. Notice in the code that the value from the retrieved free/busy status interval is used as an index for the arrBGColors array of colors we created earlier: CdoFree (0) will display light gray, CdoTentative (1) will display light blue, CdoBusy (2) will display blue, and CdoOutOfOffice (3) will display purple. The For…Next loop ranges from 1 through 48 because we specified 30 minutes as the interval for the time slots in the call to the GetFreeBusy method. If you calculate the number of 30-minute intervals from 12 am to 11:30 pm, the result turns out to be 48.
Creating a Meeting with the User
Once a technician finds time slots in the Calendar Information section of a help ticket that are open for both the technician and the user, the technician can schedule a meeting with the user to troubleshoot on site. The technician can schedule a meeting by first typing the date and the time for the appointment in the text boxes provided at the top of the help ticket, as shown in Figure 12-19.
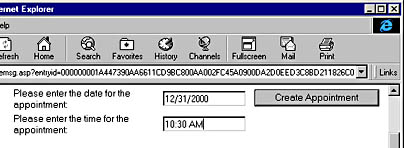
Figure 12-19. The help ticket with the date and time for an appointment filled in. Technicians can automatically schedule meetings with users to troubleshoot their machines on site.
When a technician types in a date and a time and then clicks Create Appointment, createcal.asp is called by the application to create the actual meeting request, as shown in this code:
<% 'Convert the passed-in date to a vbDate set querydate = Request.Form("Date") apptdate = CDate(querydate) set querytime = Request.Form("Time") appttime = TimeValue(querytime) compdatime = apptdate & " " & appttime compdatime = CDate(compdatime) 'Add a new message to the user's calendar Set calfolder = objOMSession.GetDefaultFolder(0) set CalRequest = calfolder.messages.add 'Set the message properties CalRequest.Subject = oMessage.Subject CalRequest.StartTime = compdatime CalRequest.EndTime = DateAdd("n", 90, CalRequest.StartTime) CalRequest.Location = myoffice CalRequest.ResponseRequested = TRUE set meetingrecip = CalRequest.Recipients.Add meetingrecip.Name = objUser meetingrecip.Resolve CalRequest.ReminderSet = True CalRequest.ReminderMinutesBeforeStart = 30 CalRequest.MeetingStatus = 1 CalRequest.Send if err.number = 0 then response.write "<SCRIPT LANGUAGE = 'JavaScript'>" response.write "window.alert('Meeting successfully created!');" response.write "</SCRIPT>" else response.write "<SCRIPT LANGUAGE = 'JavaScript'>" response.write "window.alert('Error: " & err.number & " " & err.description &"');" response.write "</SCRIPT>" end if %> |
First the code converts the passed-in date to a Date data type and the passed-in time to a Date. Then it combines the two and converts the results to a Date so that the date can be passed to the CDO property StartTime to indicate the start time of the appointment. The code uses the GetDefaultFolder method of the CDO Session object to retrieve the calendar folder of the technician. The GetDefaultFolder method in CDO is similar to the GetDefaultFolder method in the Outlook object library, but be careful when using them because the values for the constants that represent the folders are different in the two libraries.
By using the Add method on the Messages collection in the calendar folder, CDO automatically adds a new AppointmentItem object to the collection. The code then sets the properties for this new AppointmentItem object to turn it into a MeetingItem object, which will be sent to the user.
To create a meeting request in CDO, you need to set some specific properties on the AppointmentItem object to turn it into a MeetingItem object. First you need to add some recipients to the inherited Message object by creating a Recipient object in the Recipients collection. In the Helpdesk, the name of the person who submitted the help ticket is added and resolved against the address book as a recipient for the MeetingItem object.
Then you need to set the MeetingStatus property to CdoMeeting (1) for the AppointmentItem object you created. By setting this property, the current user, who is the technician, is set as the meeting organizer in the Organizer property. The MeetingStatus property can take other values as well:
- CdoNonMeeting (0) is the default and tells CDO that the appointment being organized is a regular appointment and does not represent a meeting.
- CdoMeetingCanceled (5) indicates that the meeting organizer has canceled the meeting.
Although the capability to cancel a meeting is not used in the Helpdesk application, here is some information about it. When canceling a meeting, call the Send method again on the object to send the cancellation to all attendees. Also, make sure you set the object that holds the meeting to Nothing. If you are the organizer of the canceled meeting and Outlook is the main calendar store for your users, you also need to call the Delete method on the Message object that is the parent of the MeetingItem object you just canceled. If you do not do this, you might get unexpected results when working with the folder and its contents in the future.
You should also set the ResponseRequested property. This property takes a Boolean that tells CDO whether the meeting organizer wants responses to the meeting request. You should set this property to False only if you want to send out an FYI meeting request, which adds the item in a user's calendar, but does not need to track whether the user has accepted or rejected the item. For example, you would set the property to False if you sent out meeting requests for all the holidays in a year but did not actually care which holidays your users decided to take off.
The preceding script sets some general properties for the appointment item such as the Subject, which is the problem contained in the ticket. It also sets the StartTime and EndTime properties of the appointment so that the EndTime is 90 minutes after the StartTime. The Location property is set to the office location for the user, which is pulled from the Exchange Server directory. The ReminderSet and ReminderMinutesBeforeStart properties are also set to True and 30 minutes before the appointment starts to make sure both parties are aware that they need to meet.
The final step when you create any meeting request is to call the Send method on the MeetingItem object, which sends the request to the recipients you invited to the meeting. If any of the properties you set are incorrect or empty, CDO will return an error after calling Send. For this reason, the code checks the Err object in VBScript. Depending on whether or not an error occurred, the JavaScript client code will display a success message or an error message. Figure 12-20 shows the success message. If a property is empty, such as the Office property for an Exchange user, the error message "Error 448: Named argument not found" is displayed.

Figure 12-20. A JavaScript alert box indicating that the technician successfully created a meeting with the user in the help ticket.
After the meeting request is sent, the user can use any client to accept or decline the meeting request. You can even send meeting requests to users over the Internet, and as long as they are using Outlook or OWA, they can view and accept or decline meeting requests. You will not, however, be able to view the free/busy information of users on different systems. Figure 12-21 shows the scheduled meeting in the user's Outlook calendar.
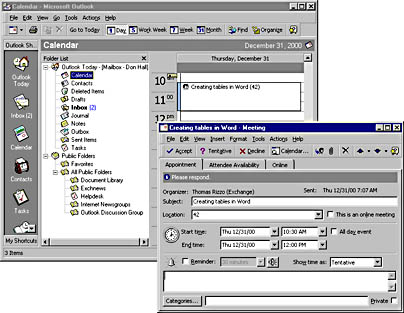
Figure 12-21. A meeting scheduled by a technician using the Helpdesk application.
Resolving the Help Ticket
The technician can mark a help ticket as resolved. Resolving a help ticket consists of setting the status of the ticket as Done and sending an e-mail message to the user who submitted the ticket explaining that the issue has been resolved. The code that resolves the help ticket is resolved.asp. This code shows you how to update fields on a message and also how to send e-mail messages using the CDO library:
<% if InStr(Request.Form("Action"), "Resol") then set objFolder = Session("HelpdeskFolder") set recursefolder = objFolder set objMessageID = Request.QueryString("entryid") set oMessage = objOMSession.GetMessage(objMessageID, _ Session("InfoStoreID")) 'Retrieve the message flag and set it set msgstatus = oMessage.Fields("Flag") msgstatusid = msgstatus.ID oMessage.Fields(msgstatusid) = "Done" oMessage.Update 'Send a resolved message to the user stating that the 'problem was resolved Set objNewMsg = objOMSession.outbox.messages.add objNewMsg.Text = "Your problem: " & oMessage.Subject & _ " was resolved on " & Now & chr(10) & chr(10) & _ "Please see the helpdesk FAQ at " & _ "http://exserver/faq/ for commonly asked questions." objNewMsg.Subject = "Resolved: " & oMessage.Subject Set objonerecip = objNewMsg.recipients.add objonerecip.Name = oMessage.Fields("From User") objonerecip.Resolve 'Send the message without showing a dialog box objNewMsg.Send showDialog=False end if %> |
The script retrieves the help ticket from the folder. Then it uses the Add method on the Messages collection to add a new message to the Outbox of the technician. The script sets the message text by using the Text property of the Message object. The Text property can contain only plain text. It does not support formatted text.
The code then sets the Subject of the message and adds recipients to the Recipients collection. The recipient for this message is the user who submitted the ticket. The code uses the Resolve method of the Message object to make sure that there are no ambiguous recipients on the message. Finally, it calls the Send method to send the message to the user. Figure 12-22 shows a sample of the e-mail received by the user.
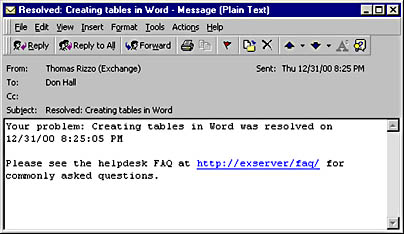
Figure 12-22. An e-mail message, sent to the user by the technician, indicating the problem has been solved.
EAN: 2147483647
Pages: 184