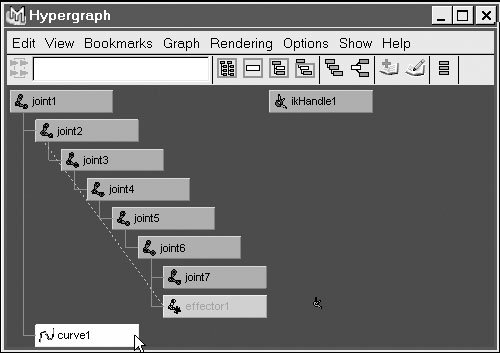
Understanding the Hypergraph and Skeletons When you're creating characters, the Hypergraph plays an important role in hierarchy order and selection. It's the best tool Maya offers to help you understand the way hierarchies are formed as well as how Maya's various elements relate to one another. The Hypergraph provides two layout options: Freeform and Automatic (the default). If you choose the Automatic option, Maya lays out the Hypergraph for you, with the root node at the top of the hierarchy and each child indented below its parent with a line connecting child and parent. In addition, nodes are locked in place so that the hierarchies remain visually consistent and organized. In contrast, if you select Freeform from the Options > Layout menu, you can move the nodes around and organize them to your liking. In addition, you can import an image of your character into the background of the Hypergraph so that you can align its joints to their proper positions on top of the image, making it much easier to select individual joints. In a simple hierarchy, this may not be necessary; but when you have hundreds of joints and surfaces, selection can become cumbersome without this aid. The Hypergraph displays each of your joints with a blue joint icon  . When a single joint is selected in the view pane, all of its children are highlighted to indicate their relationship to the selected joint. As children of the joint, they are affected if the selected joint is rotated. Be aware that although the children are highlighted in the view pane, they haven't been individually selected. . When a single joint is selected in the view pane, all of its children are highlighted to indicate their relationship to the selected joint. As children of the joint, they are affected if the selected joint is rotated. Be aware that although the children are highlighted in the view pane, they haven't been individually selected. Select a joint, and open the Hypergraph. The joint you clicked is selected (yellow), but the joints underneath it (its children) aren't. Because the parent is selected, the children will follow. If, in the Hypergraph, you  -select the children and then rotate the joints, each joint will rotate. Although you'll rarely select joints in this fashion, it's important to understand what is and isn't selected in a hierarchy. -select the children and then rotate the joints, each joint will rotate. Although you'll rarely select joints in this fashion, it's important to understand what is and isn't selected in a hierarchy. You can move joints from one hierarchy to another or disconnect them from a hierarchyall from within the Hypergraph. You use the middle mouse button to move joints in and out of hierarchies. To move a joint (and its children) into another hierarchy, drag the joint (using the middle mouse button) onto the node you want to serve as its parent. Once you do this, the selected node (and its children) is connected to the new hierarchy. To remove a joint (and its children) from a hierarchy, select its node with the middle mouse button, and drag it away from the hierarchy (releasing the mouse when the node has been moved away from the hierarchy). This technique also works well for removing objects from a group within the Hypergraph. | 
 Tips
Tips