| Maya provides multiple tools for moving, rotating, and scaling objects and components. The Universal Manipulator tool, new in Maya 7, can perform all of these operations at once, which can be helpful when an object requires all three transformations. We'll discuss the Universal Manipulator tool in more detail later in this chapter. Each of these tools, including the Universal Manipulator tool, has axes that you can grab and move to transform an object. These axes, called manipulators (Figure 4.3), let you translate (move), rotate, or scale the object. Manipulators make it easy to constrain objects along a particular axis: You click and drag the colored line for the axis along which you want to constrain the object. The colors remain consistent for each tool. RGB colors coincide with the x-y-z axes (Figure 4.4): The manipulator's x axis is red, the y axis is green, and the z axis is blue. If you forget an axis's color, check the View axis in the lower left-hand corner of each pane or the View Compass at upper right (Figure 4.5). The axis selected on the manipulator is always yellow. Figure 4.3. The Move, Rotate, and Scale manipulators. 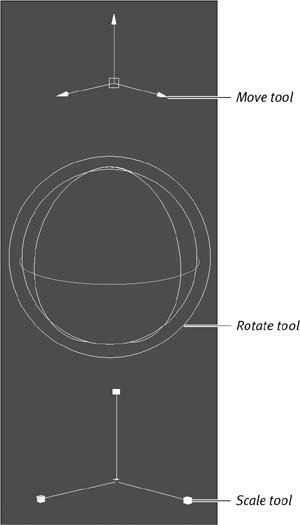
Figure 4.4. RGB colors match the xyz axes. 
Figure 4.5. Check the View axis in the lower-left corner of each pane to remind yourself which color is associated with each axis. 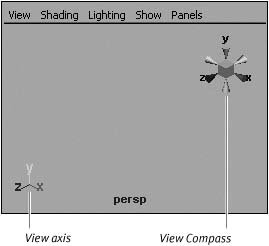
In addition to constraining an object along an axis, you can freely manipulate the object by clicking and dragging the square in the middle of the Move, Scale, and Universal Manipulator tools (Figure 4.6), or by clicking and dragging anywhere inside the Rotate manipulator. Figure 4.6. The Universal Manipulator combines the common functions of the Move, Scale, and Rotate tools. 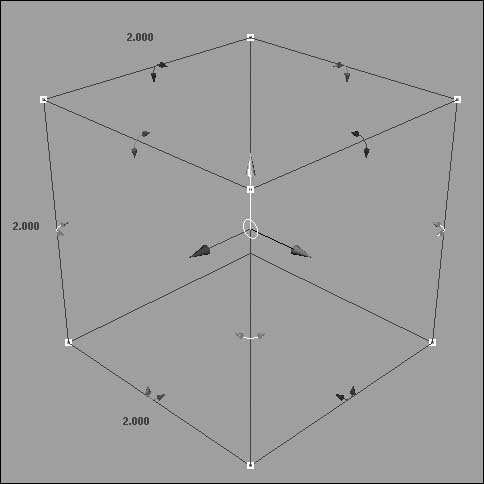
To get precise results, you can also use the Channel Box for numerical entry. The Channel Box allows direct access to any of the attributes (translation axis, rotation axis, and scale values) that the translation tools affect. Each of the tools in the toolbarwith the exception of the Lasso tool, the Soft Modification tool, and the Universal Manipulatorhas an associated shortcut that coincides with qwerty keys on the keyboard. You can press a tool's key (or, in the case of the Universal Manipulator, the key combination) to turn on its manipulator. The shortcut keys and the manipulators they turn on are as follows (Figure 4.7): Figure 4.7. The manipulation tools and their shortcut keys. 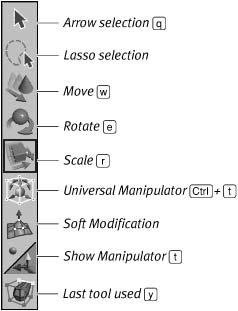
 Arrow selection tool Arrow selection tool
 Move tool Move tool
 Rotate tool Rotate tool
 Scale tool Scale tool
 Universal Manipulator Universal Manipulator
 Show Manipulator Show Manipulator
 Last tool used Last tool used
 Tips Tips
Be aware that these keys won't work if the Caps Lock key is on. Maya is case sensitive: Capitals represent different hotkeys with different functions mapped to them. For example, the Move, Rotate, and Scale tools' associated keyboard shortcuts are , , and , respectively. However, when those same keyboard letters are capitalized, they set an animation keyframe on the translation, rotation, or scale channels instead (keyframes are discussed in Chapter 12).
To translate an object or component using the Move tool: 1. | Select an object or component by clicking it.
| 2. | Press or click the Move tool icon  in the toolbar. in the toolbar.
The Move manipulator becomes visible on the object or component (Figure 4.8).
Figure 4.8. The Move manipulator is used to move the object around the scene. 
| | | 3. | Click and drag the manipulator's arrow in the direction you want the object to move (Figure 4.9).
Figure 4.9. Click and drag the axis to which you want the object constrained so that you can maintain precise control over the surface's position. This is particularly useful in the Perspective view. 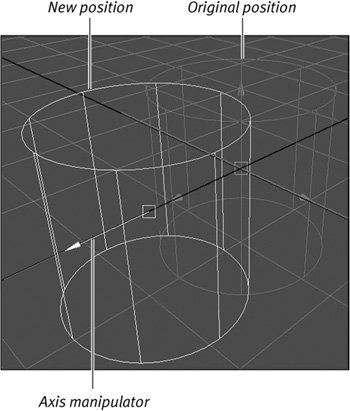
This action translates the object along the selected axis.
or
Hold down  , and then, with the middle mouse button, click and drag in the direction you want the object to move (Figure 4.10). , and then, with the middle mouse button, click and drag in the direction you want the object to move (Figure 4.10).
Figure 4.10. By holding down and dragging with the middle mouse button, you can move an object without using the manipulator handles. 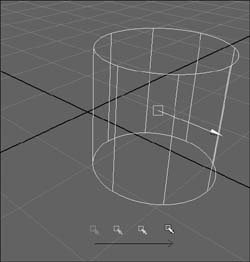
This action selects the appropriate manipulator axis and translates the object in that direction. This is particularly useful if you've created an object at the origin but moved the camera away from the grid. You can pull the object into your camera view if you know the direction of the origin.
or
To translate the object freely, click and drag the center of the manipulator, and the motion will not be constrained on any axis.
|
Tips You'll usually want to avoid using free translations for large adjustments in the Perspective view. The nature of the view can lead to translations in unwanted directions. You can also hold down  to activate grid snap. In addition, if you drag with the middle mouse button anywhere on the grid, the object snaps to that location. to activate grid snap. In addition, if you drag with the middle mouse button anywhere on the grid, the object snaps to that location. You can use the  and and  keys to enlarge or shrink the manipulators. keys to enlarge or shrink the manipulators. From anywhere in a view pane, you can hold down the keyboard shortcut for the Move (), Rotate (), or Scale () tool and click to bring up that tool's marking menu (Figure 4.11). Maya's Transform marking menus include shortcuts to many of the tools' options. Figure 4.11. The Scale tool's marking menu includes shortcuts for scaling proportionally and changing the pivot options for components. 
To scale an object or component using the Scale tool: 1. | Select an object or component by clicking it.
| 2. | Press , or click the Scale tool icon  in the toolbar. in the toolbar.
The Scale manipulator becomes visible on the object or component (Figure 4.12).
Figure 4.12. You use the Scale tool's manipulator to scale an object proportionally or along a single axis. 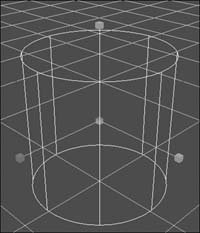
| 3. | Click the small square of the axis on which you want to scale the object or component, and drag in the direction you want the object to scale (Figure 4.13).
Figure 4.13. Click and drag a Scale tool's axis to scale an object along a particular axis. 
or
While pressing , click and drag with the middle mouse button anywhere in the pane in the direction in which you want the object to scale (Figure 4.14).
Figure 4.14. This cylinder is being scaled along the x axis by shift clicking and dragging with the middle mouse button. 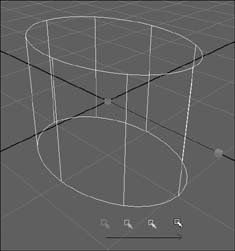
This action selects the appropriate manipulator axis and scales the object in that direction.
|
To rotate an object or component using the Rotate tool: 1. | Select an object or component by clicking it.
| 2. | Press or click the Rotate tool icon  in the toolbar. in the toolbar.
The Rotate manipulator becomes visible on the object or component (Figure 4.15).
Figure 4.15. The Rotate manipulator is used to rotate the surface on one or more axes. 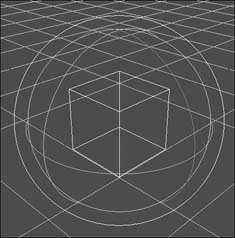
| 3. | Click the circle of the axis around which you want to rotate the object or component, and drag in the direction you want the object to rotate (Figure 4.16).
Figure 4.16. Click and drag the axis circle to which you want the object constrained. A gray pie slice shows you how many degrees you have rotated the object. 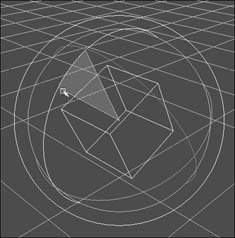
|
Tips You can click anywhere within the Rotate manipulator sphere, and click and drag to rotate the object without being constrained to any axis. Once the axis you want to use is yellow on the manipulator, you can click and drag anywhere in the pane with the middle mouse button to rotate the object around that axis without touching the axis or the object. The light blue outer ring rotates the object or component around an axis that always faces the camera view (Figure 4.17). Figure 4.17. The light-blue outer ring rotates the object or component in the view plane. 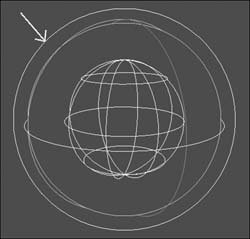
To translate, rotate, or scale an object or component using the Channel Box: 1. | Click an object or component to select it.
| 2. | In the Channel Box, click once in the field next to the attribute you want to change (Figure 4.18).
Figure 4.18. Click the field name of the attribute you want to change (in this case, Translate X). 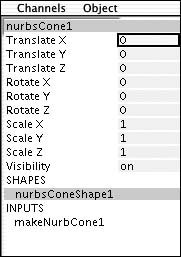
| 3. | Type a new value in the selected field.
The object reflects the value change (Figures 4.19).
Figure 4.19. Changing the Translate X value to 3 moves the cone three units in the positive x direction. 
or
Click to select the attribute's name, and then move the mouse over a view pane. Hold down the middle mouse button, and drag left or right to interactively change the value of the selected attribute (Figure 4.20).
Figure 4.20. You can use the middle mouse button to interactively change values anywhere in a pane. 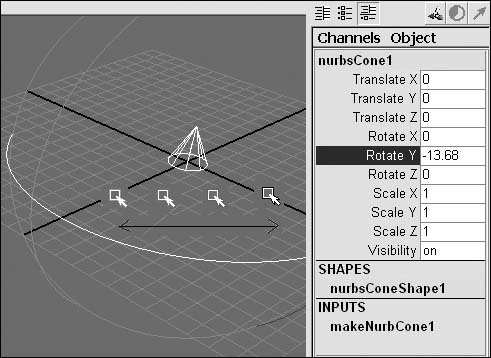
|
Using the Universal Manipulator The Universal Manipulator provides easy access to three transformations in one tool (Figure 4.21). It can be used to enter in exact values without using the Channel Box, and also enables you to quickly perform these operations around different temporary center points. Figure 4.21. The Universal Manipulator combines many functions for quick manipulation. It's a great time saver for performing common transformations. 
The Universal Manipulator also provides real-time information about how far you have translated or rotated an object (Figure 4.22). Figure 4.22. Using the translation axis displays a color-coded triangle showing exactly how far you have moved your object along each axis. 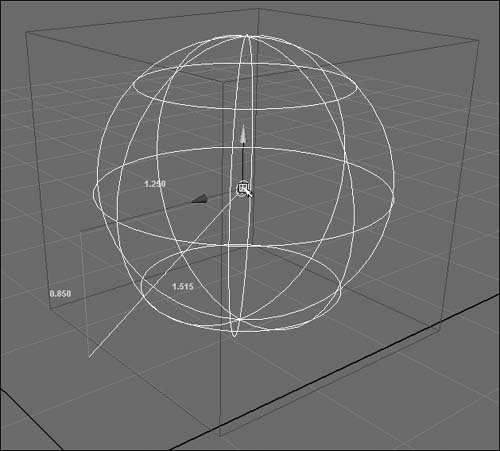
The Universal Manipulator does have its limits. For instance, it can't rotate freely in all directions, and you can't use it to manipulate components, only objects. To translate an object using the Universal Manipulator: 1. | Select an object or component by clicking it.
| 2. | Press , or click the Universal Manipulator tool icon  . .
The Universal Manipulator becomes visible on the object or component (Figure 4.23).
Figure 4.23. The Universal Manipulator shows a bounding box around your object. 
| 3. | Click the axis you want to translate, and drag the mouse to translate in that direction.
or
Click the center circle, and drag the mouse to translate the object freely.
or
Click once on the tip of the translation axis, and enter a numerical value in the box that appears (Figure 4.24).
Figure 4.24. Entering in a precise value saves a trip to the Channel Box. 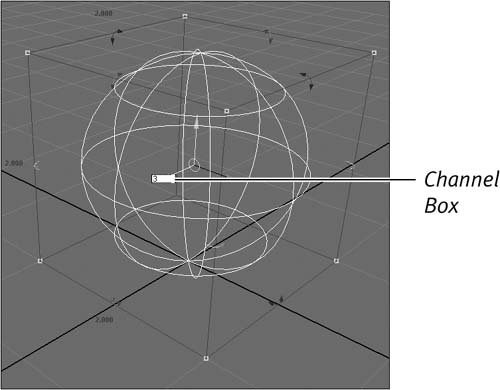
|
To rotate an object using the Universal Manipulator: 1. | Select an object or component by clicking it.
| 2. | Press , or click the Universal Manipulator tool icon .
| 3. | Click the arrow corresponding to the axis you want to translate, and drag the mouse to rotate on that axis (Figure 4.25).
Figure 4.25. When you're rotating an object on an axis using the Universal Manipulator, the length (in degrees) of the rotation will be displayed near the rotation handle. 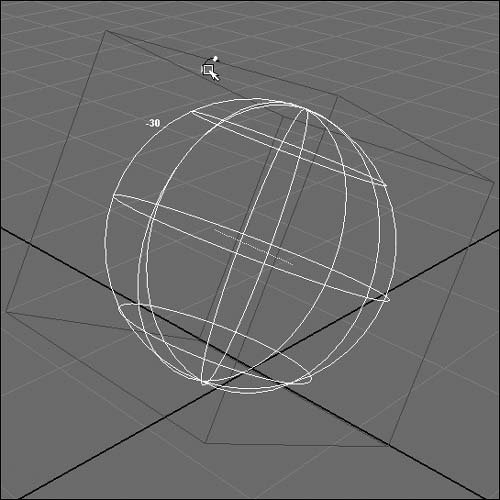
or
Click once on a rotation arrow, and enter a numerical value in the box that appears.
|
To scale an object using the Universal Manipulator: 1. | Select an object or component by clicking it.
| 2. | Press , or click the Universal Manipulator tool icon in the toolbar.
| 3. | Click a vertex of the bounding box, and drag to scale the object universally (Figure 4.26).
Figure 4.26. Scaling with the bounding box scales to the opposite corner of the one you've selected. 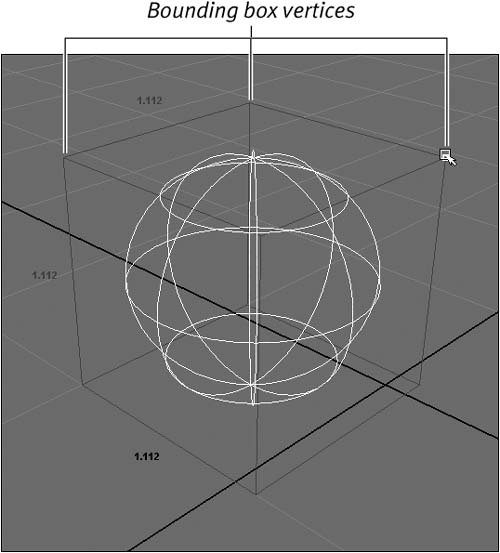
Note that the Universal Manipulator uses the opposite corner from the one you've selected as the center point for the scale. This means that it will scale towards the opposite corner instead of the center of the object
or
Click one of the size numbers, and enter a numerical value.
|
Tips To restrict scaling to one axis, hold  and move the mouse in the direction of that axis (Figure 4.27), or click a size number and enter in a value. and move the mouse in the direction of that axis (Figure 4.27), or click a size number and enter in a value. Figure 4.27. Using allows scaling on an axis instead of to a corner. 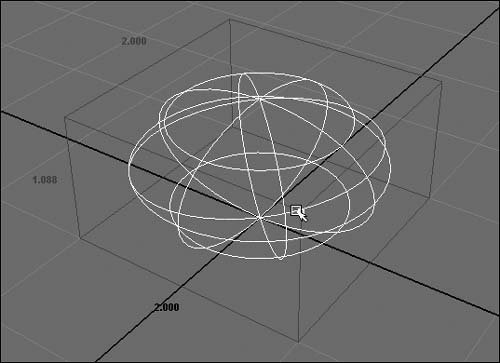 Pressing when performing scale operations performs them from the center of the object rather than a corner or side. Pressing when rotating the object using the Universal Manipulator rotates the object around the bounding box edges. The edge it will use is the one opposite the rotation arrow you chose (Figure 4.28). Figure 4.28. Rotating an object around a corner saves you from having to reposition the pivot point every time. 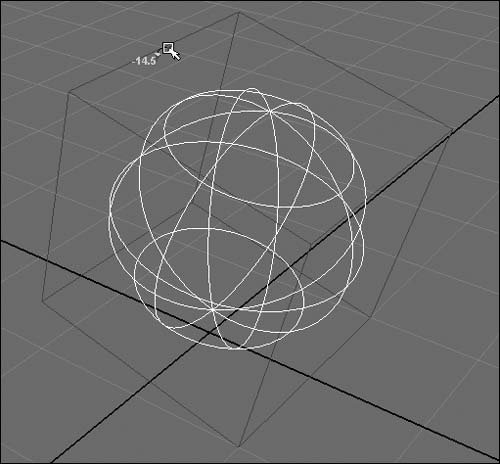
Using the Show Manipulator tool The Show Manipulator tool  lets you access the Inputs node of an object (known as its construction history) to alter a surface or curve. In other words, the Show Manipulator tool gives you access to certain attributes used in the creation or manipulation of an object that are usually only available in the Channel Box or Attribute Editor (Figure 4.29). lets you access the Inputs node of an object (known as its construction history) to alter a surface or curve. In other words, the Show Manipulator tool gives you access to certain attributes used in the creation or manipulation of an object that are usually only available in the Channel Box or Attribute Editor (Figure 4.29). Figure 4.29. The additional manipulator on the Show Manipulator tool controls additional input attributes, saving you from going to the Channel Box. In this example, the end sweep was changed to less than 360 degrees by moving the circular manipulator. 
The Show Manipulator tool is commonly used to adjust a spotlight or camera. When you use it on a spotlight, the light has three manipulators instead of oneone to move the light; one for the light to point at, which makes adjusting lighting easier; and one represented by a circle with a tick mark, which adjusts the attributes to be manipulated. To aim a spotlight using the Show Manipulator tool: 1. | Select Create > Lights > Spotlight.
| 2. | Click the Show Manipulator icon  in the toolbar. in the toolbar.
The spotlight now has one manipulator at its base and another in front of the light (Figure 4.30).
Figure 4.30. Two manipulators appear, giving you more precise control over what objects the spotlight is pinpointing and the direction in which the light is aimed. 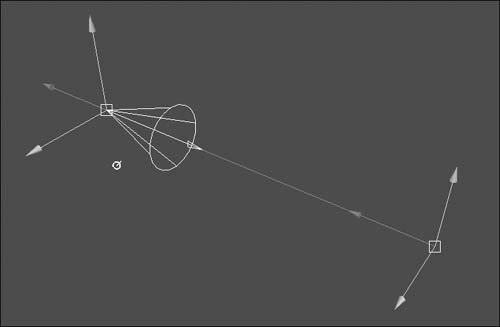
| 3. | Select and move the manipulator at the base of the spotlight (Figure 4.31).
Figure 4.31. Select the manipulator attached to the spotlight to translate the light. 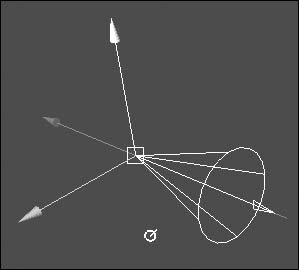
The spotlight moves with the manipulator but continues to point at the second manipulator.
| 4. | Select and move the manipulator in front of the spotlight.
The spotlight remains in place but continues to point at the manipulator (Figure 4.32).
Figure 4.32. Move one manipulator to exercise control over the light or its target. 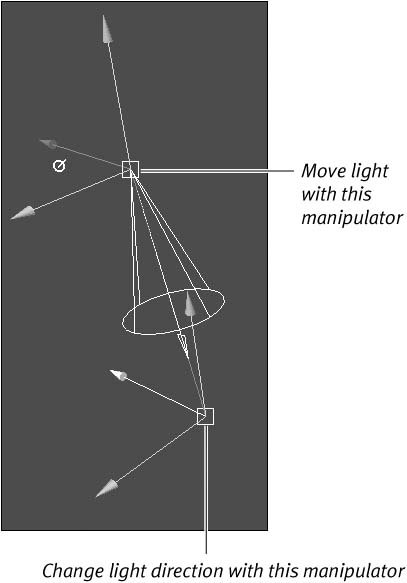
| | | 5. | Click twice on the ring that hovers near the spotlight.
The manipulators change into a ring around the cone of light. Each time you click the ring, it cycles you through some of the cone's input nodes (Figure 4.33).
Figure 4.33. Most objects display a blue ring from which you can access that object's input nodes or attributes interactively. 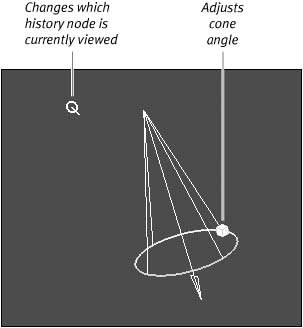
| 6. | Click and drag on the cube atop the circle that surrounds the cone.
The cone angle changes interactively as you drag the mouse (Figure 4.34).
Figure 4.34. The cone angle controls the width of the light beam. 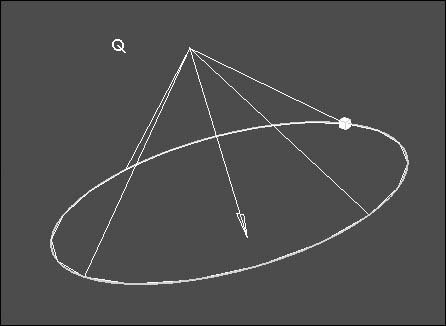
|
|