| Maya gives you a great deal of control over which of its interface elements are displayed. By default, all elements of the interface are displayed, but you may want to hide some or even all of these elements. Doing so can give you more available screen space for your main panel or panels, which may be significant, depending on your monitor size and resolution. It also simplifies Maya's powerful but information-dense default interface, which may be unnecessarily complex for a particular project or for your general work style. The menu bars at the top of Maya's main window and above each panel provide important access to vital tools and functions, and take up only a small amount of space. Even if you choose to hide all UI elements, these menu bars remain visible. However, you can hide (and restore) them if you wish, via the Hotbox. The Hotbox is the only interface element that is hidden by default, since it is intended to be displayed only when you are actively using it. Its menu sets are also unaffected by hiding all UI elements, but can be hidden and shown independently. To hide or show a UI element: - Choose Display > UI Elements, and choose the UI element you would like to hide or show (Figure 2.30).
Each UI element name toggles between hidden and shown. If it's hidden, selecting it shows it, and vice versa.
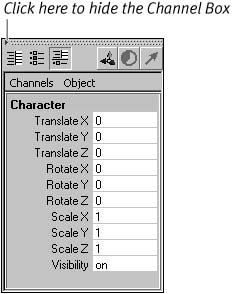
Figure 2.30. You can turn each interface element on and off, allowing you to save screen space when the element isn't needed. 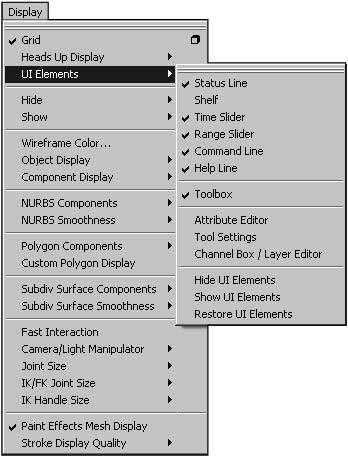
 Tip Tip
To hide all UI elements: - Choose Display > UI Elements > Hide UI Elements.
All elements are hidden except the menu bars and your current panel layout (Figure 2.32).
Figure 2.32. Use the Hide UI Elements command to quickly gain more working space. 
To show all UI elements: - Choose Display > UI Elements > Show UI Elements (Figure 2.33).
Figure 2.33. You can quickly show all interface elements when needed by using the Show UI Elements command. 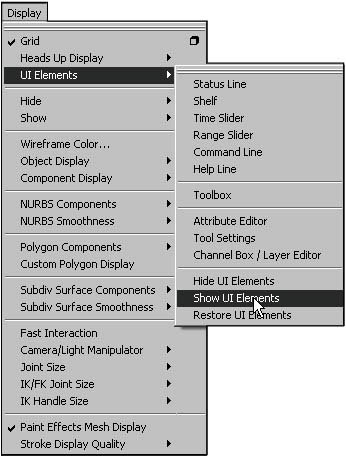
All UI elements are shown.
To hide or show the main menu bar (Windows only): - Hold down the
 anywhere in a panel, and select Hotbox Controls > Window Options > Show Main Menubar (Figure 2.34). anywhere in a panel, and select Hotbox Controls > Window Options > Show Main Menubar (Figure 2.34).
This command toggles the visibility of menu bar on and off. If it's on, selecting this option turns it off, and vice versa.
Figure 2.34. You can turn the main menu bar on and off via the Hotbox. 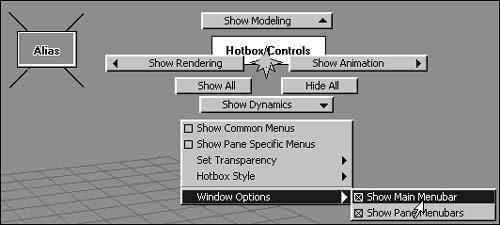
To hide or show the panel menu bars: - From the Hotbox, select Hotbox Controls > Window Options > Show Pane Menubar.
This command toggles the visibility of the menu bars in all of the panels.
To show and hide the Hotbox: 1. | Show the Hotbox by holding down the (Figure 2.35).
Figure 2.35. Holding down the opens the Hotbox. 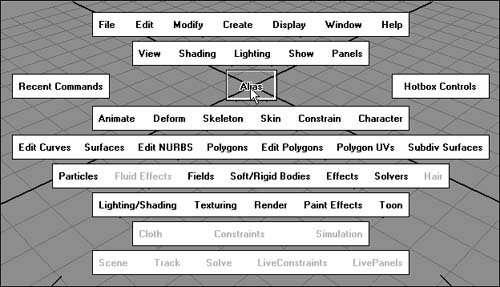
| 2. | Hide the Hotbox by releasing the .
|
To hide and show menu sets in the Hotbox: 1. | Show the Hotbox by holding down the in any panel.
| 2. | Hold down the left mouse button over Hotbox Controls to show the Hotbox Controls marking menu (Figure 2.36).
Figure 2.36. You can hide menus you don't want to access via the Hotbox. 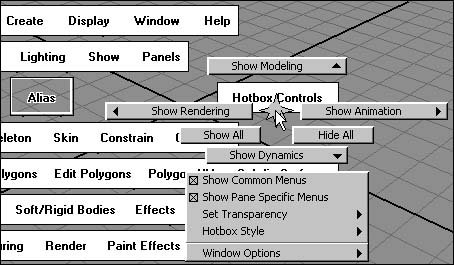
| 3. | Move the mouse over the menu set name you want to show.
An additional marking menu opens (Figure 2.37).
Figure 2.37. You can change the menus that are shown in the Hotbox by using the appropriate marking menu in the Hotbox Controls. 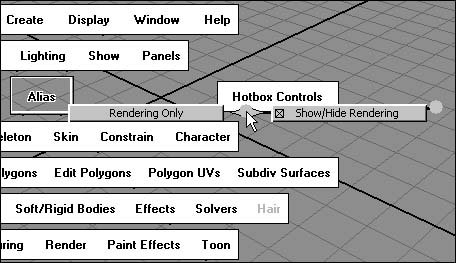
| 4. | Select Show/Hide (menu set name).
The menu set is shown if it was hidden, and vice versa.
|
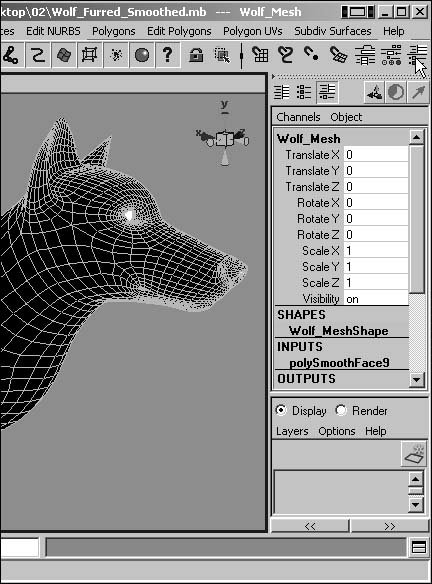
About the Channel Box, Attribute Editor, and Tool Settings The Channel Box and the Attribute Editor both allow you to view and adjust a selected object's attributes. The Channel Box provides access to keyable attributes, which can be animated. It's also the most convenient way to access these attributes, even when working on non-animation tasks. The Attribute Editor requires more space, but it displays additional attributes not accessible from the Channel Box. The Tool Settings allows you to view and change the settings for the current tool. Because the Channel Box, Attribute Editor, and Tool Settings all open on the far right side of the Maya interface, you can view only one of them at a time. The Channel Box and Attribute Editor are both commonly used tools, so toggling them on and off and switching between them is likely to become part of your workflow. Maya provides several different ways to do this. To show or hide the Channel Box: Do any of the following: To show or hide the Attribute Editor: Do any of the following: - Click the "Show or hide the Attribute Editor" icon
 on the right side of the Status Line. on the right side of the Status Line.
- Choose Display > UI Elements > Attribute Editor.
- Press
 . .
- Choose Window > Attribute Editor.
The Attribute Editor appears on the right side of the Maya interface (Figure 2.39).
Figure 2.39. If you show the Attribute Editor while the Channel Box is visible, the Channel Box is hidden so the Attribute Editor can be displayed. 
To show or hide the Tool Settings: - Click the "Show or hide the Tool Settings" icon
 on the right side of the Status Line. on the right side of the Status Line.
or
- Choose Display > UI Elements > Tool Settings.
The Tool Settings appear on the right side of the Maya interface (Figure 2.40).
Figure 2.40. The Tool Settings allow you to adjust the currently selected tool's settings. 
Changing UI components In addition to allowing you to hide and show UI elements, Maya gives you various options for some specific components of those elements. You can experiment with these options to find your own personal preferences. To show and hide the grid: - Choose Display > Grid to toggle the grid displayed in the Perspective view on and off.
Tip You can adjust the size, closeness, and colors of the grid lines in the Grid Options. In the Display menu, click the square to the right of the Grid menu item.
To alter your Maya color scheme: 1. | Choose Window > Settings/Preferences > Colors.
The Colors dialog box opens.
| 2. | Click the 3D Views arrow to view the Background color slider.
| 3. | Click the color swatch next to Background to open the Color Chooser (Figure 2.41).
Figure 2.41. You can use the color slider to quickly change the brightness of the color, while clicking the color swatch lets you change the hue, saturation, and value. 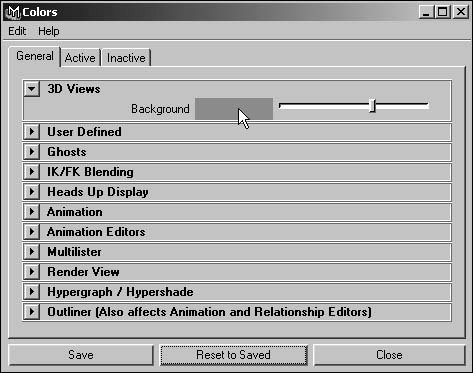
| 4. | In the Wheel, click the color you would like for your Maya background (Figure 2.42).
Figure 2.42. The Color Chooser provides several different methods of selecting the color you want. 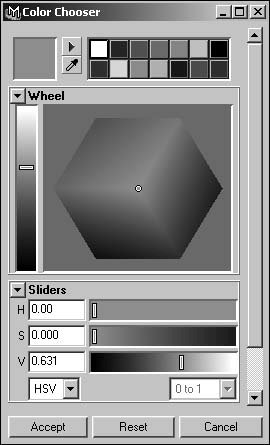
| 5. | Click Accept.
Your Maya background updates to reflect your chosen color.
|
Tips
To change the size of Maya's manipulators: 1. | Selected any object. If there are no objects in your scene, choose Create > NURBS Primitive > Sphere.
| 2. | Select the Move tool by pressing  or clicking the Move icon in the Tool Box or clicking the Move icon in the Tool Box  . .
| 3. | Choose Window > Settings/Preferences > Preferences.
| 4. | Select Manipulators in the Categories list (Figure 2.43).
Figure 2.43. The Manipulators section of the Preferences dialog box lets you customize Maya's manipulators. 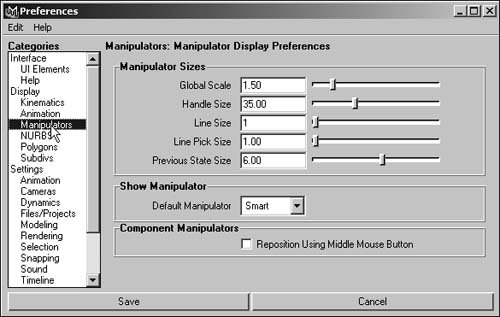
The Manipulator Display Preferences are shown to the right of the Categories list.
| 5. | Move the Preferences dialog box so you can see your selected object and the Move tool manipulator (Figure 2.44).
Figure 2.44. You can see the changes to the manipulator as you make them. 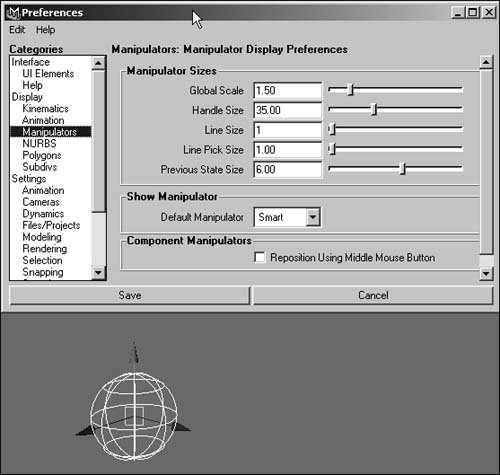
| 6. | In the Manipulator Display Preferences, adjust the Global Scale slider.
You can see your manipulator change in size as you adjust the slider. Choose the size that works best for you (Figure 2.45).
Figure 2.45. Global Scale scales all manipulators, not just the one currently selected. 
| | | 7. | Once you've sized the Move tool manipulator to your satisfaction, adjust the Handle Size slider to change the size of the manipulator's handles (Figure 2.46).
Figure 2.46. Handle Size affects both the Move manipulator (shown here) and the Scale manipulator. 
| 8. | Without closing the Preferences window, switch to the Rotate tool by pressing the or clicking the Rotate icon in the Tool Box  . .
The Rotate manipulator appears, scaled to a size determined by the new Global Scale.
| 9. | In the Manipulator Display Preferences, adjust the Line Size slider to change the size of the Rotate manipulator's lines (Figure 2.47).
Figure 2.47. Line Size affects the Rotate manipulator. 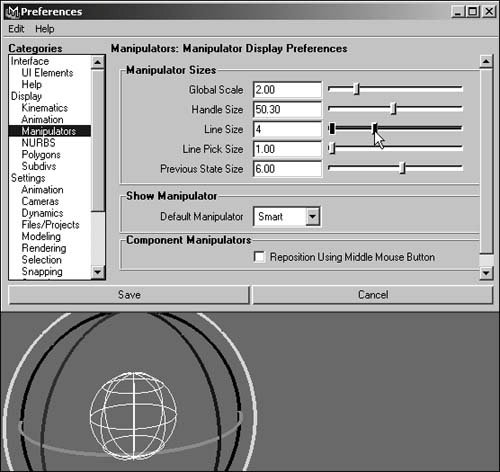
|
About menus Maya has four main menu sets: Animation, Modeling, Dynamics, and Rendering. Each of these sets displays menus specific to its topic, as well as the common menus File, Edit, Modify, Create, Display, Window, and Help. The common menus are always accessible, regardless of which menu set you're currently using. Most of Maya's menus can be "torn off" of the interface. These menus then function as separate windows, which will remain visible at all times and can be repositioned freely. This feature can save you time if you're likely to use many commands in a row from a particular menu. To change the menu set: - On the left side of the status bar, use the pop-up menu to select the appropriate menu set (Figure 2.48).
Figure 2.48. Each menu set holds menus specific to the type of process you're working on. 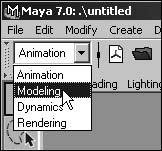
or
- In any view panel, hold down
 and the left mouse button to select a menu set from the marking menu (Figure 2.49). and the left mouse button to select a menu set from the marking menu (Figure 2.49).
Figure 2.49. You can use this marking menu to change your menu set when you've hidden the Status Line or if you want to speed up your workflow. 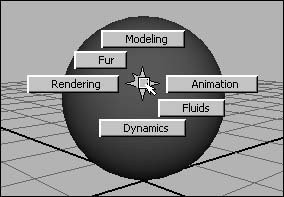
To tear off a menu: 1. | Open the menu you'd like to tear off.
| 2. | Click the tear-off bar (indicated by two parallel lines) at the top of the menu.
The menu becomes a separate, free-floating window. (Figure 2.50).
Figure 2.50. You can tear off almost every menu in Maya. 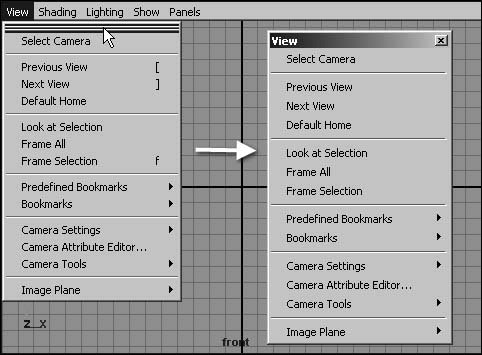
|
Changing undo settings Maya defaults to allow for 50 undos. Although this is enough in most situations, you may want to increase this limit or even set it to infinite. Keep in mind that each saved undo takes up memory, so if memory is an issue, you may want to lower the undo limit. To change the number of undos: 1. | Choose Window > Settings/Preferences > Preferences.
The Preferences dialog box opens.
| 2. | Under Categories, click Undo to view the Undo preferences (Figure 2.51).
Figure 2.51. You can change the number of undos in the Preferences dialog box. 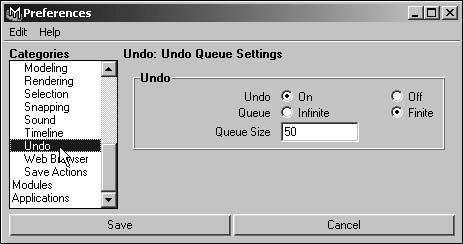
| 3. | Enter your preferred undo limit in the Queue Size field, or change the Queue setting to Infinite, and click Save.
|
|