| Maya offers ten types of materials. Five of them are special-case materials, and five are more common, basic, surfaces. The five primary surfaces are anisotropic, blinn, lambert, phong, and phong e (Figure 14.30). These material types share basic properties, but they're different in a few ways, primarily in their specular and reflectivity options (how they reflect light). The more complicated special-purpose materialsincluding layered and rampgenerally take input from a more basic material. Figure 14.30. Material types, from left to right: anisotropic, blinn, lambert, phong, phong e. 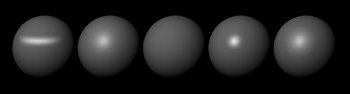
Common materials - Anisotropic materials are used to simulate microscopic grooves or disturbances on a surface that make the specular highlight perpendicular to the light angle. You use an anisotropic material when creating an object like a CD or something made of brushed metal.
- Lambert textures are the simplest shading model mathematically, because they're just matte surfaces. Lambert textures work best on dry rocks, rubber, or basic colors. The default shader in Maya is a lambert called lambert1.
- Blinn materials are more complicated than lambert materials but generally represent surfaces more accurately. They're suited to shiny reflective surfaces with small (or complicated) specular highlights, like detailed metals or jewelry.
- Phong surfaces are shiny and can be reflective, suited to simple consistent surfaces like glass and plastic.
- Phong e materials are similar to phong (as the name indicates), but they give you more control over specular attributes, and generally have a softer highlight.
Several controls are common to the basic materials. They include color, transparency, ambient color, incandescence, and bump mapping. You can map images to all of these, and most of them can have a color or luminance value assigned to them as well. All are accessible from the Attribute Editor for the corresponding material (Figure 14.31). Figure 14.31. This is the Attribute Editor for a blinn material. It holds most of the controls that determine the look of the surface. 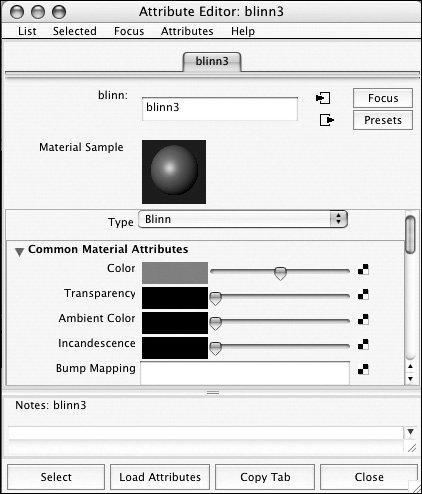
Common material attributes - Color determines the color of an object. You can pick a color using the Color Chooser, or you can map an image to the color.
- Transparency lets you make a surface see-through. You can use the slider to make the surface more or less transparent, or you can map an image to make part of the surface transparent and part of it opaque. This attribute only recognizes luminancethat is, how light or dark an image is. White is transparent; black is opaque (Figure 14.32).
Figure 14.32. The node in the lower-right corner is the texture, which was mapped to the plane as a transparency map. The parts of the image that are white determine the parts of the plane that are transparent. 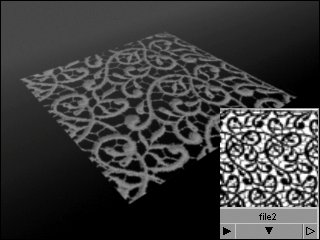
- Ambient color simulates scattered light as it hits the surface, which brightens the object's diffuse color. You can lighten the whole surface evenly, or you can map an image to lighten only certain parts of a surface. High values tend to make objects look flat or unnatural.
- Incandescence gives a material the appearance of emitting its own light (as opposed to ambient, which simulates receiving light from other sources). Objects with incandescence render as illuminated even if there is no light in the scene.
- Bump mapping makes a surface appear bumpy. This is an illusion, and the silhouette doesn't change; nor does it display well at acute viewing angles. To affect the surface, this attribute must have an image or texture mapped to it. White on the image creates the illusion of raised bumps; 50 percent gray causes no bumps; and darker colors create divots (Figure 14.33).
Figure 14.33. The node in the lower-right corner is the texture, which was mapped to the plane as a bump map. The white areas are higher; the dark areas are lower. Render to see the results of a bump map. 
To change the color of an object: 1. | In the Hypershade window, select Create > Materials > Lambert (Figure 14.34).
Figure 14.34. This is a portion of the Hypershade. When you click the Lambert button, a new material node called lambert2 appears. 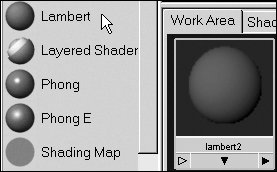
A new material appears in the Work Area (the lower half of the window).
| 2. | With the middle mouse button, drag the material from the Hypershade onto the surface.
or
Select the surface, right-click the material to open the marking menu, and select Assign Material To Selection (Figure 14.35).
Figure 14.35. When you right-click a material in the Hypershade, a marking menu appears that lets you assign that material to the selected surface. This is particularly convenient if you're assigning shaders to multiple surfaces simultaneously. 
| 3. | Click the IPR button  . .
| | | 4. | Double-click the new material.
The Attribute Editor for this material appears (Figure 14.36).
Figure 14.36. This is the Attribute Editor for the material that was just created in the Hypershade. 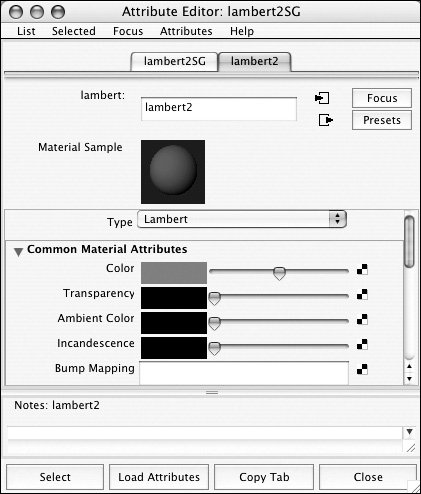
| 5. | Click the field next to Color.
The Color Chooser opens (Figure 14.37).
Figure 14.37. The Color Chooser lets you select a color from the swatches at the top or from the color wheel. 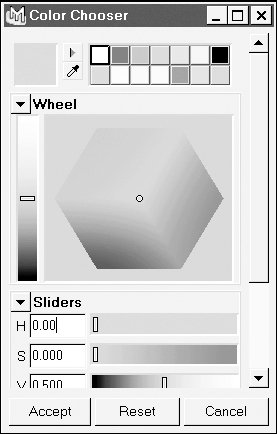
| 6. | Choose a color by clicking one of the color swatches at the top of the window or by clicking in the color wheel.
Notice the color update in the IPR window as you click in the color wheel.
| 7. | Click Accept.
The Color Chooser window closes.
|
 Tip Tip
If you assign a shader to a surface by using the middle mouse button to drag the shader from the Hypershade, be sure that the view you drag it into is in shaded mode. If it were in wireframe mode, you would need to drag it precisely onto an isoparm or edge of the surface, which is more difficult. However, the drag method of assigning textures only lets you assign a shader to one object at a time. In most cases, it's easier to use the marking menu, because doing so lets you assign a shader to many objects or groups.
|